English
English
# JQL database operations
JQL, the full name of javascript query language, is a specification for operating databases in js mode.
JQL大幅降低了js工程师操作数据库的难度,比SQL和传统MongoDB API更清晰、易掌握。JQL支持强大的DB Schema,内置数据规则和权限。DB Schema 支持uni-id,可直接使用其角色和权限。无需再开发各种数据合法性校验和鉴权代码。JQLutilizes the nested feature of json database, which greatly simplifies the complexity of join table query and tree query, and supports more flexible virtual tables.
# jql's birth background
For traditional database queries, there are two query syntaxes, sql and nosql.
- sql is a string expression, written as:
select * from table1 where field1="value1"
- nosql is a parameter of js method + json method, written as:
const db = uniCloud.database()
let res = await db.collection('table').where({
  field1: 'value1'
}).get()
The sql writing method has a learning cost for js engineers, and it cannot handle the non-relational MongoDB database, and the sql join table query inner join and left join are not easy to learn.
The writing of nosql is too complicated. For example, the following three examples:
- The operator needs to be transcoded,
>needs to use thegtmethod,==needs to use theeqmethod
For example, a simple query, taking field1>0, requires the following complex writing
const db = uniCloud.database()
const dbCmd = db.command
let res = await db.collection('table1').where({
  field1: dbCmd.gt(0)
}).get()
If you want to express the or relationship, you need to use the or method, which is more complicated to write
field1:dbCmd.gt(0).or(dbCmd.lt(-5))
- Nosql's join table query writing method is more complicated than sql
SQL's inner join and left join are messy enough, and nosql's code is more "heinous" in both writing and readability. For example, this join table query:
const db = uniCloud.database()
const dbCmd = db.command
const $ = dbCmd.aggregate
let res = await db.collection('orders').aggregate()
.lookup({
  from: 'books',
  let: {
    order_book: '$book',
    order_quantity: '$quantity'
  },
  pipeline: $.pipeline()
    .match(dbCmd.expr($.and([
      $.eq(['$title', '$$order_book']),
      $.gte(['$stock', '$$order_quantity'])
    ])))
    .project({
      _id: 0,
      title: 1,
      author: 1,
      stock: 1
    })
    .done(),
  as: 'bookList',
})
.end()
These problems put up a wall, making back-end development more difficult and becoming a "professional field". But in fact, this wall can be completely torn down.
jql will solve these problems, so that js engineers do not have difficult databases to operate.
See the following example for details
const db = uniCloud.database()

// Use `jql` to query the records whose `name` field value is `hello-uni-app` in the list table
db.collection('list')
  .where('name == "hello-uni-app"')
  .get()
  .then((res)=>{
    // res is the database query result
  }).catch((err)=>{
    // err.message error message
    // err.code error code
  })
# JQL流程图解
下图包括clientDB及云函数内使用jql扩展库的调用流程
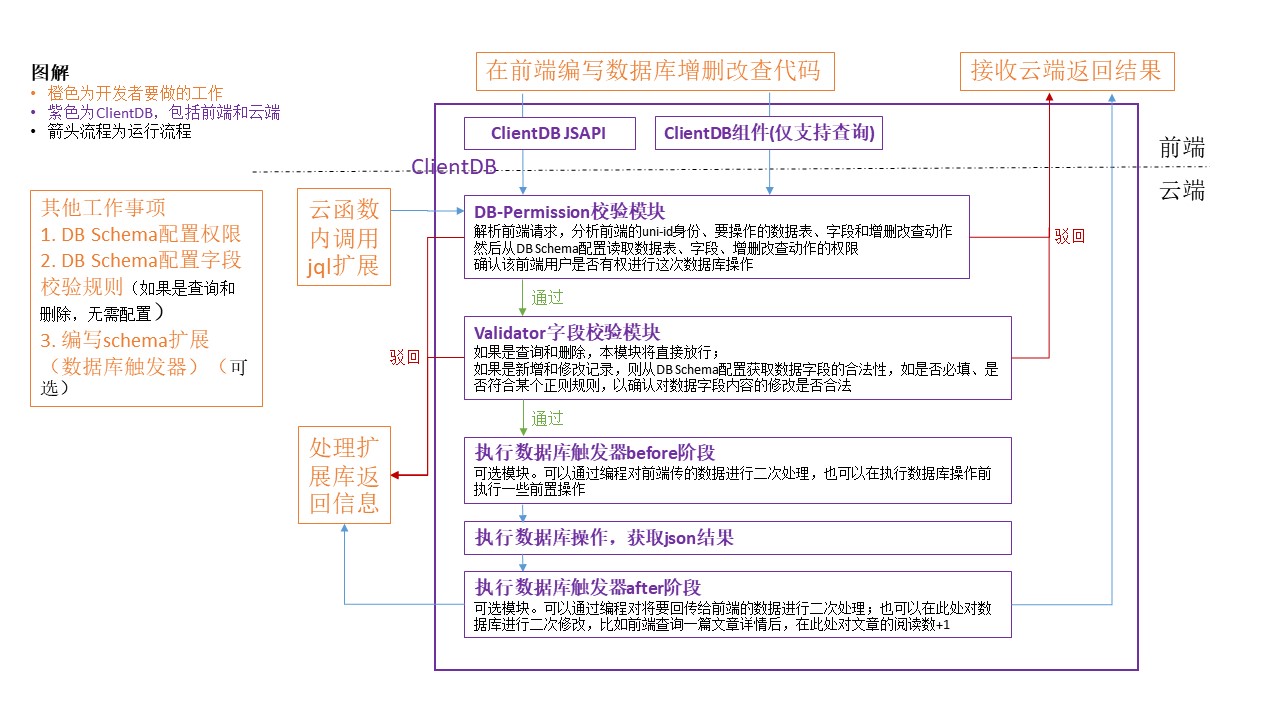
# JQL included modules
Here we choose to use clientDB with the full function of JQL as an example. The process of operating the database with JQL is as follows. For the difference between different usage scenarios, please refer to: JQL usage scenarios
# JQL usage scenarios
You can use JQL in the following scenarios
- Client clientDB, including js and unicloud-db components, refer to: clientDB
- HBuilderX JQL database manager, reference: JQL database manager
- Cloud functions with the jql extension enabled, refer to: Using JQL in cloud functions
# Differences in different scenarios
The above scenarios will perform data verification when adding or modifying data, but the permission verification and action parts are slightly different
JQL database manager:
- Does not verify any permissions, equivalent to executing as a database administrator
- Even password type data that admin cannot read and write can be read and written
- will not fire database triggers
- Action cloud functions cannot be executed
Client clientDB:
- Complete permission verification, the user who performs the operation cannot operate data other than his own permission
- The admin user cannot operate password type data
Cloud Function JQL:
- Same as clientDB, but the password type data can be configured with permissions. The default permission is false and can be operated by the admin user.
- You can specify the identity of the user currently performing database operations through setUser.
# JQL limit
- Serialize database operations, all non-JSON serializable parameter types except Date type and RegExp are not supported (for example: undefined)
- In order to strictly control permissions, the use of set methods is prohibited
- In order to strictly limit the data verification, the update operator
db.command.inc, etc. cannot be used when updating the database - When updating data, the key value cannot be in the form of
{'a.b.c': 1}, it needs to be written in the form of{a:{b:{c:1}}}
# JQL method usage restrictions
# Single table query
The following methods must be called strictly in the following order, and other methods need to be called after these methods (the order is not limited)
collection
aggregate
geoNear // 新增于 HBuilderX 3.6.10
doc
where
field
groupBy
groupField
# Joint Table Query
Temporary tables can use the following methods (need to be called in the following order)
collection
geoNear // 新增于 HBuilderX 3.6.10
where
field
orderBy
skip
limit
getTemp
The virtual joint table can use the following methods (need to be called in the following order)
collection
foreignKey
where
field
groupBy
groupField
distinct
orderBy
skip
limit
get
# New
Only collection().add() is allowed
# Revise
Only the following two forms are allowed
db.collection('xx').doc('xxx').update({})
db.collection('xx').where('xxxx').update({})
# delete
Only the following two forms are allowed
db.collection('xx').doc('xxx').remove()
db.collection('xx').where('xxxx').remove()
# Cloud environment variable
| Parameter name | Description |
|---|---|
| $cloudEnv_uid | User uid, depends on uni-id |
| $cloudEnv_now | Server Timestamp |
| $cloudEnv_clientIP | Current client IP |
use within a string
db.collection('user').where('_id==$cloudEnv_uid').get()
use within an object
db.collection('user').where({
	_id: db.getCloudEnv('$cloudEnv_uid')
}).get()
Notice
- When these variables are used, they do not directly obtain the corresponding value, but generate a tag, and then replace the tag with the actual value when performing database operations in the cloud
# Return value description
# Normal request returns result
Different database operations return different result structures
Query data
{
	errCode: 0,
	errMsg: '',
	data: []
}
Send database query requests in batches
Only batch query requests can be sent
{
	errCode: 0,
	errMsg: '',
	dataList: [] // dataList内每一项都是一个查询数据的响应结果 {errCode: 0, errMsg: '', data: []}
}
New data
Add a single
{
	errCode: 0,
	errMsg: '',
	id: '' // 新增数据的id
}
Add multiple
{
	errCode: 0,
	errMsg: '',
	ids: [], // 新增数据的id列表
	inserted: 3 // 新增成功的条数
}
delete data
{
	errCode: 0,
	errMsg: '',
	deleted: 1 // 删除的条数
}
update data
{
	errCode: 0,
	errMsg: '',
	updated: 1 // 更新的条数,数据更新前后无变化则更新条数为0
}
# Request error and return err format
{
  errCode: "", // 错误码
  errMsg: "", // 错误信息
}
err.errCode错误码列表
| error code | description |
|---|---|
| TOKEN_INVALID_INVALID_CLIENTID | token verification failed (device feature verification failed) |
| TOKEN_INVALID | token verification failed (the cloud does not contain this token) |
| TOKEN_INVALID_TOKEN_EXPIRED | token verification failed (token has expired) |
| TOKEN_INVALID_WRONG_TOKEN | token verification failed (token verification failed) |
| TOKEN_INVALID_ANONYMOUS_USER | token verification failed (the current user is an anonymous user) |
| SYNTAX_ERROR | Syntax error |
| PERMISSION_ERROR | Permission verification failed |
| VALIDATION_ERROR | Data format failed |
| DUPLICATE_KEY | Index conflict |
| SYSTEM_ERROR | System error |
If you need to customize the returned err object, you can hang an action cloud function in clientDB, modify the returned result with js in the after of the action cloud function, and pass the result in after without code and message.
# Query data
# Query array field
If the following records exist in the database
{
  "_id": "1",
  "students": ["li","wang"]
}
{
  "_id": "2",
  "students": ["wang","li"]
}
{
  "_id": "3",
  "students": ["zhao","qian"]
}
When using jql query syntax, you can directly use students=='wang' as the query condition to query the records containing wang in students.
# Use regular query
Take searching for user input value as an example
const res = await db.collection('goods').where(`${new RegExp(searchVal, 'i')}.test(name)`).get()
If you use unicloud-db component, it is written as follows
<template>
	<view class="content">
		<input @input="onKeyInput" placeholder="请输入搜索值" />
		<unicloud-db v-slot:default="{data, loading, error, options}" collection="goods" :where="where">
			<view v-if="error">{{error.message}}</view>
			<view v-else>

			</view>
		</unicloud-db>
	</view>
</template>

<script>
	export default {
		data() {
			return {
        searchVal: ''
      }
		},
		computed: {
			where() {
				return `${new RegExp(searchVal, 'i')}.test(name)` // 使用计算属性得到完整where
			}
		},
		methods: {
      onKeyInput(e) {
        // In actual development, there should be anti-shake or throttling operations here, no demonstration here
        this.searchVal = e.target.value
      }
		}
	}
</script>

<style>
</style>
The regex modifier i is used in the above example to indicate case ignoring
# Joint table query
The following two concepts are defined for the convenience of document description:
- Temporary table: the result returned by the getTemp method, for example:
const article = db.collection('article').getTemp(), where article is a temporary table - Virtual join table: the table generated by joining the main table and the secondary table, for example:
db.collection(article, 'comment').get()
JQL optimized the join table query strategy on April 28, 2021. For details, please refer to: join table query strategy adjustment
JQL provides a simpler join table query scheme. There is no need to learn complex methods such as join and lookup.
Just create a mapping relationship between the associated fields of the two tables in the db schema, and you can directly query the two tables as a virtual joint table.
JQL join table query has the following two ways of writing:
// Directly associate multiple tables as virtual join tables and then query, the old way of writing, it is currently more recommended to use getTemp for join table queries
const res = await db.collection('order,book').where('_id=="1"').get() // 直接关联order和book之后再过滤

// Use getTemp to filter and process the temporary table first and then join the table query. Recommended usage
const order = db.collection('order').where('_id=="1"').getTemp() // 注意结尾的方法是getTemp,对order表过滤得到临时表
const res = await db.collection(order, 'book').get() // 将获取的order表的临时表和book表进行联表查询
The final result of the above two writing methods is the same, but the second writing method has better performance. The first way of writing will first associate all the data. If the amount of data is large, this step will consume a lot of time. See the description below for a detailed example
The data structure of the returned result after the associated query is as follows:
Through the JQL database management function provided by HBuilderX, it is convenient to view the structure of the returned data when querying the joint table
When the foreignKey of a field in the main table points to the sub-table
{
  "主表字段名1": "xxx",
  "主表字段名2": "xxx",
  "主表内foreignKey指向副表的字段名": [{
    "副表字段名1": "xxx",
    "副表字段名2": "xxx",
  }]
}
When the foreignKey of a field in the secondary table points to the main table
{
  "主表字段名1": "xxx",
  "主表字段名2": "xxx",
  "主表内被副表foreignKey指向的字段名": {
    "副表1表名": [{ // 一个主表字段可能对应多个副表字段的foreignKey
      "副表1字段名1": "xxx",
      "副表1字段名2": "xxx",
    }],
    "副表2表名": [{ // 一个主表字段可能对应多个副表字段的foreignKey
      "副表2字段名1": "xxx",
      "副表2字段名2": "xxx",
    }],
    "_value": "主表字段原始值" // 使用副表foreignKey查询时会在关联的主表字段内以_value存储该字段的原始值,新增于HBuilderX 3.1.16
  }
}
For example, there are the following two tables, the book table, which stores book products; the order table, which stores book sales order records.
The book table contains the following data, title is the title of the book and author is the author:
{
  "_id": "1",
  "title": "西游记",
  "author": "吴承恩"
}
{
  "_id": "2",
  "title": "水浒传",
  "author": "施耐庵"
}
{
  "_id": "3",
  "title": "三国演义",
  "author": "罗贯中"
}
{
  "_id": "4",
  "title": "红楼梦",
  "author": "曹雪芹"
}
The order table contains the following data, the book_id field is the book_id of the book table, and the quantity is the number of books sold by the order:
{
  "book_id": "1",
  "quantity": 111
}
{
  "book_id": "2",
  "quantity": 222
}
{
  "book_id": "3",
  "quantity": 333
}
{
  "book_id": "4",
  "quantity": 444
}
{
  "book_id": "3",
  "quantity": 555
}
If we want to query these two tables together and display the book name and author in the order record at the same time, then we must first establish the mapping relationship of the associated field book in the two tables.
That is, in the db schema of the order table, configure the foreignKey of the field book_id to point to the _id field of the book table, as follows
// order table schema
{
  "bsonType": "object",
  "required": [],
  "permission": {
    "read": true
  },
  "properties": {
    "book_id": {
      "bsonType": "string",
      "foreignKey": "book._id" // 使用foreignKey表示,此字段关联book表的_id。
    },
    "quantity": {
      "bsonType": "int"
    }
  }
}
The DB Schema of the book table should also be kept correct
// book table schema
{
  "bsonType": "object",
  "required": [],
  "permission": {
    "read": true
  },
  "properties": {
    "title": {
      "bsonType": "string"
    },
    "author": {
      "bsonType": "string"
    }
  }
}
After the schema is saved, it is queried using JQL. After the query table is set to the two table names of order and book, it can be automatically queried according to a merged virtual joint table, and the field, where and other settings are set according to the merged virtual joint table.
// Client join table query
const db = uniCloud.database()
const order = db.collection('order').field('book_id,quantity').getTemp() // 临时表field方法内需要包含关联字段,否则无法建立关联关系
const book = db.collection('book').field('_id,title,author').getTemp() // 临时表field方法内需要包含关联字段,否则无法建立关联关系
db.collection(order, book) // 注意collection方法内需要传入所有用到的表名,用逗号分隔,主表需要放在第一位
  .where('book_id.title == "三国演义"') // 查询order表内书名为“三国演义”的订单
  .get()
  .then(res => {
    console.log(res);
  }).catch(err => {
    console.error(err)
  })
The above is written in jql syntax. If jql is not used, the traditional MongoDB writing method needs to write long and difficult to understand code, which is roughly as follows
// Note that JQL inline table queries need to use splicing sub-queries (let+pipeline)
const db = uniCloud.database()
const dbCmd = db.command
const $ = dbCmd.aggregate
db.collection('order')
  .aggregate()
  .lookup({
    from: 'book',
    let: {
      book_id: '$book_id'
    },
    pipeline: $.pipeline()
      .match(dbCmd.expr(
        $.eq(['$_id', '$$book_id'])
      ))
      .project({
        title: true,
        author: true
      })
      .done()
    as: 'book_id'
  })
  .match({
    book_id: {
      title: '三国演义'
    }
  })
  .project({
    book_id: true,
    quantity: true
  })
  .end()

// If you can also use the following writing in the cloud function
const db = uniCloud.database()
const dbCmd = db.command
const $ = dbCmd.aggregate
db.collection('order')
  .aggregate()
  .lookup({
    from: 'book',
    localField: 'book_id',
    foreignField: '_id',
    as: 'book_id'
  })
  .match({
    book_id: {
      title: '三国演义'
    }
  })
  .project({
    'book_id.title': true,
    'book_id.author': true,
    quantity: true
  })
  .end()
The above query will return the following results. You can see that the book information is embedded in the book_id field of the order table and becomes a child node. At the same time, according to the where condition setting, only order records with the title of Romance of the Three Kingdoms are returned.
{
	"code": "",
	"message": "",
	"data": [{
		"_id": "b8df3bd65f8f0d06018fdc250a5688bb",
		"book_id": [{
			"_id": "3",
			"author": "罗贯中",
			"title": "三国演义"
		}],
		"quantity": 555
	}, {
		"_id": "b8df3bd65f8f0d06018fdc2315af05ec",
		"book_id": [{
			"_id": "3",
			"author": "罗贯中",
			"title": "三国演义"
		}],
		"quantity": 333
	}]
}
A two-dimensional relational database cannot do this design. jql makes full use of the characteristics of json document database and dynamically nests data to realize this simplified joint table query scheme.
Not only 2 tables, but 3 and 4 tables can also be queried in this way. In the multi-table scenario, only the association relationship (foreignKey) between the secondary table and the primary table can be used, and the relationship between the secondary table and the secondary table cannot be used. association relationship.
Not only js, the <unicloud-db> component also supports all jql functions, including join table query.
When debugging a JQL linked table query on the front-end page without filtering fields, it will be affected by permissions, which makes debugging difficult. You can easily view the virtual joint table structure during joint table query through the JQL database management function provided by HBuilderX.
For the above query, you can directly execute the following code in the JQL file to view the complete returned fields
db.collection('order,book').get()
Notice
- After generating a linked table and querying a virtual linked table, the associated field will be replaced with the content of the associated table. Therefore, the associated field cannot be used as a condition in the where after the virtual linked table is generated. For example, in the above example,
where({book_id:"1"})cannot filter out the correct results, but you can usewhere({'book_id._id':"1"}) - In the above example, if the
book_idfield of the order table stores multiple book_ids in the form of an array, which is also consistent with the above writing, JQL will automatically perform a joint table query according to the field type - The _id field of each table will be included by default, even if it is not specified to return
# Temporary table join table query
Added in
HBuilderX 3.2.6
Prior to this, JQL join table queries could only use virtual join tables directly, instead of filtering the main table and secondary table before generating virtual join tables. Since the entire primary table and the secondary table need to be joined when generating a virtual join table, the performance will be poor in the case of a large amount of data.
When using a temporary table for join table query, you can filter the main table or the auxiliary table first, and then generate a virtual join table based on the processed temporary table.
Still take the above two tables of article and comment as an example
The database operations for obtaining articles whose article_id is '1' and their comments are written as follows in direct join table query and when using temporary table join table query
// Directly use virtual join table query
const res = await db.collection('article,comment')
.where('article_id._value=="1"')
.get()

// Filter the article table first, then get the virtual joint table to get the comments
const article = db.collection('article').where('article_id=="1"').getTemp() // 注意是getTemp不是get
const res = await db.collection(article, 'comment').get()
Directly use the virtual joint table to query the joint table. When the virtual joint table is generated in the first step, the joint table query will be performed with all the data of the main table and the auxiliary table. If the amount of data in the main table is large, this step will waste a lot of time. Filtering the main table first does not have this problem. After filtering, there is only one piece of data and the auxiliary table for joint table query.
The following methods can be used in the temporary table
Method calls must be in strict order, such as field cannot be placed before where
where
field // 关于field的使用限制见下方说明
orderBy
skip
limit
临时表内如果使用field进行字段过滤需要保留关联字段
const article = db.collection('article').where('article_id=="1"').field('title').getTemp() // 此处过滤article表,仅保留title字段。会导致下一步查询时找不到关联关系而查询失败
const res = await db.collection(article, 'comment').get()
Methods that can be used when querying the combined virtual table
Method calls must be in strict order, such as foreignKey cannot be placed after where
foreignKey // foreignKey自 HBuilderX 3.3.7版本支持
where
field // 关于field的使用限制见下方说明
groupBy // HBuilderX 3.4.0起支持
groupField // HBuilderX 3.4.0起支持
distinct // HBuilderX 3.4.0起支持
orderBy
skip
limit
Under normal circumstances, no additional processing is required for the virtual join table, because the data has been filtered and sorted in the temporary table. The following code is for demonstration only and has no practical significance
const article = db.collection('article').getTemp()
const comment = db.collection('comment').getTemp()
const res = await db.collection(article, comment).orderBy('title desc').get() // 按照title倒序排列
field usage restrictions
- Before
HBuilderX 3.3.7, only field filtering can be performed in fields, and fields cannot be renamed or operated on,field('name as value'),field('add(score1, score2) as totalScore')are all unsupported usages HBuilderX 3.3.7and above supports renaming or operations on fields- Only the association relationship between the filtered fields in the temporary table can be used for join table query, such as the query of article and comment above.
- It is not recommended to rename or operate the sub-table fields in the virtual join table. If there is such a requirement, it should be performed in the temporary table, and unexpected results will occur. For compatibility with the old version, this usage only outputs a warning and does not throws an error
Permission verification
It is required that each temporary table that forms a virtual join table must meet the permission restrictions, that is, the permission check will not calculate the where and field used after combining into a virtual join table.
The following is an example schema of an order table (order) and a book table (book)
// order schema
{
  "bsonType": "object",
  "required": [],
  "permission": {
    "read": "doc.uid==auth.uid",
    "create": false,
    "update": false,
    "delete": false
  },
  "properties": {
    "id": { // 订单id
      "bsonType": "string"
    },
    "book_id": { // 书籍id
      "bsonType": "string"
    },
    "uid": { // 用户id
      "bsonType": "string"
    }
  }
}

// book schema
{
  "bsonType": "object",
  "required": [],
  "permission": {
    "read": true,
    "create": false,
    "update": false,
    "delete": false
  },
  "properties": {
    "id": { // 书籍id
      "bsonType": "string"
    },
    "name": { // 书籍名称
      "bsonType": "string"
    }
  }
}
If the main table is first filtered where('uid==$cloudEnv_uid'), the permission restrictions can be satisfied ("doc.uid==auth.uid"of theorder table')
const order = db.collection('order')
.where('uid==$cloudEnv_uid') // 先过滤order表内满足条件的部分
.getTemp()

const res = await db.collection(order, 'book').get() // 可以通过权限校验
If you do not filter the main table, but filter the virtual join table (join table result), the permission restriction cannot be satisfied ("doc.uid==auth.uid"` of the order table)
const order = db.collection('order').getTemp()

const res = await db.collection(order, 'book').where('uid==$cloudEnv_uid').get() // 对虚拟联表过滤,无法通过权限校验
# Set field alias
You can also rename the field in the field when querying the linked table. The writing method is similar to the alias writing method for simple query, original field name as new field name. Field alias for simple query
Still taking the above two tables, order and book as an example, the following query renames the quantity field of the order table to order_quantity, renames the title of the book table to book_title, and renames the author to book_author when querying with tables
// Client join table query
const db = uniCloud.database()

const order = db.collection('order').field('book_id,quantity').getTemp()
const book = db.collection('book').field('_id,title as book_title,author as book_author').getTemp()
db.collection(order, book)
  .where('book_id.book_title == "三国演义"') // 如果field内对副表字段title进行了重命名,where方法内则需要使用重命名之后的字段名
  .get()
  .then(res => {
    console.log(res);
  }).catch(err => {
    console.error(err)
  })
The query results are as follows
{
	"code": "",
	"message": "",
	"data": [{
		"_id": "b8df3bd65f8f0d06018fdc250a5688bb",
		"book_id": [{
			"book_author": "罗贯中",
			"book_title": "三国演义"
		}],
		"order_quantity": 555
	}, {
		"_id": "b8df3bd65f8f0d06018fdc2315af05ec",
		"book_id": [{
			"book_author": "罗贯中",
			"book_title": "三国演义"
		}],
		"order_quantity": 333
	}]
}
# Manually specify the used foreignKey
If there are multiple foreignKeys and you only want some of them to take effect, you can use foreignKey to specify the foreignKey to use
Before 10:00 on April 28, 2021, this method is only used to be compatible with the writing method before and after the adjustment of the JQL join table query strategy. The clientDB updated after this date (uploading schema and uni-id will trigger the update) will have the specified foreignKey For this adjustment, please refer to: Adjustment of Linked Table Query Policy
example:
The schema and data in the database are as follows:
// comment - the comment table

// schema
{
  "bsonType": "object",
  "required": [],
  "permission": {
    "read": true,
    "create": false,
    "update": false,
    "delete": false
  },
  "properties": {
    "comment_id": {
      "bsonType": "string"
    },
    "content": {
      "bsonType": "string"
    },
    "article": {
      "bsonType": "string",
      "foreignKey": "article.article_id"
    },
    "sender": {
      "bsonType": "string",
      "foreignKey": "user.uid"
    },
    "receiver": {
      "bsonType": "string",
      "foreignKey": "user.uid"
    }
  }
}

// data
{
  "comment_id": "1-1",
  "content": "comment1-1",
  "article": "1",
  "sender": "1",
  "receiver": "2"
}
{
  "comment_id": "1-2",
  "content": "comment1-2",
  "article": "1",
  "sender": "2",
  "receiver": "1"
}
{
  "comment_id": "2-1",
  "content": "comment2-1",
  "article": "2",
  "sender": "1",
  "receiver": "2"
}
{
  "comment_id": "2-2",
  "content": "comment2-2",
  "article": "2",
  "sender": "2",
  "receiver": "1"
}
// article - article table

// schema
{
  "bsonType": "object",
  "required": [],
  "permission": {
    "read": true,
    "create": false,
    "update": false,
    "delete": false
  },
  "properties": {
    "article_id": {
      "bsonType": "string"
    },
    "title": {
      "bsonType": "string"
    },
    "content": {
      "bsonType": "string"
    },
    "author": {
      "bsonType": "string",
      "foreignKey": "user.uid"
    }
  }
}

// data
{
  "article_id": "1",
  "title": "title1",
  "content": "content1",
  "author": "1"
}
{
  "article_id": "2",
  "title": "title2",
  "content": "content2",
  "author": "1"
}
{
  "article_id": "3",
  "title": "title3",
  "content": "content3",
  "author": "2"
}
const comment = db.collection('comment').where('comment_id == "1-1"').getTemp()
const user = db.collection('user').field('uid,name').getTemp()
db.collection(comment, user)
.foreignKey('comment.receiver') // 仅使用comment表内receiver字段下的foreignKey进行主表和副表之间的关联
.get()
Notice
HBuilderX 3.3.7and above supports the use of foreignKey method in the virtual join table using getTemp
# Sub-table foreignKey joint query
JQL before April 28, 2021 only supports the foreignKey of the main table, and the content of the sub-table is embedded under the foreignKey field of the main table. Handling duplicate foreignKeys is not supported.
After the adjustment of April 28, 2021, the new version supports the foreignKey joint search of the secondary table. The data of the sub-table is embedded in the main table in the form of an array and used as a virtual joint table.
The data structure after the associated query is as follows:
Through the JQL database management function provided by HBuilderX, it is convenient to view the structure of the returned data when querying the joint table
When the foreignKey of a field in the main table points to the sub-table
{
  "主表字段名1": "xxx",
  "主表字段名2": "xxx",
  "主表内foreignKey指向副表的字段名": [{
    "副表字段名1": "xxx",
    "副表字段名2": "xxx",
  }]
}
When the foreignKey of a field in the secondary table points to the main table
{
  "主表字段名1": "xxx",
  "主表字段名2": "xxx",
  "副表foreignKey指向的主表字段名": {
    "副表1表名": [{ // 一个主表字段可能对应多个副表字段的foreignKey
      "副表1字段名1": "xxx",
      "副表1字段名2": "xxx",
    }],
    "副表2表名": [{ // 一个主表字段可能对应多个副表字段的foreignKey
      "副表2字段名1": "xxx",
      "副表2字段名2": "xxx",
    }],
    "_value": "主表字段原始值" // 使用副表foreignKey查询时会在关联的主表字段内以_value存储该字段的原始值,新增于HBuilderX 3.1.16
  }
}
The following query uses the foreignKey corresponding to the article field of the comment table to perform an associated query
const article = db.collection('article').where('article_id == "1"').getTemp()
const comment = db.collection('comment').getTemp()
db.collection(article,comment)
.field('content,article_id')
.get()
The query results are as follows:
[{
  "content": "content1",
  "article_id": {
    "comment": [{ // 使用副表foreignKey查询时此处会自动插入一层副表表名
      "comment_id": "1-1",
      "content": "comment1-1",
      "article": "1",
      "sender": "1",
      "receiver": "2"
    },
    {
      "comment_id": "1-2",
      "content": "comment1-2",
      "article": "1",
      "sender": "2",
      "receiver": "1"
    }],
    "_value": "1"
  }
}]
If you want to filter the sub-table fields of the above query, you need to pay attention to the name of the additional sub-table table inserted.
// filter side table fields
const article = db.collection('article').where('article_id == "1"').getTemp()
const comment = db.collection('comment').field('article,content').getTemp() // 如果有field方法,field内需包含关联字段以建立关联关系
db.collection('article,comment').get()

// The query result is as follows
[{
  "content": "content1",
  "article_id": {
    "comment": [{ // 使用副表foreignKey联查时此处会自动插入一层副表表名
	  "article": "1",
      "content": "comment1-1"
    },
    {
	  "article": "1",
      "content": "comment1-2"
    }],
    "_value": "1"
  }
}]
The fields in the sub-table can also be renamed using as. For example, in the above query, if you want to rename the content of the sub-table to value, you can use the following writing method
HBuilderX 3.3.7 and above supports the use of as inside getTemp
// rename side table fields
const article = db.collection('article').where('article_id == "1"').getTemp()
const comment = db.collection('comment').field('article,content as value').getTemp() // 如果有field方法,field内需包含关联字段以建立关联关系
db.collection(article,comment).get()

// The query result is as follows
[{
  "content": "content1",
  "article_id": {
    "comment": [{ // 使用副本foreignKey联查时此处会自动插入一层副表表名
	  "article": "1",
      "value": "comment1-1"
    },
    {
	  "article": "1",
      "value": "comment1-2"
    }]
  }
}]
# Query record filter where condition
code block
dbget
jql simplifies query conditions, and developers can use where('a==1||b==2') to indicate that field a is equal to 1 or field b is equal to 2. If you do not use jql syntax, the above conditions need to be written in the following form
const db = uniCloud.database()
const dbCmd = db.command
const res = await db.collection('test')
  .where(
    dbCmd.or({
      a:1
    },{
      b:2
    })
  )
  .get()
There is not much difference in the performance of the two usages, and you can choose the appropriate writing method according to the scene.
jql supports two types of query conditions. The following content is helpful to understand the difference between the two. When writing, you don't need to care too much about simple query conditions or complex query conditions. JQL will automatically select
where also supports the use of cloud environment variables. For details, please refer to: Cloud environment variables
Use where query in unicloud-db component reference
# Simple query condition
Simple query conditions include the following, corresponding to various [operators] under db.command (https://uniapp.dcloud.net.cn/uniCloud/cf-database?id=dbcmd) and those that do not use operators Queries such as where({a:1}).
| Operator | Description | Example | Example Explanation (Collection Query) |
|---|---|---|---|
| == | Equal to | name == 'abc' | Query the records whose name attribute is abc, and the left side is the database field |
| != | Not equal to | name != 'abc' | Query the records whose name attribute is not abc, and the left side is the database field |
| > | Greater than | age>10 | The age attribute of the query condition is greater than 10, and the left side is the database field |
| >= | Greater than or equal to | age>=10 | The age attribute of the query condition is greater than or equal to 10, and the left side is the database field |
| < | Less than | age<10 | The age attribute of the query condition is less than 10, and the left side is the database field |
| <= | Less than or equal to | age<=10 | The age attribute of the query condition is less than or equal to 10, and the left side is the database field |
| in | Exists in the array | status in ['a', 'b'] | The status of the query condition is one of ['a', 'b'], and the left side is the database field |
| !(xx in []) | Does not exist in the array | !(status in ['a','b']) | The status of the query condition is not any of ['a','b'] |
| && | and | uid == auth.uid && age > 10 | query record uid attribute is the current user uid and the age attribute of the query condition is greater than 10 |
| || | or | uid == auth.uid||age>10 | The uid attribute of the query record is the current user uid or the age attribute of the query condition is greater than 10 |
| test | Regular verification | /abc/.test(content) | Query the records containing abc in the content field. Can be used to replace like in sql. You can also write more regular expressions to achieve more complex functions |
The test method here is relatively powerful, and the format is: regular rule.test(fieldname).
Specific to this regularity /abc/.test(content), similar to content like '%abc%' in SQL, that is, to query all data records whose field content contains abc.
Notice
- does not support non-operations
- When writing query conditions, except for test, the left side of the operator is the database field, and the right side is the constant
Simple query conditions require that both sides of the binary operator must not be fields in the database
The query statement written above can be compared and verified with the permission configured in the schema in the permission verification stage. If the verification is passed, the database will not be checked for permission verification.
# Complex query conditions
Supported since HBuilderX 3.1.0
Database operation method can be used in complex queries. It should be noted that, unlike the database operation method used in the cloud function, the usage of the database operation method in jql is simplified.
Example: The data table test has the following data
{
  "_id": "1",
  "name": "n1",
  "chinese": 60, // 语文
  "math": 60 // 数学
}
{
  "_id": "2",
  "name": "n2",
  "chinese": 60,
  "math": 70
}
{
  "_id": "3",
  "name": "n3",
  "chinese": 100,
  "math": 90
}
Use the following writing method to filter data with a total score of Chinese and mathematics greater than 150
const db = uniCloud.database()
const res = await db.collection('test')
.where('add(chinese,math) > 150')
.get()

// The return result is as follows
res = {
  result: {
    data: [{
      "_id": "3",
      "name": "n3",
      "chinese": 100,
      "math": 90
    }]
  }
}
In addition, compared with simple query conditions, complex query conditions can compare two fields in the database, while simple query conditions require that both sides of the binary operator cannot be both fields in the database. JQL will automatically determine whether to use simple query or Complex query conditions.
Example: Still taking the above data as an example, the following query statement can query records with higher scores in mathematics than in Chinese
const db = uniCloud.database()
const res = await db.collection('test')
.where('math > chinese')
.get()

// The return result is as follows
res = {
  result: {
    data: [{
      "_id": "2",
      "name": "n2",
      "chinese": 60,
      "math": 70
    }]
  }
}
You can also use new Date() to get a date object when querying conditions.
Example: The data table test has the following data
{
  "_id": "1",
  "title": "t1",
  "deadline": 1611998723948
}
{
  "_id": "2",
  "title": "t2",
  "deadline": 1512312311231
}
Use the following notation to query fields whose deadline is less than the current time (time in the cloud function)
const db = uniCloud.database()
const res = await db.collection('test')
.where('deadline < new Date().getTime()') // 暂不支持使用Date.now(),后续会支持
.get()
Notice
- Regular query cannot be used when complex query conditions are used
# Query list pagination
Paging query can be done by skip+limit
const db = uniCloud.database()
db.collection('book')
  .where('status == "onsale"')
  .skip(20) // 跳过前20条
  .limit(20) // 获取20条
  .get()

// The paging condition corresponding to the above usage is: take the second page of 20 entries per page
Notice
- limit不设置的情况下默认返回100条数据;设置limit有最大值,腾讯云限制为最大1000条,阿里云限制为最大1000条。
The <unicloud-db> component provides an easier way to paginate, including two modes:
- Scroll to the end to load the next page (append mode)
- Click the page number button to switch between different pages (replace mode)
For details, see: https://uniapp.dcloud.net.cn/uniCloud/unicloud-db?id=page
# Field filtering field
When querying, you can use the field method to specify the return field. All fields are returned when the field method is not used
field can specify a string or an object.
All database operation methods can be used in the field
- String writing: List field names, and multiple fields are separated by commas. For example,
db.collection('book').field("title,author"), the query result will return the data of_id,title,authorfields. String writing,_idwill definitely return
** Complex nested json data filtering**
If the data structure in the database is nested json, for example, the book table has a price field, including ordinary price and VIP user price, the data is as follows:
{
  "_id": "1",
  "title": "西游记",
  "author": "吴承恩",
  "price":{
	  "normal":10,
	  "vip":8
  }
}
Then use db.collection('book').field("price.vip").get(), you can only return the vip price, not the normal price. The query results are as follows:
{
  "_id": "1",
  "price":{
	  "vip":8
  }
}
For joint table query, the data of the sub-table is embedded under the associated fields of the main table. At this time, the sub-table fields are defined by {} in the filed. For example, in the example given in the previous section on joint table query, the book table and the order table joint table query:
// join table query
db.collection('order,book') // 注意collection方法内需要传入所有用到的表名,用逗号分隔,主表需要放在第一位
  .field('book_id{title,author},quantity') // 这里联表查询book表返回book表内的title、book表内的author、order表内的quantity
  .get()
Do not use {} to filter secondary table fields
This notation is supported from April 28, 2021
In the field method, {} can not be used for sub-table field filtering. Taking the above example as an example, it can be written as
const db = uniCloud.database()
db.collection('order,book')
  .where('book_id.title == "三国演义"')
  .field('book_id.title,book_id.author,quantity as order_quantity') // book_id.title、book_id.author为副表字段,使用别名时效果和上一个示例不同,请见下方说明
  .orderBy('order_quantity desc') // 按照order_quantity降序排列
  .get()
  .then(res => {
    console.log(res);
  }).catch(err => {
    console.error(err)
  })
# Field aliases as
Since 2020-11-20, JQL supports field aliases, which are mainly used to rename fields when the field names required by the front end are inconsistent with the database field names.
The usage is like: author as book_author, which means to rename the author field of the database to book_author.
Still take the above order table and book table as an example
// Client join table query
const db = uniCloud.database()
db.collection('book')
  .where('title == "三国演义"')
  .field('title as book_title,author as book_author')
  .get()
  .then(res => {
    console.log(res);
  }).catch(err => {
    console.error(err)
  })
The above query returns the following results
{
	"code": "",
	"message": "",
	"data": [{
      "_id": "3",
			"book_author": "罗贯中",
			"book_title": "三国演义"
		}]
}
_id is a special field. If an alias is set to _id, both _id and the set alias field will be returned
example:
// Client join table query
const db = uniCloud.database()
db.collection('book')
  .where('title == "三国演义"')
  .field('_id as book_id,title as book_title,author as book_author')
  .get()
  .then(res => {
    console.log(res);
  }).catch(err => {
    console.error(err)
  })
The above query returns the following results
{
	"code": "",
	"message": "",
	"data": [{
      "_id": "3",
      "book_id": "3",
			"book_author": "罗贯中",
			"book_title": "三国演义"
		}]
}
# Field aliases when querying with tables
The field alias is written in a similar way to a simple query in a joint table query
// Client join table query
const db = uniCloud.database()
db.collection('order,book')
  .where('book_id.title == "三国演义"')
  .field('book_id{title as book_title,author as book_author},quantity as order_quantity') // 这里联表查询book表返回book表内的title、book表内的author、order表内的quantity,并将title重命名为book_title,author重命名为book_author,quantity重命名为order_quantity
  .orderBy('order_quantity desc') // 按照order_quantity降序排列
  .get()
  .then(res => {
    console.log(res);
  }).catch(err => {
    console.error(err)
  })
The res returned by the above request is as follows
{
	"code": "",
	"message": "",
	"data": [{
		"_id": "b8df3bd65f8f0d06018fdc250a5688bb",
		"book_id": [{
			"book_author": "罗贯中",
			"book_title": "三国演义"
		}],
		"order_quantity": 555
	}, {
		"_id": "b8df3bd65f8f0d06018fdc2315af05ec",
		"book_id": [{
			"book_author": "罗贯中",
			"book_title": "三国演义"
		}],
		"order_quantity": 333
	}]
}
It should be noted that the alias of the sub-table field is used. If it is written as .field('book_id.title as book_id.book_title,book_id.author,quantity as order_quantity') book_title will be an array composed of the title of each item under book_id. Points behave the same as arrays in mongoDB
const db = uniCloud.database()
db.collection('order,book')
  .where('book_id.title == "三国演义"')
  .field('book_id.title as book_title,book_id.author as book_author,quantity as order_quantity') // book_id.title、book_id.author为副表字段,使用别名时效果和上一个示例不同,请见下方说明
  .orderBy('order_quantity desc') // 按照order_quantity降序排列
  .get()
  .then(res => {
    console.log(res);
  }).catch(err => {
    console.error(err)
  })
The return result is as follows
{
	"code": "",
	"message": "",
	"data": [{
		"_id": "b8df3bd65f8f0d06018fdc250a5688bb",
    book_title: ["三国演义"],
    book_author: ["罗贯中"],
		"order_quantity": 555
	}, {
		"_id": "b8df3bd65f8f0d06018fdc2315af05ec",
    book_title: ["三国演义"],
    book_author: ["罗贯中"],
		"order_quantity": 333
	}]
}
Notice
- The alias after as cannot have the same name as the field that already exists in the table schema
- In the mongoDB query command, after the previous stage is processed, the result is output to the next stage. In the above example, the original name is used in where, and the alias is used in orderBy
- Currently, it is not supported to use aliases for the associated fields of the linked table query, that is, the book_id in the above example cannot be aliased
# Various field operation methods
Since HBuilderX 3.1.0, JQL supports certain operations on fields in the cloud database and then returns. For a detailed list of available methods, please refer to: Database operation methods
It should be noted that, for the convenience of writing, the usage of database operation methods in JQL is simplified (compared to the use of database operation methods in cloud functions). Please refer to the above link for usage
Example: The data table class has the following data
{
  "_id": "1",
  "grade": 6,
  "class": "A"
}
{
  "_id": "1",
  "grade": 2,
  "class": "A"
}
The following writing method can be calculated by grade to get an isTopGrade to indicate whether it is the highest grade
const res = await db.collection('class')
.field('class,eq(grade,6) as isTopGrade')
.get()
The return result is as follows
{
  "_id": "1",
  "class": "A",
  "isTopGrade": true
}
{
  "_id": "1",
  "class": "A",
  "isTopGrade": false
}
Notice
- If you want to access an item of the array, please use the arrayElemAt operator, such as:
arrayElemAt(arr,1) - During permission verification, the permissions will be calculated based on all fields accessed in the field. In the above example, the read permission of the table and the permission of the grade and class fields are used for permission verification.
# Sort orderBy
The traditional sorting parameter of MongoDB is in json format, and jql supports sql-like string format, which is easier to write.
A string can be passed in the sort method and orderBy method to specify the collation.
orderBy allows ordering by multiple fields, separated by commas. Each field can specify asc (ascending order), desc (descending order). The default is ascending order.
Sort fields written at the front have higher priority than those at the back.
An example is as follows:
orderBy('quantity asc, create_date desc') //按照quantity字段升序排序,quantity相同时按照create_date降序排序
// asc can be omitted, the above code has the same effect as the following
orderBy('quantity, create_date desc')

// Be careful not to write a full-width comma by mistake
Take the above order table data as an example:
const db = uniCloud.database()
  db.collection('order')
    .orderBy('quantity asc, create_date desc') // 按照quantity字段升序排序,quantity相同时按照create_date降序排序
    .get()
    .then(res => {
      console.log(res);
    }).catch(err => {
      console.error(err)
    })

// The above writing is equivalent to
const db = uniCloud.database()
  db.collection('order')
    .orderBy('quantity','asc')
    .orderBy('create_date','desc')
    .get()
    .then(res => {
      console.log(res);
    }).catch(err => {
      console.error(err)
    })
# Limit the number of query records limit
Using the limit method, a limited number of data records can be queried.
For example, query the top 10 best-selling books, or find the book with the highest price.
// This takes the above book table data as an example to find the book with the highest price
  db.collection('book')
    .orderBy('price desc')
    .limit(1)
    .get()
limit默认值是100,即不设置的情况下,默认返回100条数据。limit最大值为1000。
In general, too much data should not be returned to the front end at one time, the database query is also slow, and the network return is also slow. Data can be returned in batches by paging.
In the result of the query, there is an affectedDocs. But affectedDocs and limit are slightly different. affectedDocs is less than or equal to limit.
For example, there are only 2 books in the book table. Although the limit is set to 10, the query result can only return 2 records, and affectedDocs is 2.
# Check only one record getone
When using the API method of JQL, you can pass the parameter getOne:true in the get method to return a piece of data.
getOne is actually equivalent to limit(1) in the previous section.
Generally, getOne and orderBy are matched.
// This takes the above book table data as an example
const db = uniCloud.database()
  db.collection('book')
    .where({
      title: '西游记'
    })
    .get({
      getOne:true
    })
    .then(res => {
      console.log(res);
    }).catch(err => {
      console.error(err)
    })
The return result is
{
	"code": "",
	"message": "",
	"data": {
    "_id": "1",
    "title": "西游记",
    "author": "吴承恩"
  }
}
If using the uniCloud-db component, add a getone to the component's property. See details
# Statistics getcount
Counting the number of records that meet the query conditions is a concept at the database level.
In the result of the query, there is an affectedDocs. But affectedDocs and count are not the same thing.
- affectedDocs indicates the number of data pieces returned from the server to the front end. The default is 100, which can be adjusted by the limit method.
- count refers to the total number of records that meet the query conditions. Whether these records are returned to the front end has nothing to do with count.
For example, there are 110 books in the book table, without writing any where, limit and other conditions, but writing the count method or getCount parameter, then the result will become as follows:
result:{
	errCode: 0,
	errMsg: "",
	count: 110,
	data:[...]
}
That is, the database has found 110 records, which are returned by count; while the network side only returns 100 records to the front end, which is represented by affectedDocs.
There are two scenarios for count count:
- Simply count the number, do not query the data. Use count() method
- Query records return details, and return the number that meets the query conditions, use the getCount parameter
# Simple statistics, no data details are returned
Use the count() method like db.collection('order').count()
You can continue to add where and other conditions to filter data records.
# Query records while returning count
When using the API method of JQL, you can pass the parameter getCount:true in the get method to return the total number at the same time
// This takes the above order table data as an example
const db = uniCloud.database()
  db.collection('order')
    .get({
      getCount:true
    })
    .then(res => {
      console.log(res);
    }).catch(err => {
      console.error(err)
    })
The return result is
{
	"code": "",
	"message": "",
	"data": [{
		"_id": "b8df3bd65f8f0d06018fdc250a5688bb",
		"book": "3",
		"quantity": 555
	}],
	"count": 5
}
If using the uniCloud-db component, add a getcount to the component's property. See details
# Query tree data gettree
From HBuilderX 3.0.3+, JQL supports query tree structure data by passing the getTree parameter in the get method. (HBuilderX 3.0.5+ unicloud-db component starts to support, the previous version can only be used by js)
Tree data is generally not stored at the tree level in the database, because storing data at different levels in the form of json objects according to the tree structure is not conducive to adding, deleting, modifying and checking a node on the tree alone.
Generally, tree data is stored, each node on the tree is a separate data table record, and then the parent-child relationship is expressed by similar parent_id.
For example, the data table of the department contains 2 pieces of data, one data record is "headquarters", parent_id is empty; the other data record is "first-level department A", parent_id is the _id of the headquarters
{
    "_id": "5fe77207974b6900018c6c9c",
    "name": "总部",
    "parent_id": "",
    "status": 0
}
{
    "_id": "5fe77232974b6900018c6cb1",
    "name": "一级部门A",
    "parent_id": "5fe77207974b6900018c6c9c",
    "status": 0
}
Although the storage format is record-by-entry, the data fed back to the front end by the query still needs to be in the form of a tree. This conversion has been more complicated in the past.
JQL provides a simple and elegant solution. Configure the parentKey in the DB Schema to express the parent-child relationship, and then declare the use of Tree query when querying, and you can directly check the tree data.
In the schema of the department table, set the "parentKey" of the field parent_id to "_id", which specifies the parent-child relationship between the data, as follows:
{
  "bsonType": "object",
  "required": ["name"],
  "properties": {
    "_id": {
      "description": "ID,系统自动生成"
    },
      "name": {
      "bsonType": "string",
      "description": "名称"
    },
    "parent_id": {
      "bsonType": "string",
      "description": "父id",
      "parentKey": "_id", // 指定父子关系为:如果数据库记录A的_id和数据库记录B的parent_id相等,则A是B的父级。
    },
    "status": {
      "bsonType": "int",
      "description": "部门状态,0-正常、1-禁用"
    }
  }
}
The parentKey field describes the parent-child relationship of different records in the data table. The query can be written directly.
Note: There can only be one parent-child relationship in one query of a table. If multiple fields in the schema of a table are set to parentKey, then you need to specify a parentKey field to be used through the parentKey() method in JQL.
Once described in the schema, the query becomes very simple.
Querying tree data is divided into two requirements: querying all child nodes and querying the parent path.
# Query all child nodes
Specify a record that meets the conditions, and then query all its child nodes, and you can specify the level. The returned result is the data of all child nodes with the record that meets the conditions as the first-level node, and is nested in a tree-like manner.
Just add the getTree parameter to the JQL get method, as follows
// get method example
get({
  getTree: {
    limitLevel: 10, // 最大查询层级(不包含当前层级),可以省略默认10级,最大15,最小1
    startWith: "parent_code=='' || parent_code==null"  // 第一层级条件,此初始条件可以省略,不传startWith时默认从最顶级开始查询
  }
})

// When using getTree, the above parameters can be abbreviated as the following
get({
  getTree: true
})
The complete code is as follows:
db.collection("department").get({
		getTree: {}
	})
	.then((res) => {
		const resdata = res.result.data
		console.log("resdata", resdata);
	}).catch((err) => {
		uni.showModal({
			content: err.message || '请求服务失败',
			showCancel: false
		})
	}).finally(() => {

	})
The result of the query is as follows:
"data": [{
	"_id": "5fe77207974b6900018c6c9c",
	"name": "总部",
	"parent_id": "",
	"status": 0,
	"children": [{
		"_id": "5fe77232974b6900018c6cb1",
		"name": "一级部门A",
		"parent_id": "5fe77207974b6900018c6c9c",
		"status": 0,
		"children": []
	}]
}]
It can be seen that each child node is nested under the "children" of the parent node, and this "children" is a fixed format.
If you do not specify the parameters of getTree, all the data in the department table will be found out, from the headquarters to the 10th-level department, and provided to the client in a tree structure.
If there are multiple headquarters, that is, the `parent_id' of the multi-line record is empty, the multiple headquarters will be used as first-level nodes, and all the children below them will be pulled out level by level. as follows:
"data": [
	{
		"_id": "5fe77207974b6900018c6c9c",
		"name": "总部",
		"parent_id": "",
    "status": 0,
		"children": [{
				"_id": "5fe77232974b6900018c6cb1",
				"name": "一级部门A",
				"parent_id": "5fe77207974b6900018c6c9c",
				"status": 0,
				"children": []
		}]
	},
	{
		"_id": "5fe778a10431ca0001c1e2f8",
		"name": "总部2",
		"parent_id": "",
		"children": [{
				"_id": "5fe778e064635100013efbc2",
				"name": "总部2的一级部门B",
				"parent_id": "5fe778a10431ca0001c1e2f8",
				"children": []
		}]
	}
]
If you feel that the returned parent_id field is redundant, you can also specify .field("_id,name") to filter out this field.
Description of parameter limitLevel of getTree
limitLevel represents the maximum level of the tree returned by the query. Nodes beyond the set level will not be returned.
- The default value of limitLevel is 10.
- The legal value range of limitLevel is between 1 and 15 (including 1 and 15). If the actual level of data exceeds 15 levels, please lazily load the query.
- limitLevel is 1, which means to check down one level of child nodes. If there are 2-level and 3-level departments in the database, if limitLevel is set to 1, and the query is "Headquarters", the returned data includes "Headquarters" and the first-level departments under it.
Description of parameter startWith of getTree
If you only need to check the sub-departments of "Headquarters", you don't need "Headquarters 2", you can specify it in startWith (getTree: {"startWith":"name=='Headquarters'"}).
Please pay attention to the difference between startWith and where in use. where is used to describe the conditions that apply to all levels (including the first level). And startWith is used to describe which node or nodes to start querying the tree from.
When startWith is not filled in, the default condition is 'parent_id==null||parent_id==""', that is, when the field of the schema configuration parentKey is null (that is, does not exist) or the value is an empty string, such a node is Treated as root node by default.
Suppose the above department table has the following data
{
    "_id": "1",
    "name": "总部",
    "parent_id": "",
    "status": 0
}
{
    "_id": "11",
    "name": "一级部门A",
    "parent_id": "1",
    "status": 0
}
{
    "_id": "12",
    "name": "一级部门B",
    "parent_id": "1",
    "status": 1
}
The following query statement specifies that startWith is _id=="1" and the where condition is status==0, to query all child nodes whose status is 0 under the headquarters.
db.collection("department")
  .where('status==0')
  .get({
    getTree: {
      startWith: '_id=="1"'
    }
	})
	.then((res) => {
		const resdata = res.result.data
		console.log("resdata", resdata);
	}).catch((err) => {
		uni.showModal({
			content: err.message || '请求服务失败',
			showCancel: false
		})
	}).finally(() => {

	})
The result of the query is as follows:
{
  "data": [{
    "_id": "1",
    "name": "总部",
    "parent_id": "",
    "status": 0,
    "children": [{
      "_id": "11",
      "name": "一级部门A",
      "parent_id": "1",
      "status": 0,
      "children": []
    }]
  }]
}
It should be noted that the conditions in where will also take effect on the first-level data, for example, change the above query to the following writing
db.collection("department")
  .where('status==1')
  .get({
    getTree: {
      startWith: '_id=="1"'
    }
	})
	.then((res) => {
		const resdata = res.result.data
		console.log("resdata", resdata);
	}).catch((err) => {
		uni.showModal({
			content: err.message || '请求服务失败',
			showCancel: false
		})
	}).finally(() => {

	})
At this time, the data cannot be queried, and the returned results are as follows
{
  "data": []
}
Specify a parentKey through the parentKey method
If multiple fields in the schema of the table are configured with parentKey, but the parentKey relationship of only one field can take effect during the query, then you need to use the parentKey() method to specify which parentKey relationship is required for this query to take effect. .
The parameter of the parentKey() method is the field name.
db.collection('department')
.parentKey('parent_id') // 如果表schema只有一个字段设了parentKey,其实不需要指定。有多个字段被设parentKey才需要用这个方法指定
.get({
    getTree: true
	})
Example
There is an example of family tree in the plugin market, you can refer to: https://ext.dcloud.net.cn/plugin?id=3798
Tree data query with large amount of data
If the amount of tree data is large, it is not recommended to return all tree data to the client at one time. Hierarchical queries are recommended, i.e. lazy loading.
For example, in the scenario of regional selection, there is a large amount of data in provinces and cities across the country. It is very time-consuming and traffic-consuming to query all the data at one time and return it to the client. You can check the province first, then check the city according to the selected province, and so on.
Notice
- Do not support using getTree at the same time using join table query
- If the where condition is used, it will take effect for all queried nodes
- If limit is used to set the maximum number of returns, it will only take effect on the root node
# Query tree structure parent node path
getTree queries child nodes, and getTreePath queries parent nodes.
The getTreePath parameter is passed in the get method to query the table containing the parent-child relationship and return the path of a node of tree structure data.
// get method example
get({
  getTreePath: {
    limitLevel: 10, // 最大查询层级(不包含当前层级),可以省略默认10级,最大15,最小1
    startWith: 'name=="一级部门A"'  // 末级节点的条件,此初始条件不可以省略
  }
})
The result returned by the query is to search up 10 levels from "first-level department A", and after finding the final node, take this node as the root, and nest children downward until reaching "first-level department A".
The returned result only includes the immediate parent of "first-level department A", and the sibling nodes of its parent node will not be returned. Therefore, each layer of data has only one node.
Still take the table structure and data of the department above as an example
db.collection("department").get({
		getTreePath: {
			"startWith": "_id=='5fe77232974b6900018c6cb1'"
		}
	})
	.then((res) => {
		const treepath = res.result.data
		console.log("treepath", treepath);
	}).catch((err) => {
		uni.showModal({
			content: err.message || '请求服务失败',
			showCancel: false
		})
	}).finally(() => {
		uni.hideLoading()
		// console.log("finally")
	})
query return result
Start from the root node "headquarters" and return to "first-level department A". Nodes such as "HQ2" will not return.
{
  "data": [{
		"_id": "5fe77207974b6900018c6c9c",
		"name": "总部",
		"parent_id": "",
		"children": [{
			"_id": "5fe77232974b6900018c6cb1",
			"name": "一级部门A",
			"parent_id": "5fe77207974b6900018c6c9c"
		}]
	}]
}
Returns itself if the node specified by startWith has no parent.
If startWith matches more than one node, return the treepath of each node as an array.
For example, "Headquarters" and "Headquarters 2" both have a department name called "Sales", and "startWith": "name=='Sales Department'", it will return "Headquarters" and "Headquarters 2" Two treepaths, as follows
{
	"data": [{
		"_id": "5fe77207974b6900018c6c9c",
		"name": "总部",
		"parent_id": "",
		"children": [{
			"_id": "5fe77232974b6900018c6cb1",
			"name": "销售部",
			"parent_id": "5fe77207974b6900018c6c9c"
		}]
		}, {
		"_id": "5fe778a10431ca0001c1e2f8",
		"name": "总部2",
		"parent_id": "",
		"children": [{
			"_id": "5fe79fea23976b0001508a46",
			"name": "销售部",
			"parent_id": "5fe778a10431ca0001c1e2f8"
		}]
	}]
}
Notice
- It is not supported to use other join table query syntax while using getTreePath
- If the where condition is used, it will take effect for all queried nodes
# Group statistics groupby
Local debugging support:
HBuilderX 3.1.0+; cloud support: update the cloud DB Schema after 2021-1-26 to take effect
Data grouping statistics, that is, grouping according to a field (groupBy), and then summing, calculating the number, and calculating the average of the grouped values of other fields.
For example, to count the number of new users per day is to group by time and perform count operation on the daily user records.
Group statistics have groupBy and groupField. Slightly different from traditional sql, traditional sql does not have a separate groupField.
The field field cannot be written directly in the groupField of JQL. Only the grouping operation method can be used to process the field. Common accumulators include: count(*), sum(field name ), avg(field name). More grouping operation methods see details
Where count(*) is a fixed spelling.
Group statistics are written as follows:
const res = await db.collection('table1').groupBy('field1,field2').groupField('sum(field3) as field4').get()
If the field method is additionally used before groupBy, the meaning of this field is not the final returned field, but is used to preprocess the field, and then pass the preprocessed field to groupBy and groupField for use.
Unlike field, when using groupField, the returned result does not contain the _id field by default. At the same time, developers should not use the _id field in groupBy and groupField. _id is unique and has no unified meaning.
Example:
If the database score table is the score data of a certain competition, each record is a student's score. Students have field attributes such as grade, class, name, and score.
{
  _id: "1",
  grade: "1",
  class: "A",
  name: "zhao",
  score: 5
}
{
  _id: "2",
  grade: "1",
  class: "A",
  name: "qian",
  score: 15
}
{
  _id: "3",
  grade: "1",
  class: "B",
  name: "li",
  score: 15
}
{
  _id: "4",
  grade: "1",
  class: "B",
  name: "zhou",
  score: 25
}
{
  _id: "5",
  grade: "2",
  class: "A",
  name: "wu",
  score: 25
}
{
  _id: "6",
  grade: "2",
  class: "A",
  name: "zheng",
  score: 35
}
Next, we will group statistics on this batch of data and demonstrate how to use sum, average and count respectively.
# Sum, Average Example
The database operation method can also be used to process the data in groupBy. For the convenience of writing, the usage of the database operation method in clientDB has been simplified (compared to the database operation method used in the cloud function). For usage, please refer to: Database operation method
The grouping operation method can be used in groupField to count the grouping results. For all available accumulation methods, please refer to Grouping operation method. The following uses sum (summation) and avg (average) An example of how to use
Use the sum method to sum the data. Taking the above data as an example, the following methods are used to calculate the scores of different classes
const res = await db.collection('score')
.groupBy('grade,class')
.groupField('sum(score) as totalScore')
.get()
The return result is as follows
{
  data: [{
    grade: "1",
    class: "A",
    totalScore: 20
  },{
    grade: "1",
    class: "B",
    totalScore: 40
  },{
    grade: "2",
    class: "A",
    totalScore: 60
  }]
}
The total scores of the three classes are 20, 40, and 60, respectively.
The averaging method is similar to the summation method, and the above sum method can be replaced by the avg method.
const res = await db.collection('score')
.groupBy('grade,class')
.groupField('avg(score) as avgScore')
.get()
The return result is as follows
{
  data: [{
    grade: "1",
    class: "A",
    avgScore: 10
  },{
    grade: "1",
    class: "B",
    avgScore: 20
  },{
    grade: "2",
    class: "A",
    avgScore: 30
  }]
}
If the field method is used before groupBy, this field is used to decide which data to pass to groupBy and groupField.
Example: If the score in the above data is an array
{
  _id: "1",
  grade: "1",
  class: "A",
  name: "zhao",
  score: [1,1,1,1,1]
}
{
  _id: "2",
  grade: "1",
  class: "A",
  name: "qian",
  score: [3,3,3,3,3]
}
{
  _id: "3",
  grade: "1",
  class: "B",
  name: "li",
  score: [3,3,3,3,3]
}
{
  _id: "4",
  grade: "1",
  class: "B",
  name: "zhou",
  score: [5,5,5,5,5]
}
{
  _id: "5",
  grade: "2",
  class: "A",
  name: "wu",
  score: [5,5,5,5,5]
}
{
  _id: "6",
  grade: "2",
  class: "A",
  name: "zheng",
  score: [7,7,7,7,7]
}
The following field writing method sums the above score array and passes it to groupBy and groupField for use. Fields (such as name) that do not appear in field cannot be used in subsequent methods
const res = await db.collection('score')
.field('grade,class,sum(score) as userTotalScore')
.groupBy('grade,class')
.groupField('avg(userTotalScore) as avgScore')
.get()
The return result is as follows
{
  data: [{
    grade: "1",
    class: "A",
    avgScore: 10
  },{
    grade: "1",
    class: "B",
    avgScore: 20
  },{
    grade: "2",
    class: "A",
    avgScore: 30
  }]
}
# Statistics example
Use the count method to count the number of records. Taking the above data as an example, the following writing method counts the number of participants for different classes
const res = await db.collection('score')
.groupBy('grade,class')
.groupField('count(*) as totalStudents')
.get()
The return result is as follows
{
  data: [{
    grade: "1",
    class: "A",
    totalStudents: 2
  },{
    grade: "1",
    class: "B",
    totalStudents: 2
  },{
    grade: "2",
    class: "A",
    totalStudents: 2
  }]
}
Notice
count(*)is a fixed way of writing, the * in parentheses can be omitted
# Example of grouping statistics by day
Statistics by time period is a common requirement, and time period statistics use date operators.
Suppose you want to count the daily number of newly registered users in the uni-id-users table. The table contains the following data:
{
  "_id": "1",
  "username": "name1",
  "register_date": 1611367810000 // 2021-01-23 10:10:10
}
{
  "_id": "2",
  "username": "name2",
  "register_date": 1611367810000 // 2021-01-23 10:10:10
}
{
  "_id": "3",
  "username": "name3",
  "register_date": 1611367810000 // 2021-01-23 10:10:10
}
{
  "_id": "4",
  "username": "name4",
  "register_date": 1611281410000 // 2021-01-22 10:10:10
}
{
  "_id": "5",
  "username": "name5",
  "register_date": 1611281410000 // 2021-01-22 10:10:10
}
{
  "_id": "6",
  "username": "name6",
  "register_date": 1611195010000 // 2021-01-21 10:10:10
}
Since the register_date field is in timestamp format, it contains time, minute and second information. However, it is necessary to ignore the hours, minutes, and seconds when counting new registered users every day.
- First use the add operator to convert
register_datefrom timestamp to date type.
The usage of the add operator is add(value1, value2). add(new Date(0),register_date) represents the field register_date + 0. This operation does not change the specific time, but changes the format of register_date from timestamp to date type.
- Then use dateToString to format the date obtained by add into a string of the form
2021-01-21, removing the hours, minutes and seconds.
The usage of the dateToString operator is dateToString(date object, format string, time zone). The details are as follows: dateToString(add(new Date(0),register_date),"%Y-%m-%d","+0800")
- Then group statistics based on this string to get the number of registered users per day. code show as below:
const res = await db.collection('uni-id-users')
.groupBy('dateToString(add(new Date(0),register_date),"%Y-%m-%d","+0800") as date')
.groupField('count(*) as newusercount')
.get()
The query returns the following results:
res = {
  result: {
    data: [{
      date: '2021-01-23',
      newusercount: 3
    },{
      date: '2021-01-22',
      newusercount: 2
    },{
      date: '2021-01-21',
      newusercount: 1
    }]
  }
}
For a complete list of database operation methods, please refer to: Database operation methods available in JQL
# count permission control
When using common accumulator operators, such as sum, avg, permission control is no different from regular permission control.
However, when using count, the table-level count permission can be configured separately.
Please do not rashly set the count permission of the uni-id-users table to true, that is Anyone can count. This means that visitors will have access to your total number of users.
The control logic of count permission is as follows:
- In the case of not using field and only using groupBy and groupField, the permissions of all fields accessed in groupBy and groupField will be used to verify whether the access is legal.
- In the case of additional use of the field method, all field calculation permissions accessed within the field will be calculated. In the above example, the read permission of the table and the permissions of the three fields of grade, class, and score are used for permission verification.
- Before HBuilderX 3.1.0, the count operation will be verified using the table-level read permission. In HBuilderX 3.1.0 and later versions, if the count permission is configured, the table-level read+count permission will be used for verification, and the verification will pass if both of them are satisfied.
- If there is no count permission in the schema, only the read permission will be used for verification
- All operations that will count the number will trigger the count permission check
# Data deduplication distinct
Use the .distinct() method to remove duplicate records in the data query result.
The distinct method will deduplicate according to the field specified by the field method (if _id is not specified in the field, it will not be deduplicated according to _id)
Local debugging support:
HBuilderX 3.1.0+; Cloud support: Update the cloud DB Schema after 2021-1-26 to take effect
const res = await db.collection('table1')
.field('field1')
.distinct() // 注意distinct方法没有参数
.get()
Example: If the database score table is the score data of a certain competition, each record is the score of a student
Data for the score table:
{
  _id: "1",
  grade: "1",
  class: "A",
  name: "zhao",
  score: 5
}
{
  _id: "2",
  grade: "1",
  class: "A",
  name: "qian",
  score: 15
}
{
  _id: "3",
  grade: "1",
  class: "B",
  name: "li",
  score: 15
}
{
  _id: "4",
  grade: "1",
  class: "B",
  name: "zhou",
  score: 25
}
{
  _id: "5",
  grade: "2",
  class: "A",
  name: "wu",
  score: 25
}
{
  _id: "6",
  grade: "2",
  class: "A",
  name: "zheng",
  score: 35
}
The following code can be deduplicated according to the two fields of grade and class to get all participating classes
const res = await db.collection('score')
.field('grade,class')
.distinct() // 注意distinct方法没有参数
.get()
The query returns the result as follows
{
  data: [{
    grade:"1",
    class: "A"
  },{
    grade:"1",
    class: "B"
  },{
    grade:"2",
    class: "A"
  }]
}
Notice
- distinct refers to deduplication of identical records in the returned result, and only one duplicate record is retained. Because the
_idfield is necessarily different, the field must be specified at the same time when using distinct, and the_idfield cannot exist in the field
# Geolocation query geoNear
Added in HBuilderX 3.6.10
geoNear can be used to query database records whose location is within a certain distance of a given point. This method must immediately follow the collection method or the aggregate method.
parameter
| Property | Type | Default Value | Required | Description |
|---|---|---|---|---|
| near | GeoPoint | Yes | GeoJSON Point, the point used to judge the distance | |
| spherical | true | Yes | required, the value is true | |
| maxDistance | number | No | Maximum distance | |
| minDistance | number | No | Minimum distance | |
| query | object|string | No | The record must meet this condition at the same time (syntax is the same as where) | |
| distanceMultiplier | number | no | multiplies the distance by this number on return | |
| distanceField | string | 是 | 存放距离的输出字段名,可以用点表示法表示一个嵌套字段 | |
| includeLocs | string | no | list the fields to be used for distance calculation, useful if there are multiple fields in the record that are all geolocations | |
| key | string | no | Select the geolocation index to use. If the collection is indexed by multiple geographic locations, one must be specified by specifying the corresponding field |
example
const res = await db.collection('geo-near').aggregate().geoNear({
    distanceField: 'distance',
    spherical: true,
    near: new db.Geo.Point(116.397689, 39.904626), // 人民英雄纪念碑
    maxDistance: 500,
    query: 'name == "readable"'
  }).end()
Precautions
- When there is geoNear, its query parameter will replace where/doc as the basis for permission verification, that is, the result matched by query needs to meet the permission before it can be queried
# unicloud-map 云端一体组件
若想要在地图上展示自定义的POI信息,试试 unicloud-map 云端一体组件,该组件将前端地图组件与云端数据库无缝连接,只需写一个<unicloud-map>组件,即可从数据库中获取附近的POI信息并在地图上呈现。无论是静态还是动态的POI,甚至更多自定义功能,都轻松实现。让地图开发变得愉快又高效。
文档地址:https://uniapp.dcloud.net.cn/uniCloud/unicloud-map.html
渲染静态POI运行效果图
通过从数据库获取POI数据,渲染到地图上

渲染动态POI运行效果图
通过从数据库获取POI数据,并通过 uni-id-common 内的路线规划API,计算路线、距离、时间
运行效果图
# 查询某字段和另一个表的字段相等的记录
新增于 HBuilderX 3.7.12
用于匹配某字段和另一个表的字段相等的记录,类似sql语句中的in+子查询的写法,只能在where方法内使用。
示例
// company表数据
const company = [{
  _id: '1',
  status: 0
}, {
  _id: '2',
  status: 1
}]

// employee表数据
const employee = [{
  _id: '1',
  register_date: 1671000000000,
  company_id: '1'
}, {
  _id: '1',
  register_date: 1672000000000,
  company_id: '2'
}, {
  _id: '2',
  register_date: 1670000000000,
  company_id: '2'
}]
const companyFilter = db.collection('company').where('status == 0').field('_id').getTemp() // 过滤company表,取其中status为0的记录的_id组成过滤数组
const res = await db.collection('employee').where(`register_date > 1670000000000 && company_id in ${companyFilter}`).get() // 获取用户表的company_id在过滤条件内的记录
此查询匹配到的数据库记录为
[{
  _id: '1',
  register_date: 1671000000000,
  company_id: '1'
}]
注意
in的这种用法底层使用了lookup方法,在数据量很大时效率不高,推荐在使用时尽量在in之外的条件内筛选出尽量小的数据集。以上述示例中register_date > 1670000000000 && company_id in ${companyFilter}查询条件为例,register_date > 1670000000000这部分条件应筛选出尽量小的结果集以便查询能更高效。
使用限制
- 仅可以在单表读操作及getTemp的联表查询的where方法内使用,不可用于增删改及非getTemp的联表查询
- 过滤用的临时表必须指定field
# Add data record
code block
dbadd
After obtaining the table object of db, use the add method to add data records.
Method: collection.add(data)
Parameter Description
| Parameters | Type | Required |
|---|---|---|
| data | object | array | yes |
data supports one record, and also supports adding multiple records to the collection at the same time.
There is no need to include the _id field in data, the database will automatically maintain this field.
return value
When inserting a single
| Parameters | Type | Description |
|---|---|---|
| id | String | The _id of the inserted record |
When bulk inserting
| Parameters | Type | Description |
|---|---|---|
| inserted | Number | Number of successful inserts |
| ids | Array | Bulk insert _id of all records |
Example:
For example, add a new record named Wang Wu in the user table:
const db = uniCloud.database();
db.collection('user').add({name:"王五"})
You can also insert data in batches and get the return value
const db = uniCloud.database();
const collection = db.collection('user');
let res = await collection.add([{
  name: '张三'
},{
  name: '李四'
},{
  name: '王五'
}])
If the above code is executed successfully, the value of res will include inserted:3, which means inserting 3 pieces of data, and returns the _id of 3 records in ids.
If the new record fails, an exception will be thrown. The following code example catches the exception:
// Insert 1 piece of data, and judge the success and failure status at the same time
const db = uniCloud.database();
db.collection("user")
	.add({name: '张三'})
	.then((res) => {
		uni.showToast({
			title: '新增成功'
		})
	})
	.catch((err) => {
		uni.showModal({
			content: err.message || '新增失败',
			showCancel: false
		})
	})
	.finally(() => {

	})
Tips
- If the data is added to a non-admin account, you need to configure the permission in the
db schemaof the table to be operated in the database, and give create permission to allow users to operate. - When the cloud service provider selects Alibaba Cloud, if the collection table does not exist, calling the add method will automatically create the collection table and no error will be reported.
# delete data record
Code block
dbremove
Get the table object of the db, and then specify the record to be deleted, and delete it through the remove method.
Note: If the non-admin account deletes data, you need to configure the permission in the db schema of the table to be operated in the database, and give delete the permission to allow the user to operate.
There are 2 ways to specify records to delete:
# Delete by specifying document ID
collection.doc(_id).remove()
const db = uniCloud.database();
await db.collection("table1").doc("5f79fdb337d16d0001899566").remove()
# Condition to find the document and delete it
collection.where().remove()
// delete documents with field a value greater than 2
try {
	await db.collection("table1").where("a>2").remove()
} catch (e) {
	uni.showModal({
		title: '提示',
		content: e.message
	})
}
delete all data in this table
Note: In the case of a large amount of data, deletion in this way will time out, but all data will still be deleted.
const dbCmd = db.command
const db = uniCloud.database();
await db.collection("table1").where({
  _id: dbCmd.neq(null)
}).remove()
response results
| Fields | Type | Required | Description |
|---|---|---|---|
| deleted | Number | No | Number of records deleted |
Example: Determine the success or failure of deletion, and print the number of deleted records
const db = uniCloud.database();
db.collection("table1")
  .where({
    _id: "5f79fdb337d16d0001899566"
  })
  .remove()
	.then((res) => {
		uni.showToast({
			title: '删除成功'
		})
		console.log("删除条数: ",res.deleted);
	}).catch((err) => {
		uni.showModal({
			content: err.message || '删除失败',
			showCancel: false
		})
	}).finally(() => {

	})
# Update data record
code block
dbupdate
Get the table object of the db, then specify the record to be updated, and update it through the update method.
Note: If a non-admin account modifies data, you need to configure permission in the db schema of the table to be operated in the database, and assign update to true.
collection.doc().update(Object data)
Parameter Description
| Parameters | Type | Required | Description |
|---|---|---|---|
| data | object | Yes | Object to update the field, {'name': 'Ben'} _id not required |
The res response parameter of the callback
| Parameters | Type | Description |
|---|---|---|
| updated | Number | The number of successful updates. It will return 0 if the data has not changed before and after the update. The usage is the same as the response parameter example for delete data |
const db = uniCloud.database();
let collection = db.collection("table1")
let res = await collection.where({_id:'doc-id'})
  .update({
    name: "Hey",
    count: {
      fav: 1
    }
  });
// data before update
{
  "_id": "doc-id",
  "name": "Hello",
  "count": {
    "fav": 0,
    "follow": 0
  }
}

// updated data
{
  "_id": "doc-id",
  "name": "Hey",
  "count": {
    "fav": 1,
    "follow": 0
  }
}
When updating the array, use the subscript of the array as the key. For example, the following example changes the value of subscript 1 in the array arr to uniCloud
const db = uniCloud.database();
let collection = db.collection("table1")
let res = await collection.where({_id:'doc-id'})
  .update({
    arr: {
      1: "uniCloud"
    }
  })
// before update
{
  "_id": "doc-id",
  "arr": ["hello", "world"]
}
// Updated
{
  "_id": "doc-id",
  "arr": ["hello", "uniCloud"]
}
# Batch update documents
const db = uniCloud.database();
let collection = db.collection("table1")
let res = await collection.where("name=='hey'").update({
  age: 18,
})
# Update the element at the specified index in the array
JQL does not currently support this usage
# Update the elements in the array that match the condition
JQL does not currently support this usage
# Send multiple database requests at the same time
Supported by HBuilderX 3.1.22 and above
In actual business, it is usually encountered that a page needs to be queried multiple times. For example, the application homepage needs to query the carousel map list, the announcement list, the homepage product list, etc. If splitting requests requires sending many network requests, this can affect performance. Multiple database requests can be combined into one send using multiSend.
usage
const bannerQuery = db.collection('banner').field('url,image').getTemp() // 这里使用getTemp不直接发送get请求,等到multiSend时再发送
const noticeQuery = db.collection('notice').field('text,url,level').getTemp()
const res = await db.multiSend(bannerQuery,noticeQuery)
return value
// The above request returns the following structure
res = {
  errCode: 0, // 请求整体执行错误码,注意如果多条查询执行失败,这里的code依然是0,只有出现网络错误等问题时这里才会出现错误
  errMsg: "", // 错误信息
  dataList: [{
    errCode: 0, // bannerQuery 对应的错误码
    errMsg: '', // bannerQuery 对应的错误信息
    data: [] // bannerQuery 查询到的数据
  }, {
    errCode: 0, // noticeQuery 对应的错误码
    errMsg: '', // noticeQuery 对应的错误信息
    data: [] // noticeQuery 查询到的数据
  }]
}
The unicloud-db component also supports the use of the getTemp method, which can be sent together with other database requests in combination with multiSend
Usage example:
<template>
  <view>
    <!-- Set the unicloud-db component to load manually loadtime="manual" -->
    <unicloud-db collection="banner" loadtime="manual" ref="udb" v-slot:default="{data, error}">
      <view v-if="error">{{error.message}}</view>
      <view v-else>
        <view v-for="(item,index) in data" :key="index">
          <image :src="item.url"></image>
        </view>
      </view>
    </unicloud-db>
    <button type="default" @click="test">test</button>
  </view>
</template>

<script>
  export default {
    data() {
      return {
        title: 'Hello'
      }
    },
    onLoad() {

    },
    methods: {
      test() {
        const db = uniCloud.database()
        const bannerQuery = this.$refs.udb.getTemp() // 调用模板内unicloud-db组件实例的getTemp方法
        const noticeQuery = db.collection('notice').getTemp()
        db.multiSend(bannerQuery, noticeQuery)
          .then(res => {
            console.log('banner', res.result.dataList[0]); // 使用unicloud-db组件的getTemp请求无需额外处理,查询结果会直接被设置到unicloud-db组件内
            console.log('notice', res.result.dataList[1]); // 不使用unicloud-db组件的getTemp请求需要自行处理返回值
          })
          .catch(err => {
            console.error(err)
          })
        // uniCloud.database().collection('test').get()
      }
    }
  }
</script>

<style>
</style>
# MongoDB aggregation operation
The JQL API supports the use of aggregation operations to read data. For the aggregation operations, please refer to Aggregate Operations
Example: Take 20 random pieces of data with status equal to 1
const db = uniCloud.database()
const res = await db.collection('test').aggregate()
.match({
  status: 1
})
.sample({
  size: 20
})
.end()
# Update operator (rename or delete field)
Added in HBuilderX 3.5.1, JQL database management supports the use of update operators
The update operator can be used when performing an update. For example, rename the field (rename), delete the field (remove), etc. After the table structure is changed, use the JQL manager of HBuilderX to perform data changes.
db.command.rename renames fields:
db.collection('test').update({
	field_to_rename: db.command.rename('final_field_name') // 将field_to_rename重命名为final_field_name
})
db.command.remove removes fields:
db.collection('test').update({
	field_to_remove: db.command.remove() // 删除field_to_remove字段
})
Notice
- Only available in JQL database manager in HBuilderX 3.5.1+
- Support batch incoming rename or delete commands
- After using the update operator, all data validation operations will be completely skipped, that is, no matter how the data range rules are configured in the schema, they will not take effect. Therefore, the update operator should not be mixed with ordinary data addition, deletion and modification.
# DBSchema
DB Schema is a specification for data structures defined based on the JSON format.
It has many important functions:
- Describe existing data formats. You can read the purpose of each table and field at a glance.
- Set data operation permissions (permission). What kind of roles can read/write what data is configured here.
- Set the acceptable format (validator) of the field value field. For example, it cannot be empty and must conform to the specified regular format.
- Set the default value of the data (defaultValue/forceDefaultValue), such as the current server time, current user id, etc.
- Set the mapping relationship (foreignKey) between the fields of multiple tables, and directly query multiple tables as a virtual joint table, which greatly simplifies the joint table query.
- Automatically generate form maintenance interfaces based on schemas, such as creating new pages and editing pages, and automatically process validation rules.
These tools greatly reduce the developer's development workload and duplication of effort.
**DB Schema is closely related to JQL. Mastering JQL is inseparable from reading DB Schema document. **
**Comments are used in the example below. In actual use, the schema is a standard json file and cannot use comments. **Full attribute reference schema field
{
  "bsonType": "object", // 表级的类型,固定为object
  "required": ['book', 'quantity'], // 新增数据时必填字段
  "permission": { // 表级权限
    "read": true, // 读
    "create": false, // 新增
    "update": false, // 更新
    "delete": false, // 删除
  },
  "properties": { // 字段列表,注意这里是对象
    "book": { // 字段名book
      "bsonType": "string", // 字段类型
      "permission": { // 字段权限
        "read": true, // 字段读权限
        "write": false, // 字段写权限
      },
      "foreignKey": "book._id" // 其他表的关联字段
    },
    "quantity": {
      "bsonType": "int"
    }
  }
}
# permission
The data permission configuration function in DB Schema is very powerful, please read Data Permission Control of DB Schema
After configuring the permissions of DB Schema, the query writing method of JQL, especially the aggregation query writing method of non-JQL, has some restrictions, as follows:
- When aggregation is not used, the collection method needs to be followed by a where method. The conditions passed in the where method must meet the permission control rules
- When using aggregation, the aggregate method needs to be followed by a match method, and the conditions in this match method must meet the permission control rules
- When using lookup, you can only use spliced sub-query (let+pipeline mode). This restriction is mainly because it is necessary to ensure that the query conditions are also passed in when accessing the table that requires lookup, that is,
db.command.pipeline in the pipeline parameter The match method after ()also needs to be restricted like the match in the previous one - The project and field after the match and where used to verify the permissions above are used to determine which fields need to be accessed in this query (if not, it will be considered to be accessing all fields), and the accessed field list will be used to confirm the use of Those field permission checks. The project and field in this position can only use the whitelist mode
- If
db.command.expris used in the match and where used to verify permissions above, then the conditions inside the expr method will be ignored during permission verification, and the entire expr method will be converted into a method that does not generate any conditions. A special expression for intersection, see the example below for specific performance
schema permission configuration example
// order table schema
{
  "bsonType": "object", // 表级的类型,固定为object
  "required": ['book', 'quantity'], // 新增数据时必填字段
  "permission": { // 表级权限
    "read": "doc.uid == auth.uid", // 每个用户只能读取用户自己的数据。前提是要操作的数据doc,里面有一个字段存放了uid,即uni-id的用户id。(不配置时等同于false)
    "create": false, // 禁止新增数据记录(不配置时等同于false)
    "update": false, // 禁止更新数据(不配置时等同于false)
    "delete": false, // 禁止删除数据(不配置时等同于false)
	"count": false, // 禁止对本表进行count计数
  },
  "properties": { // 字段列表,注意这里是对象
    "secret_field": { // 字段名
      "bsonType": "string", // 字段类型
      "permission": { // 字段权限
        "read": false, // 禁止读取secret_field字段的数据
        "write": false // 禁止写入(包括更新和新增)secret_field字段的数据,父级节点存在false时这里可以不配
      }
    },
    "uid":{
      "bsonType": "string", // 字段类型
      "foreignKey": "uni-id-users._id"
    },
    "book_id": {
      "bsonType": "string", // 字段类型
      "foreignKey": "book._id"
    }
  }
}
// book table schema
{
  "bsonType": "object",
  "required": ['book', 'quantity'], // 新增数据时必填字段
  "permission": { // 表级权限
    "read": "doc.status == 'OnSell'" // 允许所有人读取状态是OnSell的数据
  },
  "properties": { // 字段列表,注意这里是对象
    "title": {
      "bsonType": "string"
    },
    "author": {
      "bsonType": "string"
    },
    "secret_field": { // 字段名
      "bsonType": "string", // 字段类型
      "permission": { // 字段权限
        "read": false, // 禁止读取secret_field字段的数据
        "write": false // 禁止写入(包括更新和新增)secret_field字段的数据
      }
    }
  }
}
Request example
const db = uniCloud.database()
const dbCmd = db.command
const $ = dbCmd.aggregate
db.collection('order')
  .where('uid == $env.uid && book_id.status == "OnSell"')
  .field('uid,book_id{title,author}')
  .get()
Before performing the database operation, JQL will use the rules configured in the permission to verify the client operation once. If the verification fails this time, it will perform another verification through the database query.
Example 1:
// The news table in the database has the following data
{
  _id: "1",
  user_id: "uid_1",
  title: "abc"
}
// Do the following configuration in the schema corresponding to the news table
{
  "bsonType": "object",
  "permission": { // 表级权限
    "read": true,
    "update": "doc.user_id == auth.uid" // 只允许修改自己的数据
  },
  "properties": {
    "user_id": {
      "bsonType": "string"
    },
    "title": {
      "bsonType": "string"
    }
  }
}
// The user whose user ID is uid_1 uses the following operations on the client side
db.collection('news').doc('1').update({
  title: 'def'
})
At this time, there is only doc._id == 1 in the client condition, and doc.user_id == auth.uid is limited in the schema, so the first pre-verification cannot pass, and a database check will be performed. Whether you have permission to operate. It is found that auth.uid is indeed consistent with doc.user_id, and the above database operations are allowed to be performed.
Example 2:
// The goods table in the database has the following data
{
  _id: "1",
  name: "n1",
  status: 1
}
{
  _id: "2",
  name: "n2",
  status: 2
}
{
  _id: "3",
  name: "n3",
  status: 3
}
// Do the following configuration in the schema corresponding to the news table
{
  "bsonType": "object",
  "permission": { // 表级权限
    "read": "doc.status > 1",
  },
  "properties": {
    "name": {
      "bsonType": "string"
    },
    "status": {
      "bsonType": "int"
    }
  }
}
// The user can use the following operations on the client side to pass the first verification without triggering the database check
db.collection('goods').where('status > 1').get()

// If the user uses the following operations on the client side and fails to pass the first verification, a database check will be triggered (the principle is roughly to use name == "n3" && status <= 1 as a condition to perform a query, if there is a result It is considered that there is no permission to access, just understand, no need to go deep)
db.collection('goods').where('name == "n3"').get()

// If the user uses the following operations on the client side and fails to pass the first verification, a database check will be triggered, and the database check will also fail.
db.collection('goods').where('name == "n1"').get()
# action
Notice:
Starting from HBuilderX 3.6.11, it is recommended to use database trigger instead of action cloud function. The following are reserved for backward compatibility only
The role of action is to trigger an additional piece of cloud function logic when executing a database operation initiated by the front end. It is an optional module. Actions run in cloud functions and can use all interfaces in cloud functions.
When a front-end way of operating the database cannot fully meet the requirements, and still needs to execute some cloud functions in the cloud, when the front-end initiates database operations, the cloud is required to execute this call at the same time through the db.action("someactionname") method. The action of someactionname. You can also specify that certain actions must use the specified action in the permission rule, such as "action in ['action-a','action-b']", to achieve more flexible permission control.
Note that the action method is a method of the db object, which can only follow db, not collection()
- Correct:
db.action("someactionname").collection('table1') - Error:
db.collection('table1').action("someactionname")
Try not to use global variables in actions. If you must use them, make sure you have read and understood the Launch Mode of Cloud Functions
If you use the <unicloud-db> component, this component also has an action attribute, and you can set action="someactionname".
<unicloud-db ref="udb" collection="table1" action="someactionname" v-slot:default="{data,pagination,loading,error}">
Action supports multiple use at a time, such as using db.action("action-a, action-b"), and its execution flow is action-a.before->action-b.before->execute database operation-> action-b.after->action-a.after. Throwing an error in any before link directly enters the after process, and the error thrown in the after process will be passed to the next after process.
Action is a special cloud function that does not occupy the number of cloud functions in the service space.
New action

Each action stores a js file named after the action in the uni-clientDB-actions directory.
In the code of this js file, there are two parts, before and after, which respectively represent before and after the specific operation of the database by JQL.
before is triggered before the database operation is executed, and the code in before is executed before starting to operate the database. Common uses of before:
- Secondary processing of the incoming data from the front end
- Open the database transaction here, in case the operation of the database fails, you can roll it back in after
- Use throw to prevent running
- If the permission or field value range verification does not want to be configured in the schema and validateFunction, you can also do the verification here
after is triggered after the database operation is executed, and the code in after is triggered after JQL operates the database. Common uses of after:
- Secondary processing of the data to be returned to the front end
- Can also handle errors here, rollback database transactions
- Perform secondary operations on the database. For example, after the front-end queries the details of an article, the number of articles read here is +1. Because of the definition in the permission, it is generally necessary to prohibit the front-end operation of the reading number field of the article. At this time, you should pass the action and add 1 to the reading number in the cloud function.
Example:
// The client initiates a request, adds a row of data to the todo table, and specifies the action as add-todo
const db = uniCloud.database()
db.action('add-todo') //注意action方法是db的方法,只能跟在db后面,不能跟在collection()后面
  .collection('todo')
  .add({
    title: 'todo title'
  })
  .then(res => {
    console.log(res)
  }).catch(err => {
    console.error(err)
  })
// An example action file uni-clientDB-actions/add-todo.js
module.exports = {
  // execute before database operation
  before: async(state,event)=>{
    // state is the current database operation state and its format is described below
    // event is the event object passed into the cloud function

    // Before, you can manipulate the newData object on the state to modify the data, for example:
    state.newData.create_time = Date.now()
    // Specify the create_time in the inserted or modified data as Date.now()
    // After doing this, the actual inserted data will become {title: 'todo title', create_time: xxxx}
    // In fact, there is a simpler implementation scheme for this scenario: configure defaultValue or forceDefaultValue in the db schema to automatically process new records and use the current server time
  },
  // Execute after database operation
  after:async (state,event,error,result)=>{
    // state is the current database operation state and its format is described below
    // event is the event object passed into the cloud function
    // error is the error object to perform the operation, if there is no error, the value of error is null
    // result is the result returned by executing command

    if(error) {
      throw error
    }

    // After can perform additional processing on result and return
    result.msg = 'hello'
    return result
  }
}
state parameter description
// The format of the state parameter is as follows
{
  command: {
    // getMethod('where') Get all where methods, the return result is [{$method:'where',$param: [{a:1}]}]
    getMethod,
    // getParam({name:'where',index: 0}) Get the parameter of the first where method, the result is in the form of an array, for example: [{a:1}]
    getParam,
    // setParam({name:'where',index: 0, param: [{a:1}]}) Set the parameters of the first where method. After calling, the actual form of the where method is: where({a:1} )
    setParam
  },
  auth: {
    uid, // 用户ID,如果未获取或者获取失败uid值为null
    role, // 通过uni-id获取的用户角色,需要使用1.1.9以上版本的uni-id,如果未获取或者获取失败role值为[]
    permission // 通过uni-id获取的用户权限,需要使用1.1.9以上版本的uni-id,如果未获取或者获取失败permission值为[],注意登录时传入needPermission才可以获取permission,请参考 https://uniapp.dcloud.net.cn/uniCloud/uni-id?id=rbac
  },
  // Transaction object, if you need a transaction, you can use state.transaction = await db.startTransaction() in the before action of the action
  transaction,
  // updated or new data
  newData,
  // Accessed collection
  collection,
  // Operation type, possible values 'read', 'create', 'update', 'delete'
  type
}
Notice
- If you need to pass parameters in before and after, it is recommended to mount directly on the state. But do not override the above properties
- It may take a while for the action to take effect on the cloud after it is uploaded, usually about 3 minutes
# JQL depends on public modules and extension libraries
Related documents moved to: schema extension depends on public modules and extension libraries