English
English
# uni-admin framework (formerly uniCloud admin)
# Introduction
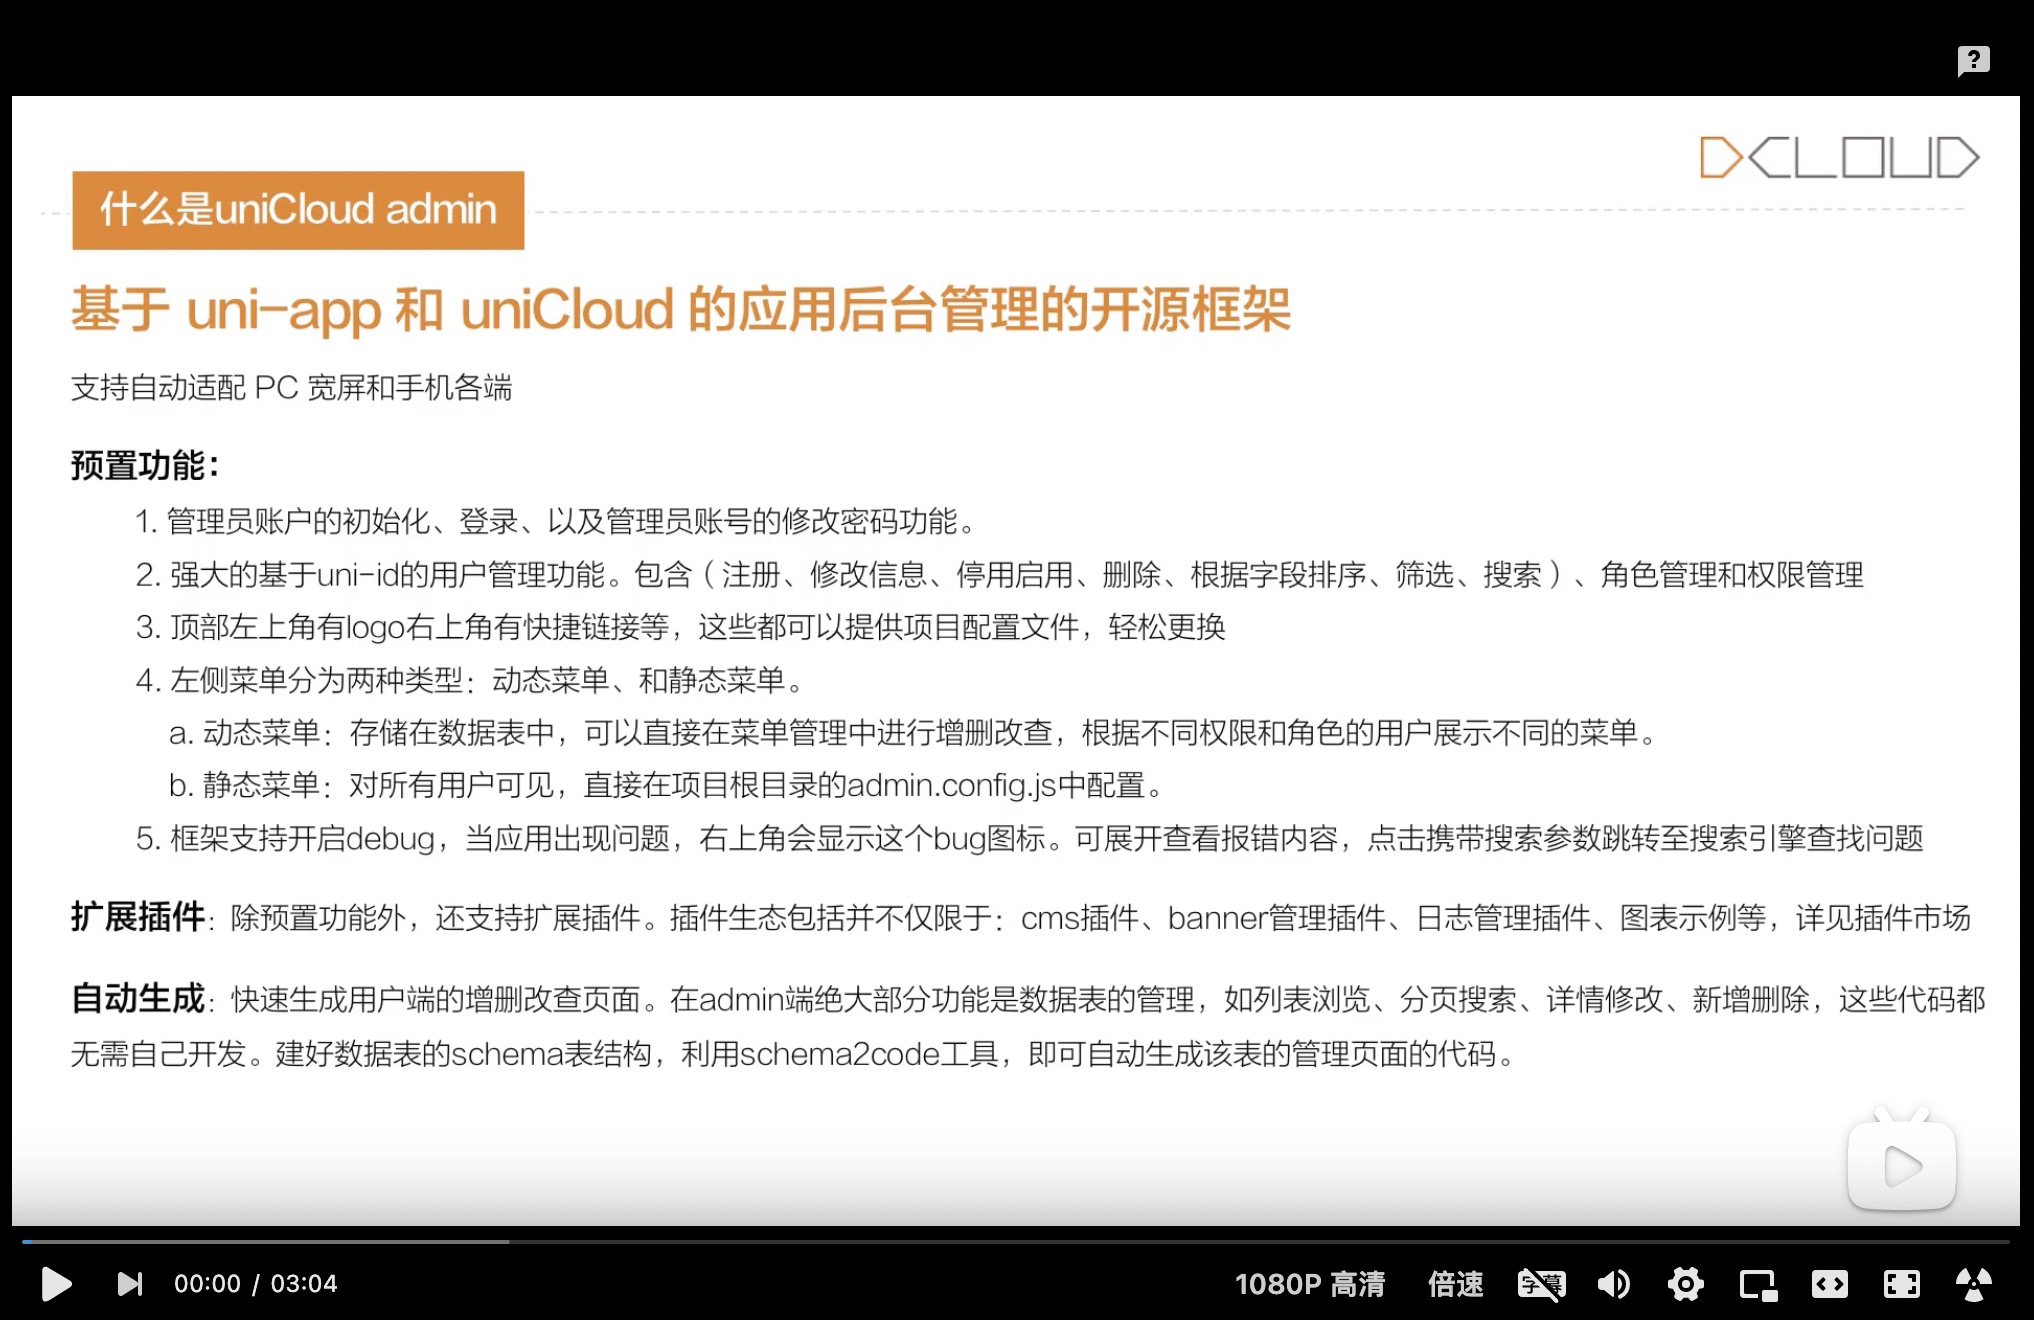
The uni-admin framework is an open source framework for application background management based on uni-app and uniCloud.
For developers of uniCloud, their background management system should use this framework.
- It is based on uni-app's widescreen adaptation, which can automatically adapt to PC widescreen and mobile terminals. Learn about Widescreen Adaptation
- 它基于 uniCloud,是 serverless 的云开发。了解uniCloud
- 它基于 uni-id,使用 uni-id 的用户账户、角色、权限系统。了解uni-id
The official build uni-admin demo site, you can quickly experience uni-admin after logging in.
uni-admin is open source and follows the MIT license, you can download it from Github or [Code Cloud](https://gitee.com/dcloud/uni- admin) to get the source code, or you can quickly download it from DCloud Plugin Market.
# Watch the video, master uni-admin in 15 minutes
问题交流与反馈,请加入:uni-admin交流群
# uni-admin functions
uni-admin has code generation tools for preset functions, plugin ecology and data table management.
With this combination, the development of the management system has become unprecedentedly simple, efficient and low-cost.
- Preset function
- 管理员账户初始化、登录、修改密码
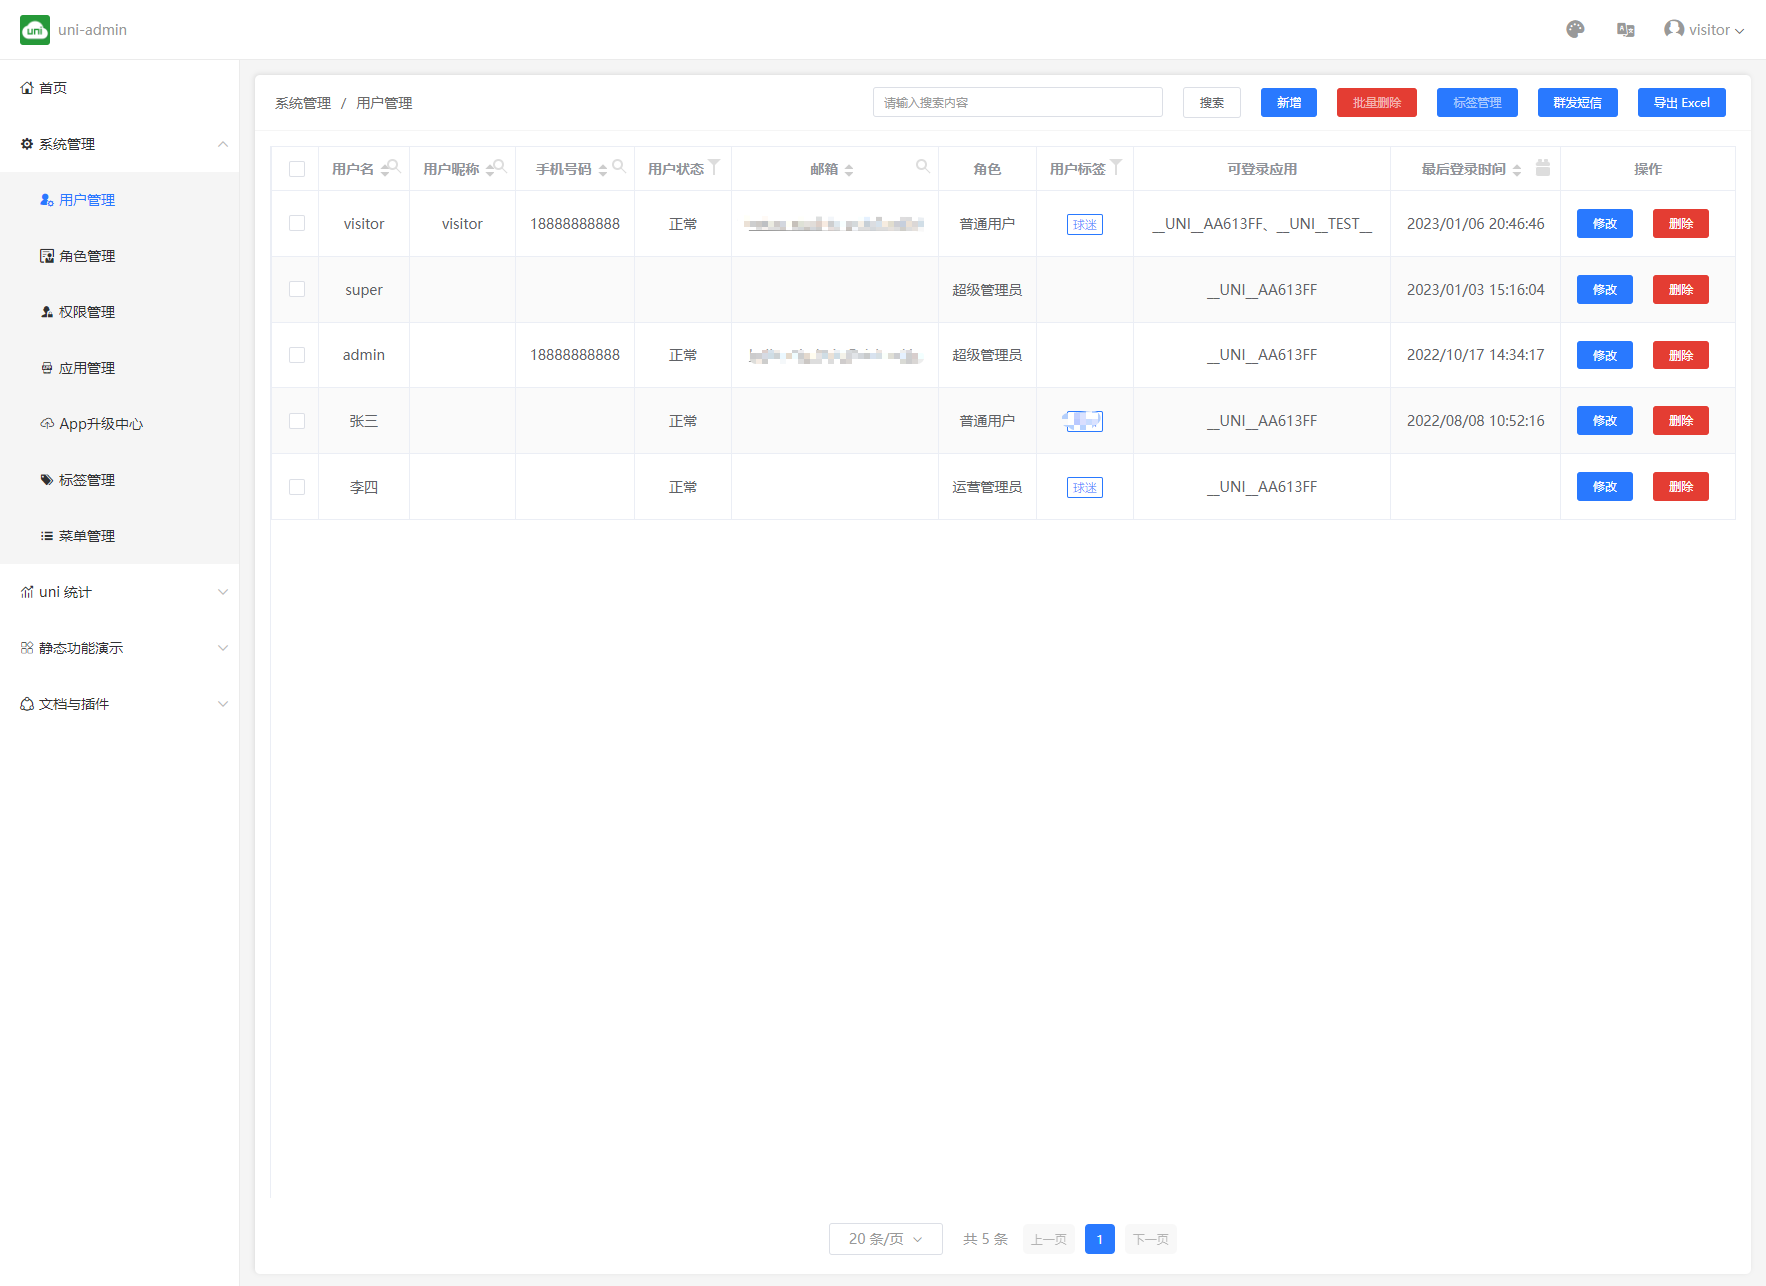
- 基于uni-id的用户管理(注册、修改信息、停用启用、删除)、角色管理、权限管理
- Settings of the top topWindow: such as logo replacement, and some links in the upper right corner are replaced. See the
admin.config.jsfile in the project root directory for details - Menu settings of leftWindow on the left: There are two types of menus, one is dynamic menu, which has business and permission functions; the other is static menu, which does not change according to the role of the logged in user
- The data of the dynamic menu is stored in the database table opendb-admin-menus. Based on the uni-id role permission, the menu can be added, deleted, modified and searched in the menu management
- The debug function in development mode helps developers to detect errors and search for error messages in time, which can be configured in the
admin.config.jsfile
- Built-in uni statistics 2.0
- uni stats 2.0 is an open source, full-end, cloud-integrated statistical platform that is more suitable for uni-app, see statistics document
- No need to develop, tick and issue in the uni statistics of manifest, deploy uni-admin in the uniCloud service space, you can view the report, see the introduction below
- Developers can also customize the management data, customize the display report
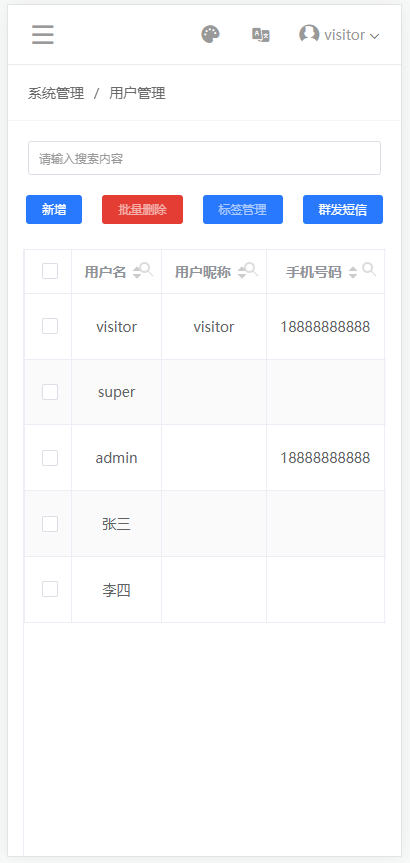
- Support responsive layout
uni-admin supports both PC and mobile. The base module is available in full end, but note that some plugins are not full end.
The PC side is as shown below:
The mobile terminal is as follows:
- Extensions
- uni-admin supports plug-in ecology, including cms plug-in, banner management plug-in, log management plug-in, chart examples, etc. For details, see [plug-in market](https://ext.dcloud.net.cn/?cat1=7&cat2=74&orderBy= UpdatedDate)
- Code generation tool for data table management
- For data table management, such as list browsing, paging search, detail modification, addition and deletion, these codes do not need to be developed by yourself. After building the schema table structure of the data table, using the schema2code tool, the code of the management page of the table can be automatically generated. For details, see schema2code
uni-admin is a complete open source uni-app project, any engineer familiar with uni-app can develop extended functions by themselves.
- Skin change function uni-admin 2.1.7+
uni-admin comes with two skins:
default blue skin
Switchable green soft skin:
If you need to modify the skin color, you can modify it in the
uni.scssfile in the root directory of the uni-admin project: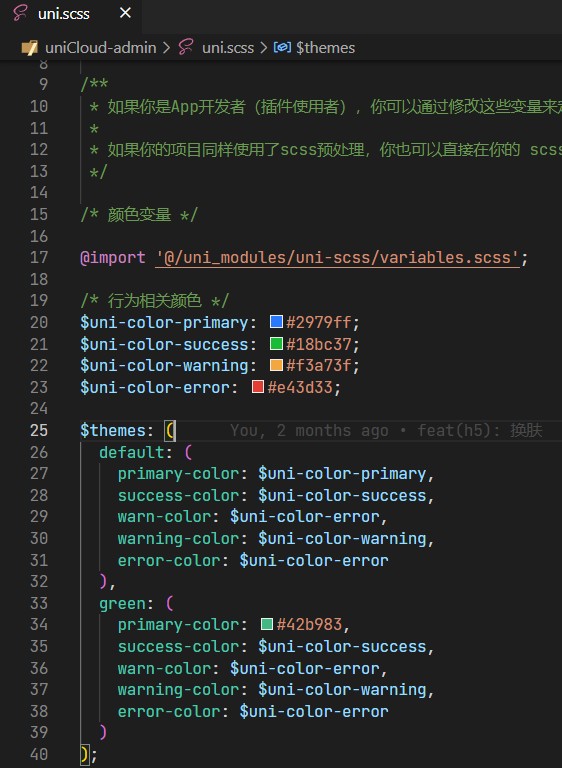
If you need to add skin, the following steps are examples:
在
uni.scss文件的$themes属性中新增一个键值blue的配置: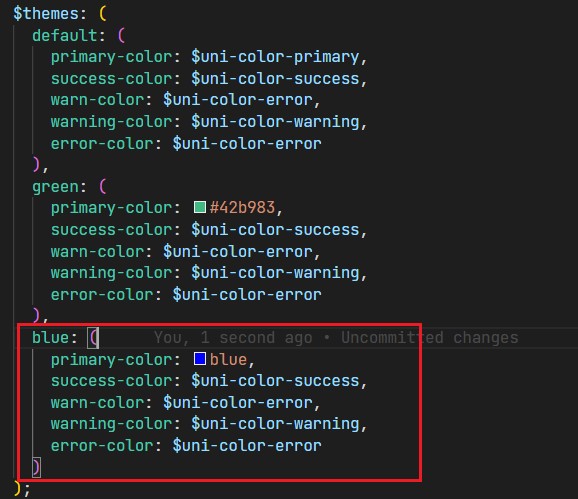
修改项目根目录的
admin.config.js文件,添加以下内容,注意:value的值需要与$themes中新增主题的键值保持一致: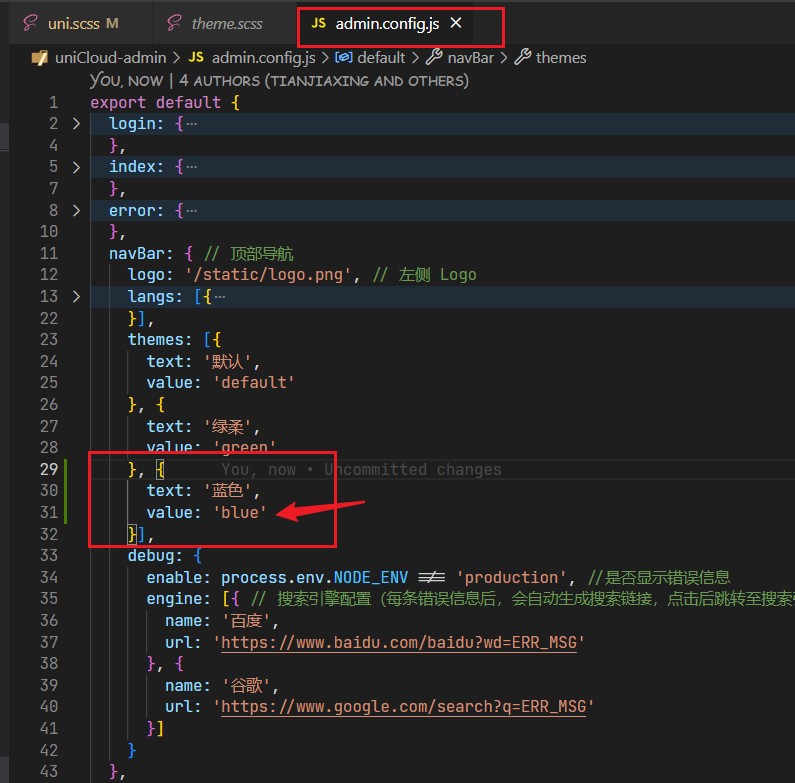
Re-run to the web to view the effect
# Instructions for use
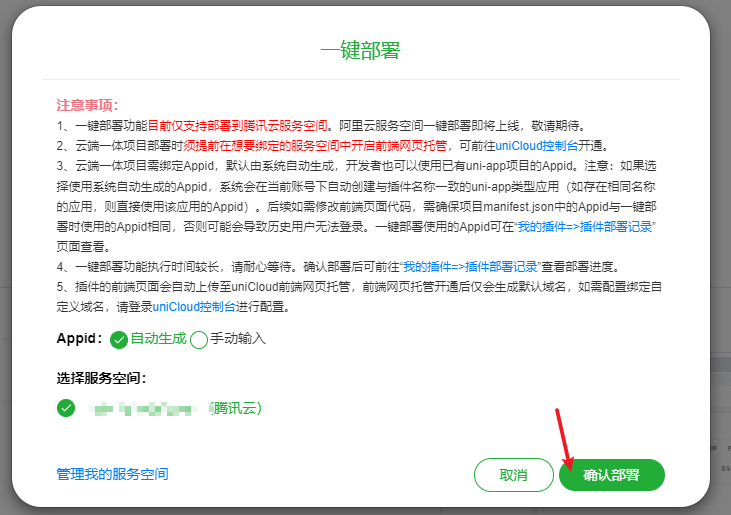
# One-click deployment
uni-admin's "one-click deployment" will automatically upload cloud functions, create a database, compile and upload the front-end page to the front-end web hosting, help you generate a website with one click and automatically deploy uni statistics; if you need to modify it in HBuilderX Customize the code, and then you can choose Manual Deployment to import the project source code to HBuilderX.
- In the plug-in market, click one-click to deploy the plug-in to uniCloud
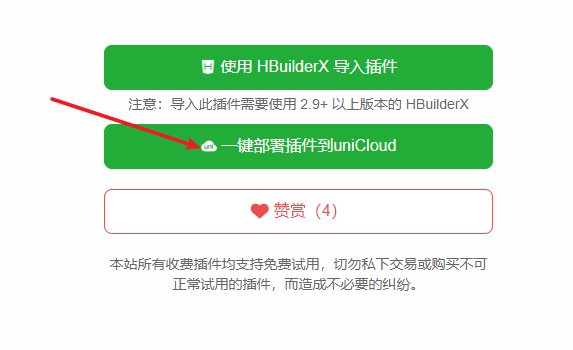
- Select a service space (currently only support the selection of Tencent Cloud service space, and you cannot be a collaborator, you need to log in with the account of the space creator)
If you need to deploy in Alibaba Cloud space, please use the Manual Deployment method
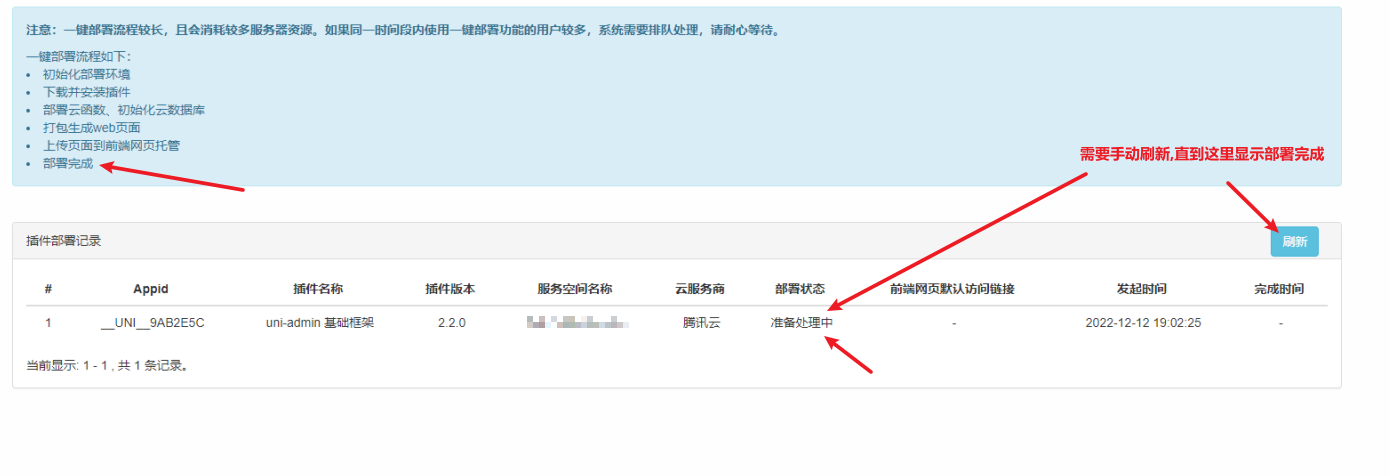
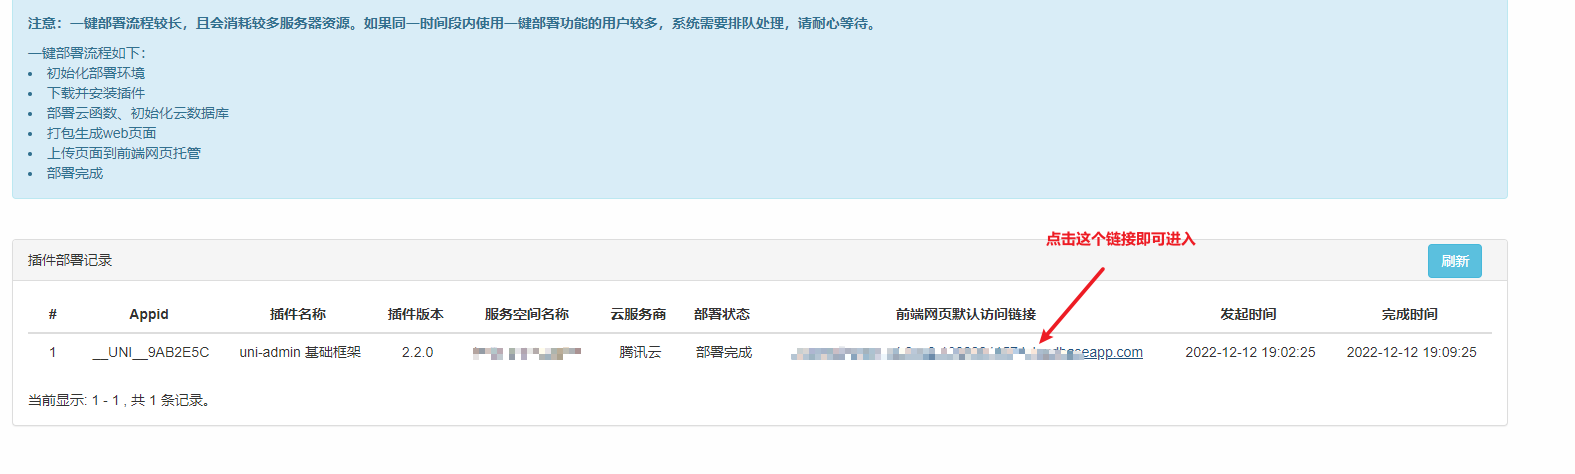
- Refresh this page every few minutes and click Refresh until it prompts that the deployment is complete.
- After the deployment is complete, click the default access link on the front-end webpage to access uni-admin
# Manual deployment
When you need to use uni-admin for development, you need to use manual deployment to import the source code into HBX for development.
# create
HBuilderX Create a new uni-app project in version 3.0+, select the uni-admin project template, as shown below
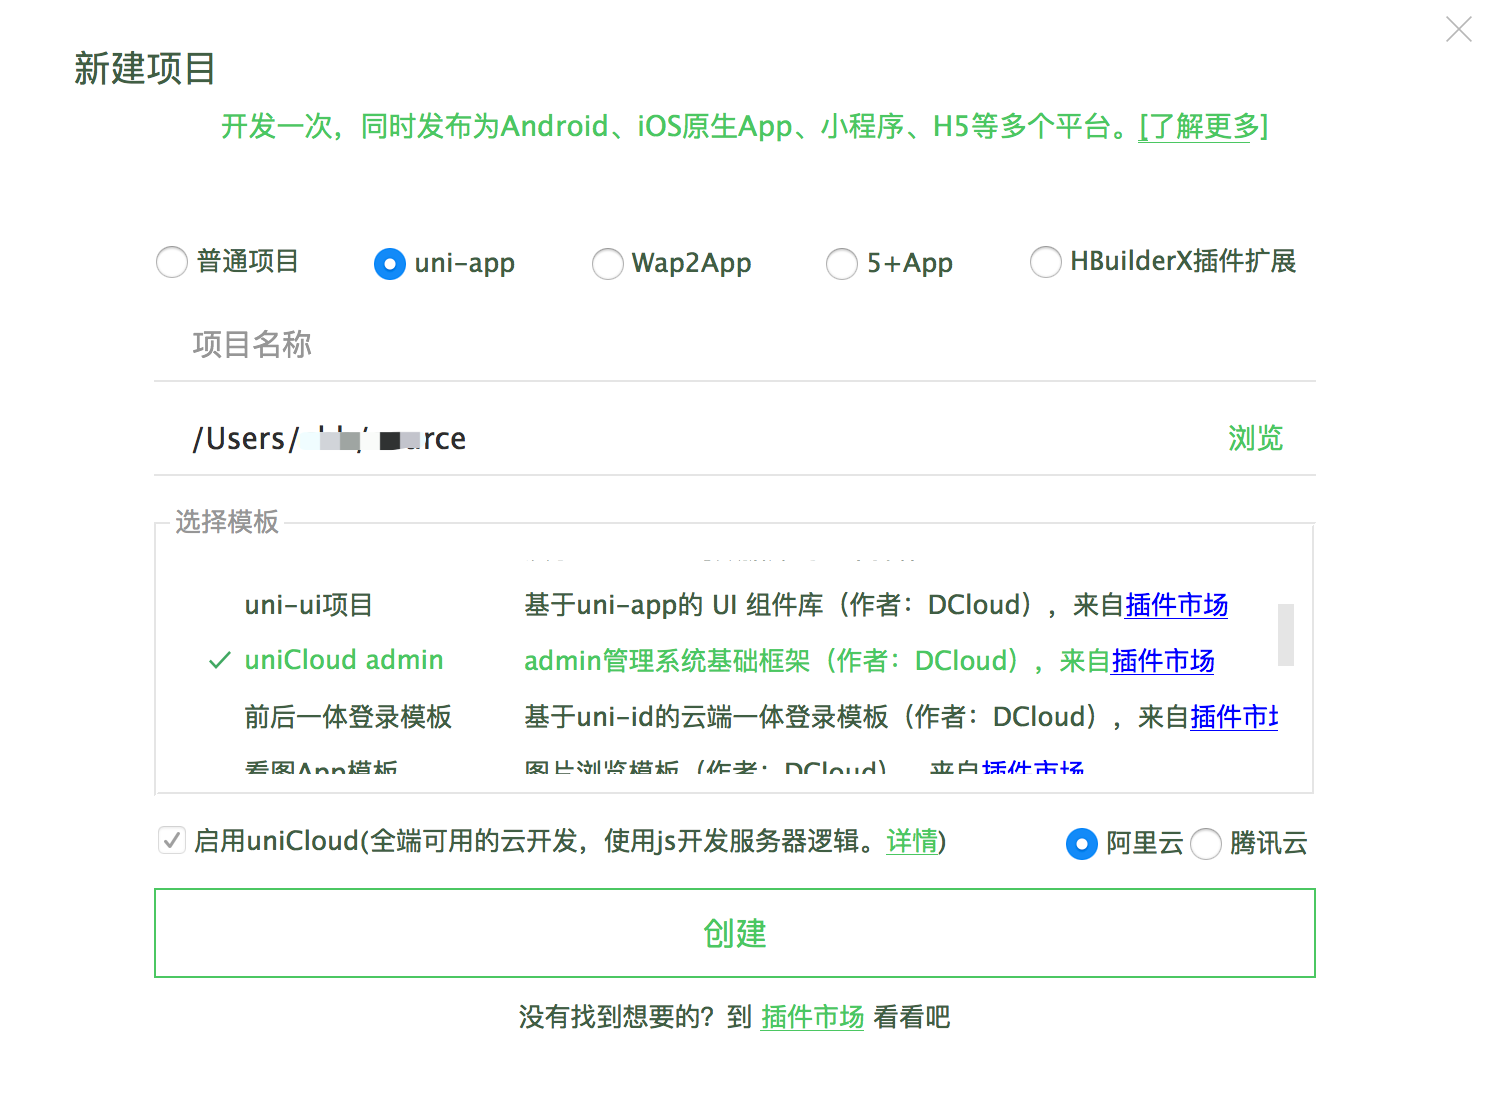
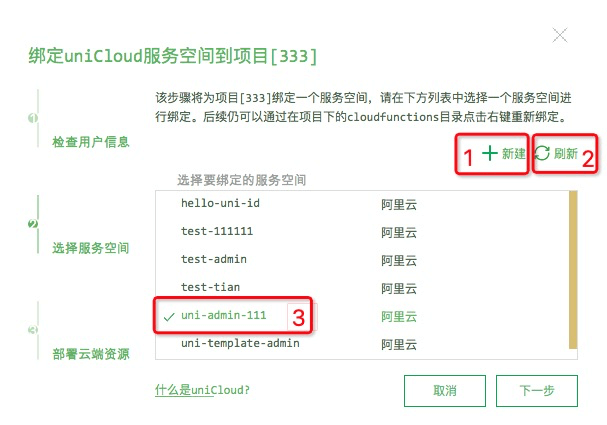
After the creation is complete, you can follow the cloud service space initialization wizard to initialize the project, create and bind the cloud service space
# run
- Enter the admin project
- In the
uniCloud/cloudfunctions/common/uni-config-center/uni-id/config.jsonfile, fill in your ownpasswordSecretfield (the key used to encrypt password storage) andtokenSecretfield ( In order to generate the key required for the token, it is also possible to skip this item during the test) - Right-click the uniCloud directory and run the cloud service space initialization wizard to initialize the database and upload and deploy cloud functions (if the cloud service space has been created and bound, skip this step)
- Click Run [Ctrl+r / cmd+r] on the HBuilderX toolbar -> Run to browser. If you are connecting to the local cloud function debugging environment, you can not upload the cloud function in the previous step, but the database still needs to be initialized.
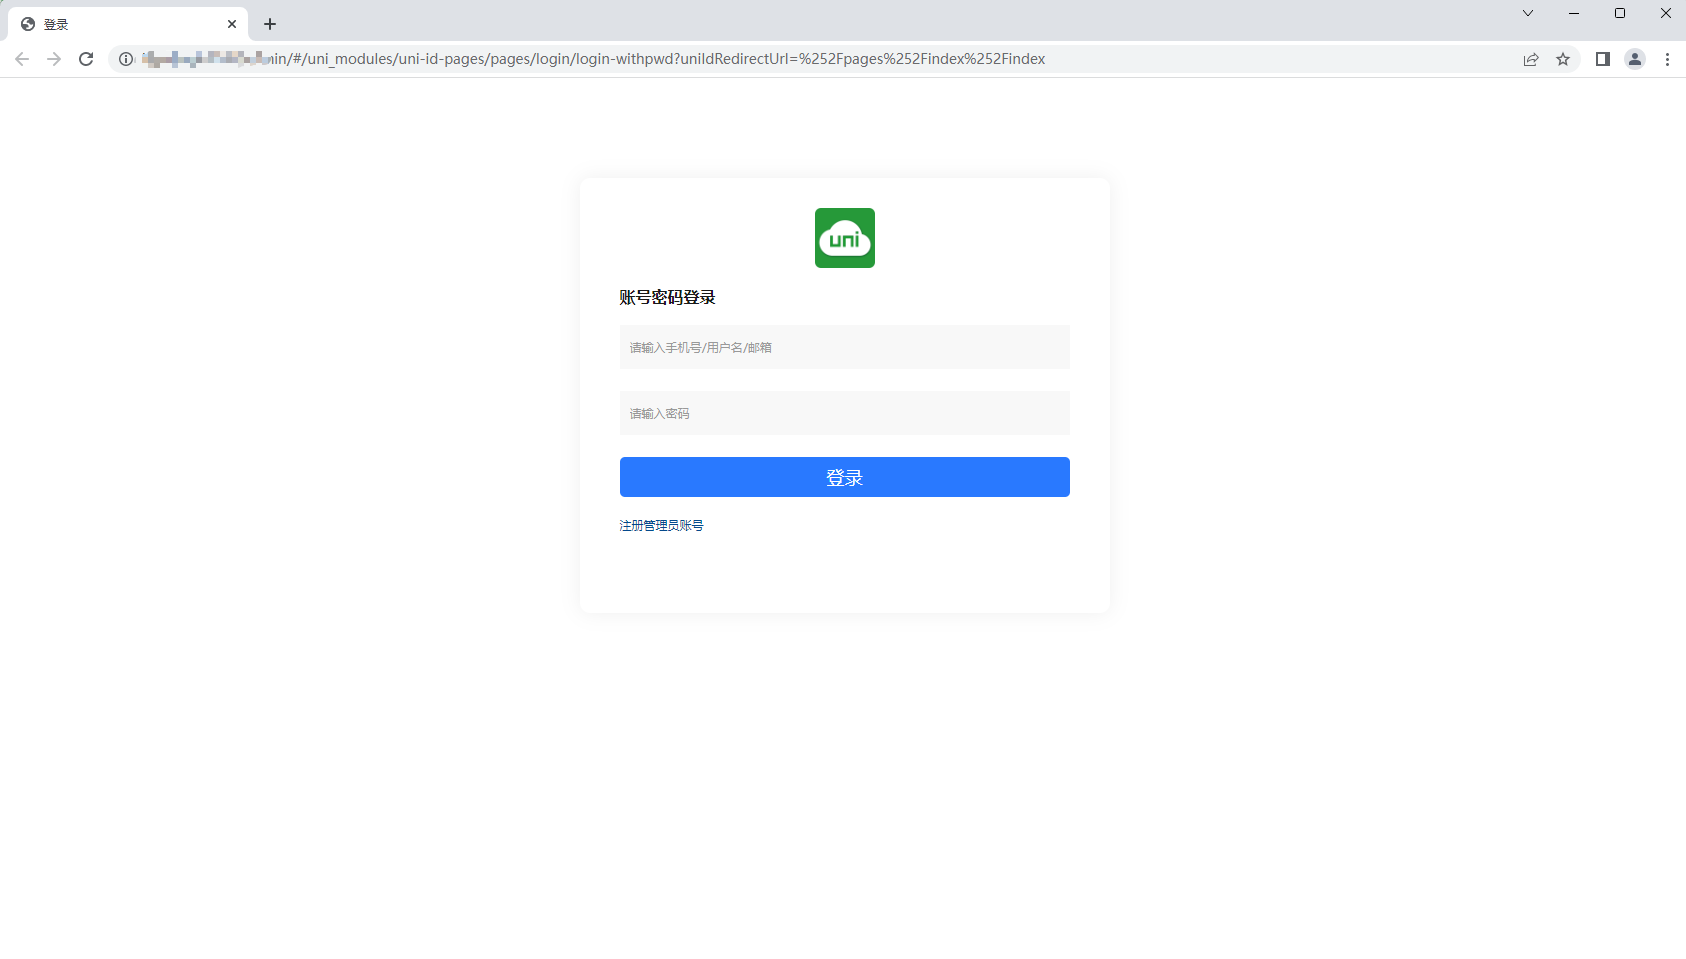
- From the bottom of the login page after startup, enter the Create Administrator page (only one administrator account registration is allowed)
Notice:
- The browser fails to connect to the Internet and reports
request: fail. You need to go to theCross-domain configurationof the cloud service space to configure a cross-domain domain name, and a port is required. See details - If you have never been in contact with uniCloud, you cannot directly get started with uni-admin. It is recommended to read the concept introduction and quick start chapters of the uniCloud documentation first. See details
# Directory Structure
┌── cloudfunctions                      # 云函数
├── common
│   │── admin-icons.css                 # admin-icons 图标样式
│   │── theme.scss                      # 换肤功能样式
│   │── uni.css                         # 公共样式
│   └── uni-icons.css                   # icon样式
├── components                          # 自定义组件
├── js_sdk                              # js sdk
│   └── uni-stat
│       └── util.js                     # uni统计相关工具方法
├── pages                               # 页面
│   │── index                           # 首页
│   │── login                           # 登录页
│   │── system                          # 系统管理
│   │   │── app                         # 应用管理
│   │   │── menu                        # 菜单管理
│   │   │── permission                  # 权限管理
│   │   │── role                        # 角色管理
│   │   │── tag                         # 标签管理
│   │   └── user                        # 用户管理
│   └── uni-stat                        # uni统计
│       │── channel                     # 渠道(app)
│       │   │── channel.vue             # 页面(下同)
│       │   └── fieldsMap.js            # 字段配置(下同)
│       │── device                      # 设备统计
│       │   │── activity                # 渠道/场景分析
│       │   │   │── activity.vue
│       │   │   └── fieldsMap.js
│       │   │── comparison              # 平台对比
│       │   │   │── comparison.vue
│       │   │   └── fieldsMap.js
│       │   │── overview                # 今日概览
│       │   │   │── overview.vue
│       │   │   └── fieldsMap.js
│       │   │── retention               # 留存
│       │   │   │── retention.vue
│       │   │   └── fieldsMap.js
│       │   │── stickiness              # 粘性
│       │   │   │── stickiness.vue
│       │   │   └── fieldsMap.js
│       │   └── trend                   # 趋势分析
│       │       │── trend.vue
│       │       └── fieldsMap.js
│       │── error                       # 错误分析
│       │   │── error.vue
│       │   └── fieldsMap.js
│       │── event                       # 事件分析
│       │   │── event.vue
│       │   └── fieldsMap.js
│       │── index                       # 统计首页
│       │   │── index.vue
│       │   └── fieldsMap.js
│       │── page-ent                    # 入口页
│       │   │── page-ent.vue
│       │   └── fieldsMap.js
│       │── page-res                    # 受访页
│       │   │── page-res.vue
│       │   └── fieldsMap.js
│       │── scene                       # 场景值(小程序)
│       │   │── scene.vue
│       │   └── fieldsMap.js
│       └── user                        # 用户统计
│           │── activity                # 渠道/场景分析
│           │   │── activity.vue
│           │   └── fieldsMap.js
│           │── comparison              # 平台对比
│           │   │── comparison.vue
│           │   └── fieldsMap.js
│           │── overview                # 今日概览
│           │   │── overview.vue
│           │   └── fieldsMap.js
│           │── retention               # 留存
│           │   │── retention.vue
│           │   └── fieldsMap.js
│           │── stickiness              # 粘性
│           │   │── stickiness.vue
│           │   └── fieldsMap.js
│           └── trend                   # 趋势分析
│               │── trend.vue
│               └── fieldsMap.js
├── static
├── store                               # vuex
├── windows
│   │── component                       # 项目中使用的组件
│   │── leftWindow.vue                  # 左侧窗口(菜单栏)
│   └── topWindow.vue                   # 顶部窗口(导航栏)
├── admin.config.js                     # 系统配置(配置导航,菜单等)
├── App.vue
├── main.js
├── mainfest.json
├── pages.json
├── postcss.config.js                   # postcss 配置(浏览器兼容性)
└── uni.scss
# login page
For the first use, you can create a super administrator through the link at the bottom of the login page (only one creation is allowed). This interface will determine that if there is a user with the admin role in the system, it is no longer allowed to add a new super administrator.
Note: After registration, it is recommended to remove this link from the login page
# Column form introduction
After logging in, we will see the following form, which is divided into three parts, topWindow top window (navigation bar), leftwindow left window (menu bar), and the content main form on the right
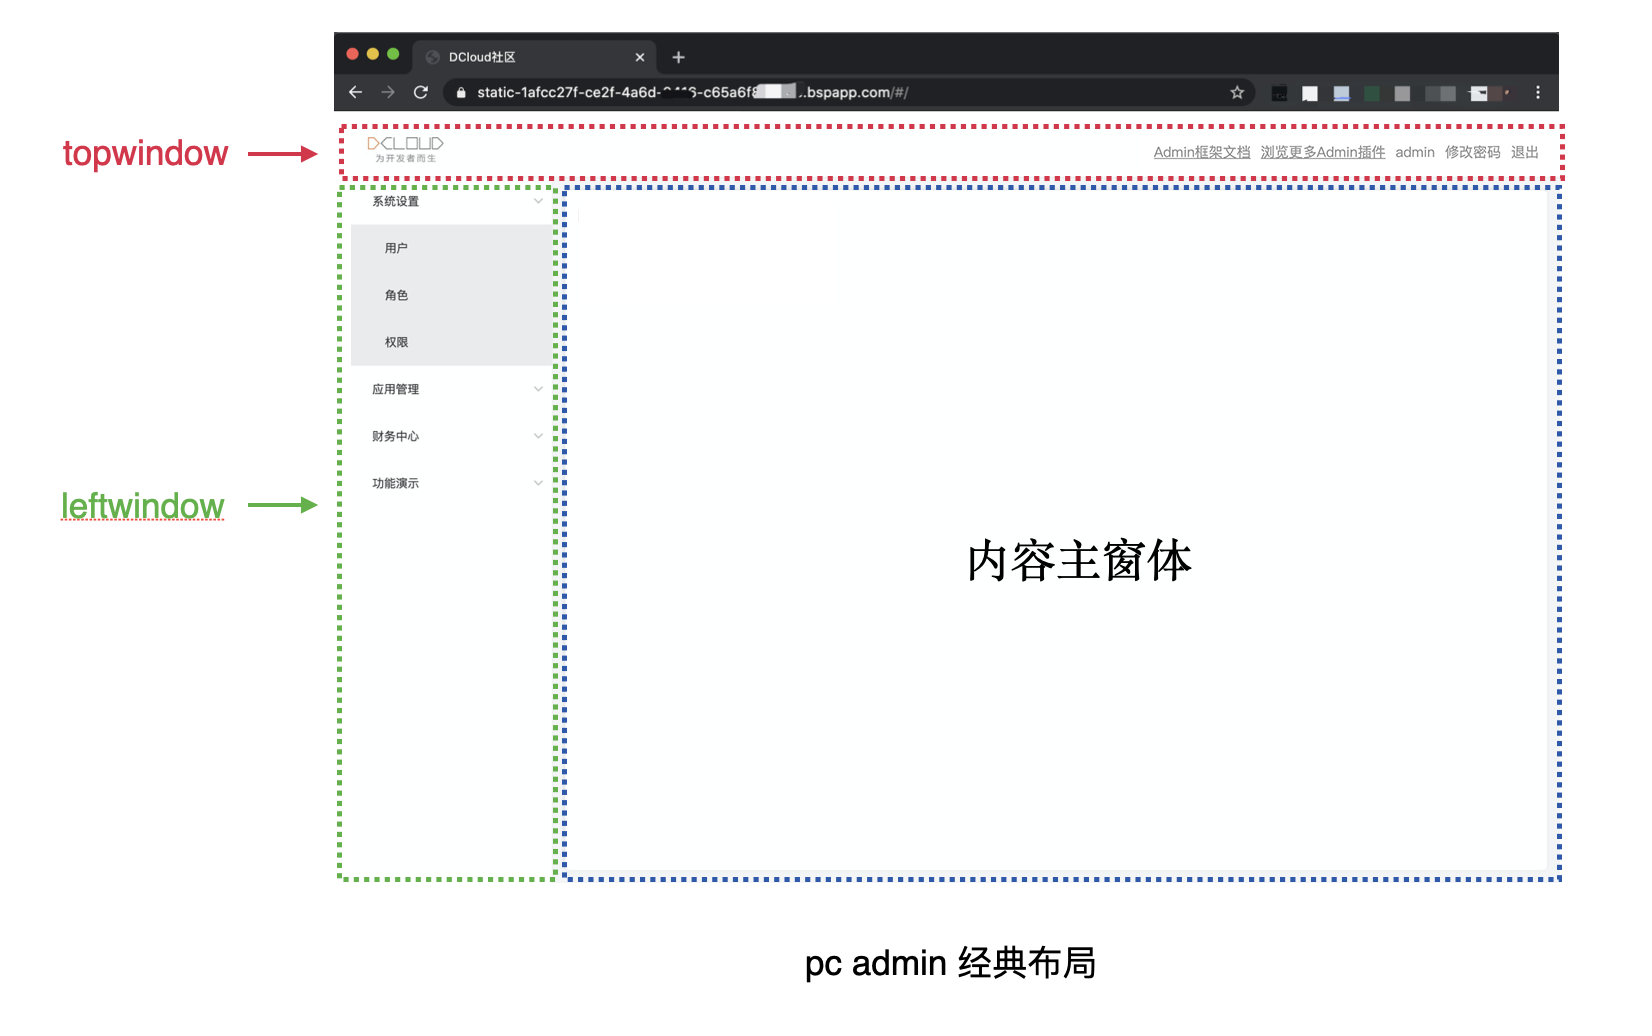
# Top window (navigation bar)
By default, the top window displays the system logo on the left and the navigation links on the right. The effect is as shown above. The display content can be configured through the admin.config.js file in the project root directory. The following is an example:
# admin.config.js
export default {
  navBar: {// 顶部导航
    logo:"https://www.example.com/logo.png",//左侧 Logo
    links: [ // 右侧链接
      {
        text: "Admin框架文档",
        url: "https://uniapp.dcloud.net.cn/uniCloud/admin",
      },
      {
        text: "浏览更多Admin插件",
        url: "https://ext.dcloud.net.cn/?cat1=7&cat2=74",
      }
    ],
  },
};
The style of the top navigation bar can be customized through uni.scss in the project root directory, as follows:
#uni.scss $top-window-bg-color: #fff; /* 背景色 */
$top-window-text-color: #999; /* 文字颜色 */
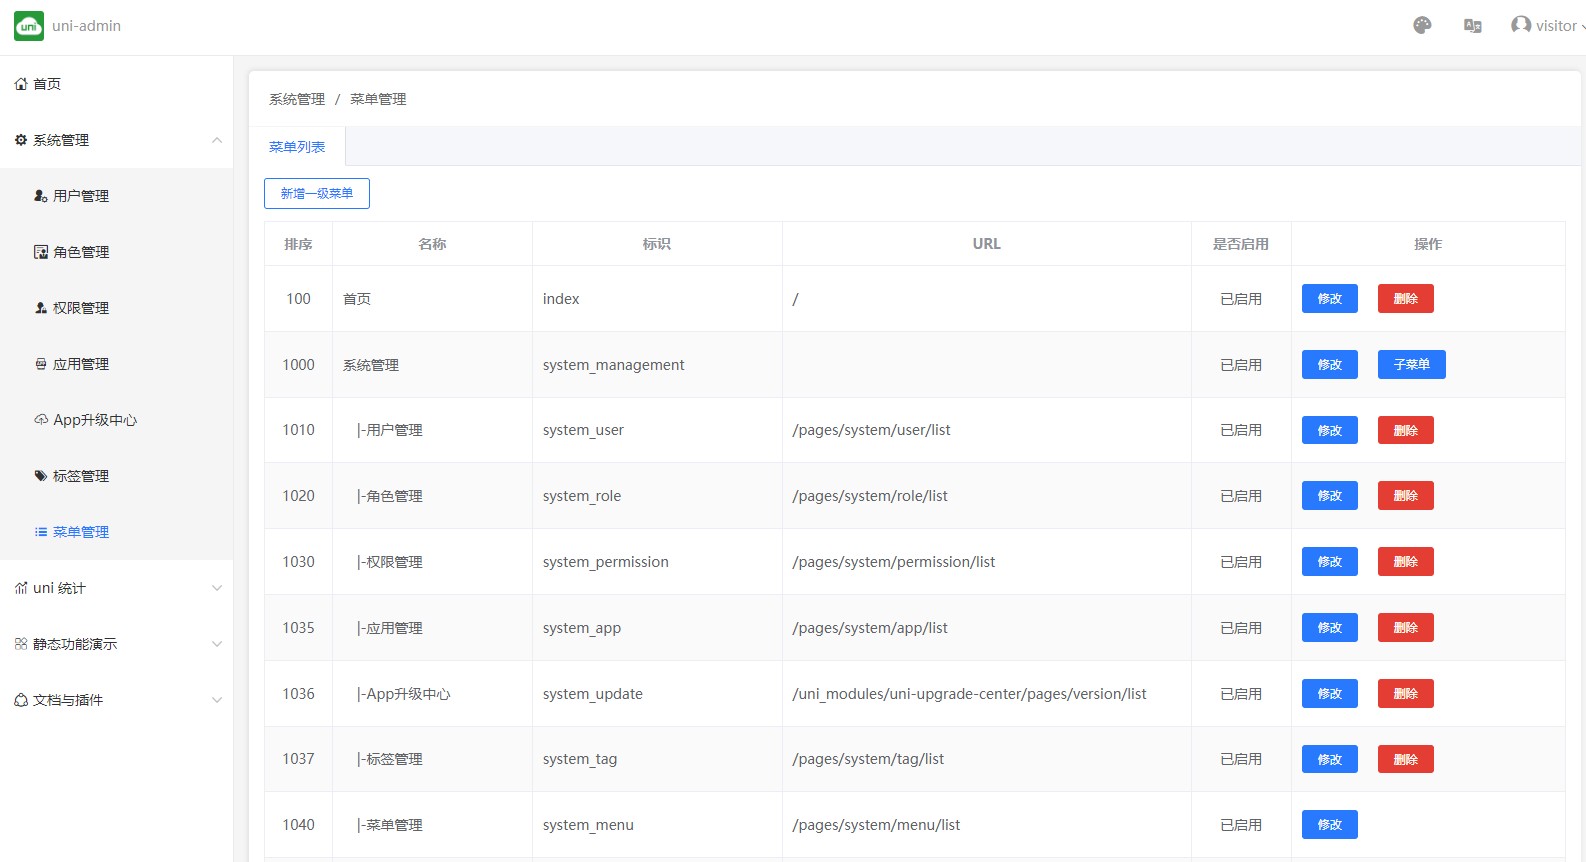
# Left window (menu bar)
There are mainly menus in the left window. The menus include static menus and dynamic menus. It supports infinite level nesting, but it is recommended that the level should not exceed three levels.
Static menu: visible to all logged in user roles
Dynamic menu: automatically generated based on role's permissions
When a user logs in, it will look up the authority that the user has according to the user's role, and then look up the corresponding menu according to the authority
# Manage Static Menu
Configure the sidebar content via admin.config.js, and all users can see the static menu.
export default {
  // Sidebar
  sideBar: {
    // Configure the static menu list (placed below the user's authorized menu list)
    staticMenu: [
      {
        menu_id: "demo",
        name: "静态功能演示",
        icon: "uni-icons-list",
        children: [
          {
            menu_id: "icons",
            name: "图标",
            url: "/pages/demo/icons/icons"
          },
          {
            menu_id: "table",
            name: "表格",
            url: "/pages/demo/table/table"
          }
        ]
      }
    ]
  }
};
# Manage dynamic menus
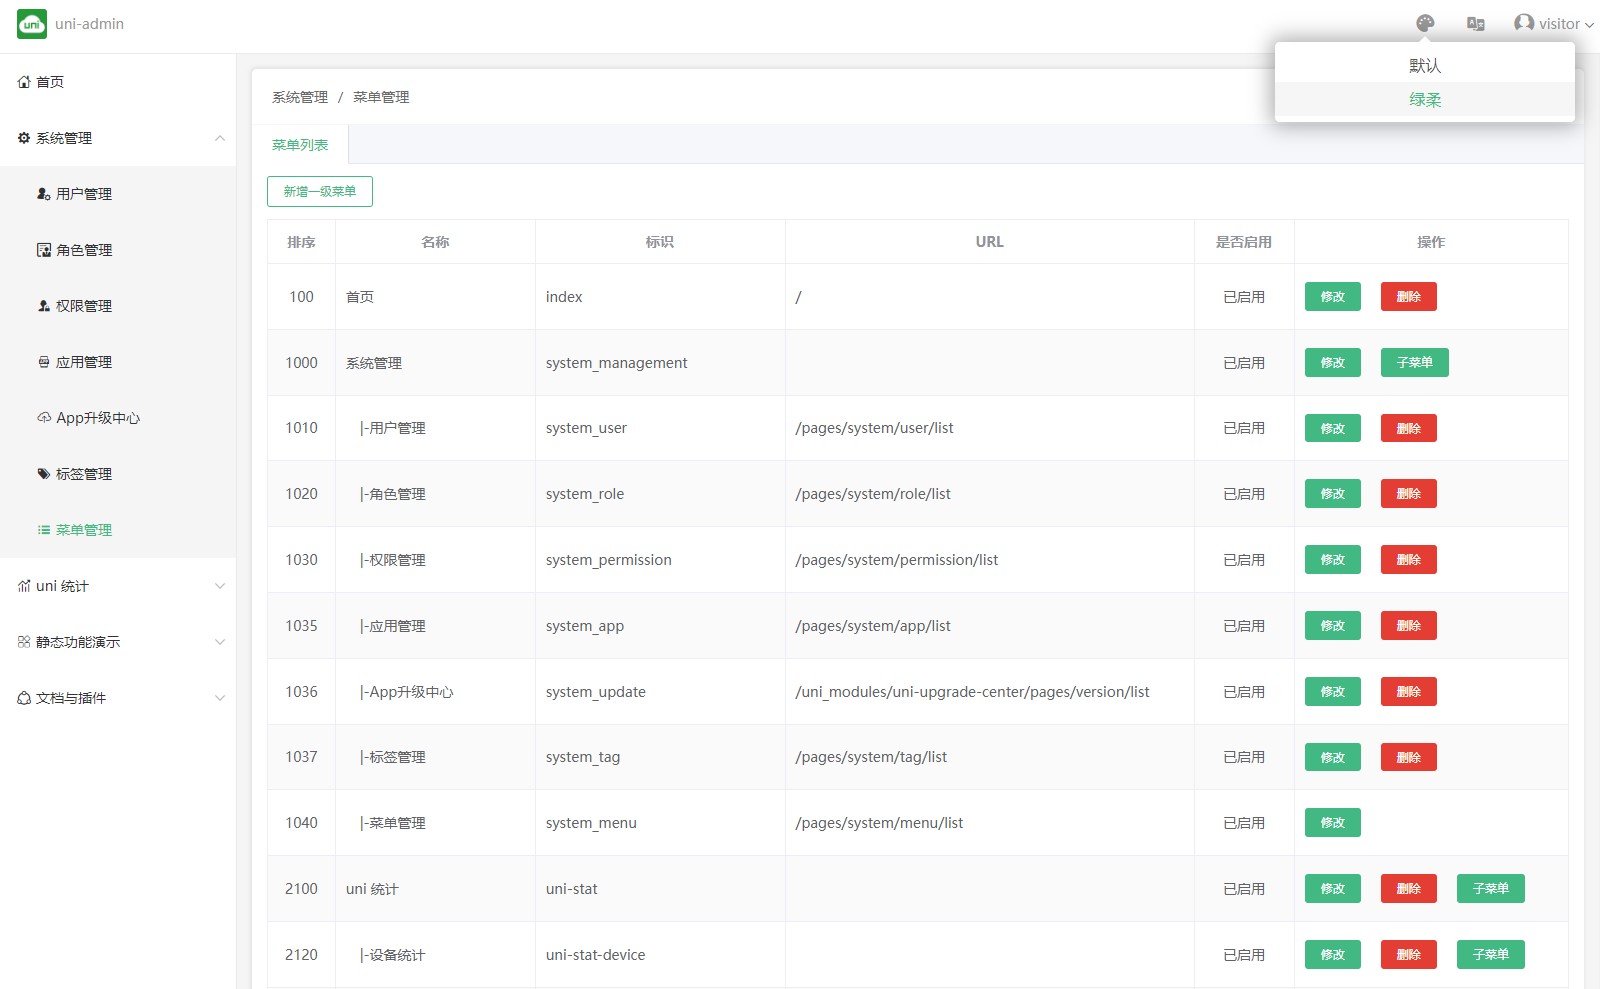
In the left navigation menu, find System Management -> Menu Management, a visual maintenance menu.
Menu data is stored in the opendb-admin-menus table in the cloud database. The table fields are described as follows:
Menu table field explanation:
| Fields | Type | Required | Description |
|---|---|---|---|
| menu_id | Object ID | yes | menu_id |
| name | String | yes | menu text |
| icon | String | no | menu icon |
| url | String | No | The page link corresponding to the menu (only menu items without submenus can be configured) |
| sort | Integer | No | Sort in the same level menu, the larger the array, the later |
| parent_id | String | No | Parent menu Id |
| permission | Array | No | Menu permission (only menu items without submenus can be configured) |
| enable | Boolean | yes | menu state: false disable true enable |
| create_date | Timestamp | yes | creation time |
Add menu records need attention:
Menu items are divided into directory menu and page menu.
- Directory menu item: non-leaf node, click to expand sub-menu, no
URLitself. Theurlfield of at least one submenu must not be empty for the menu to be displayed on the page - Page menu item: leaf node, no submenu, and the
urlfield cannot be empty, clicking this menu item will go to theurlpage. The menu cannot be displayed ifurlis empty.
# Sidebar style management
Configure sidebar styles via uni.scss
When adjusting the menu color, just set the menu background color
$menu-bg-colorand match the text foreground color by yourself
$left-window-bg-color: #fff; /* 左侧窗口背景色 */
$menu-bg-color: #fff; /* 一级菜单背景色 */
$sub-menu-bg-color: darken($menu-bg-color, 8%); /* 二级以下菜单背景色 */
$menu-bg-color-hover: darken($menu-bg-color, 15%); /* 菜单 hover 背景颜色 */
$menu-text-color: #333; /* 菜单前景色 */
$menu-text-color-actived: #409eff; /* 菜单激活前景色 */
# Right window (content main form)
The right window is the main content form, which is consistent with uni-app. The first page the user sees after logging in, the default is the first item in the pages array, which represents the application startup page.
If you want to transfer the page developed by yourself to the home page after login, you can adjust it in page.json.
# Application Management uni-admin 1.9.3+
在进入应用管理后可看到如下界面,点击右上角 新增 按钮可新增一个应用
.png)
Overall interface layout
The information on this page will be used in association with the app release and app upgrade modules, please fill in carefully
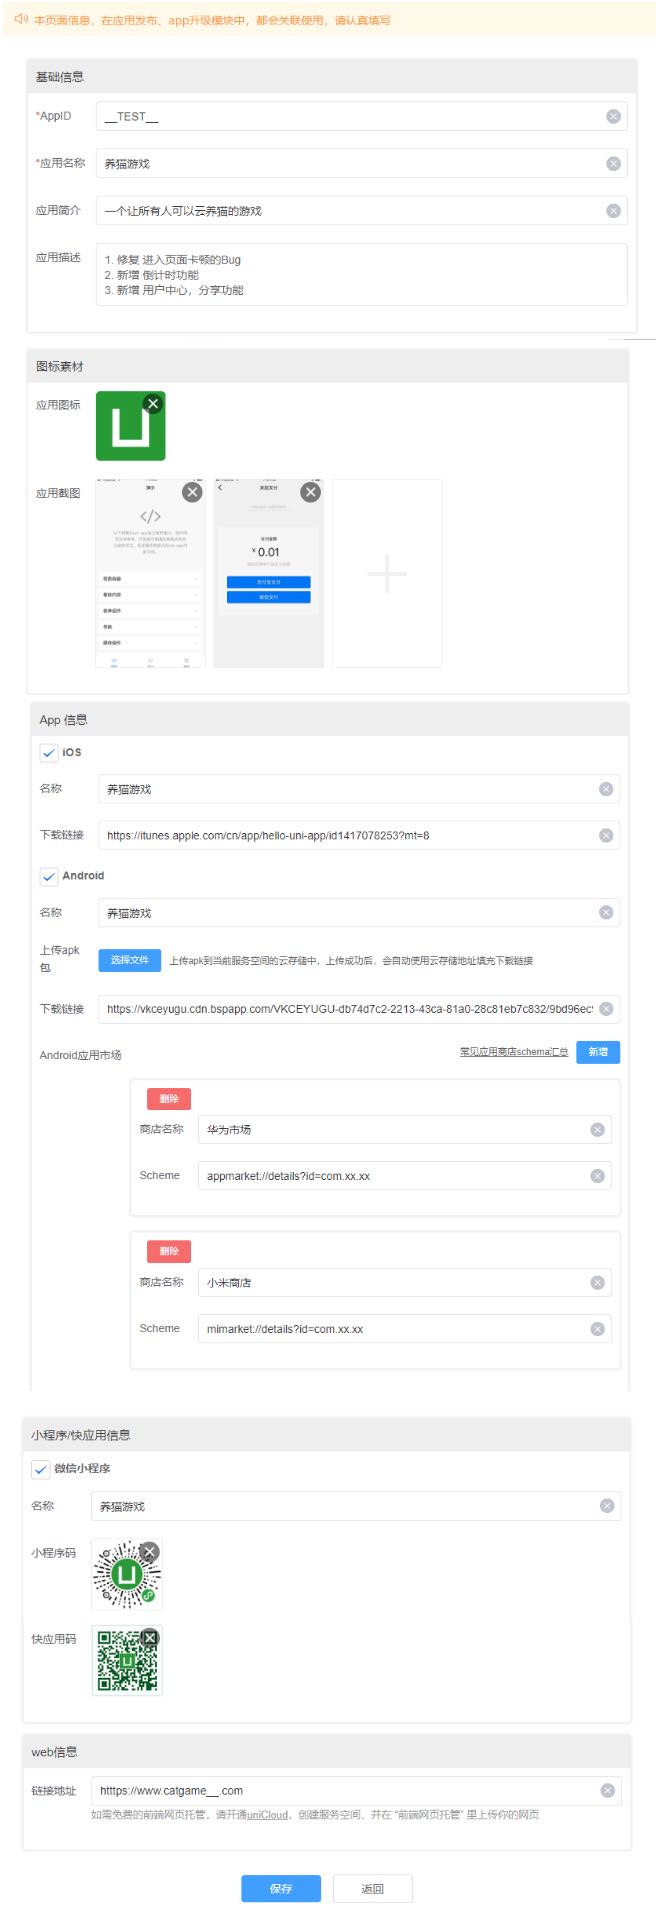
Information description
basic information
AppID: The id of the app to be published. onlyApp Name: the name of the app, it cannot be changed after filling inApp introduction: When generating the release page, it will be displayed under the app name
Picture material
App icon: the icon information of the appApp Screenshot: The actual screen shot information of the app
App Information
- Check it to fill in such information, uncheck the default folding
- Android platform: you can choose to manually fill in or upload the installation package to cloud storage to automatically fill in the download link
Autofill: Only available on edit page. The information of the currently online installation package of the App will be automatically synchronized from theApp Upgrade Center.
Mini Program/Quick App Information
- If checked, it means that this type of information needs to be published. If it is not checked, it will be folded by default.
Quick App: Only after uploading theQuick App Codewill it be displayed on the unified release page
H5
H5: When you fill in the link, it will be displayed on the unified release page
Tips
Add the following configuration in
manifest.json -> Source View:"networkTimeout":{ "uploadFile":1200000 // 单位:ms。 如果不配置,上传大文件可能会超时 }
# uni-portal: unified publishing page uni-admin 1.9.3+
Since uni-admin 1.9.3+ versions, uni-portal is built into the uni-admin project as a built-in plugin of uni-admin.
The uni-admin administrator can quickly generate an application release page after filling in the application information (such as apk download address, applet QR code) in the "Application Management" module.
For more uni-portal introduction, see: uni-portal
# uni-upgrade-center: uni-upgrade-centeruni-admin 1.9.3+
Since uni-admin 1.9.3+ versions, uni-upgrade-center is built into the uni-admin project as a built-in plugin of uni-admin.
After the uni-admin administrator fills in the application information (such as apk download address, applet QR code) in the "Application Management" module, he can enter the upgrade center through the column operation for version management.
For more uni-portal introduction, see: uni-upgrade-center
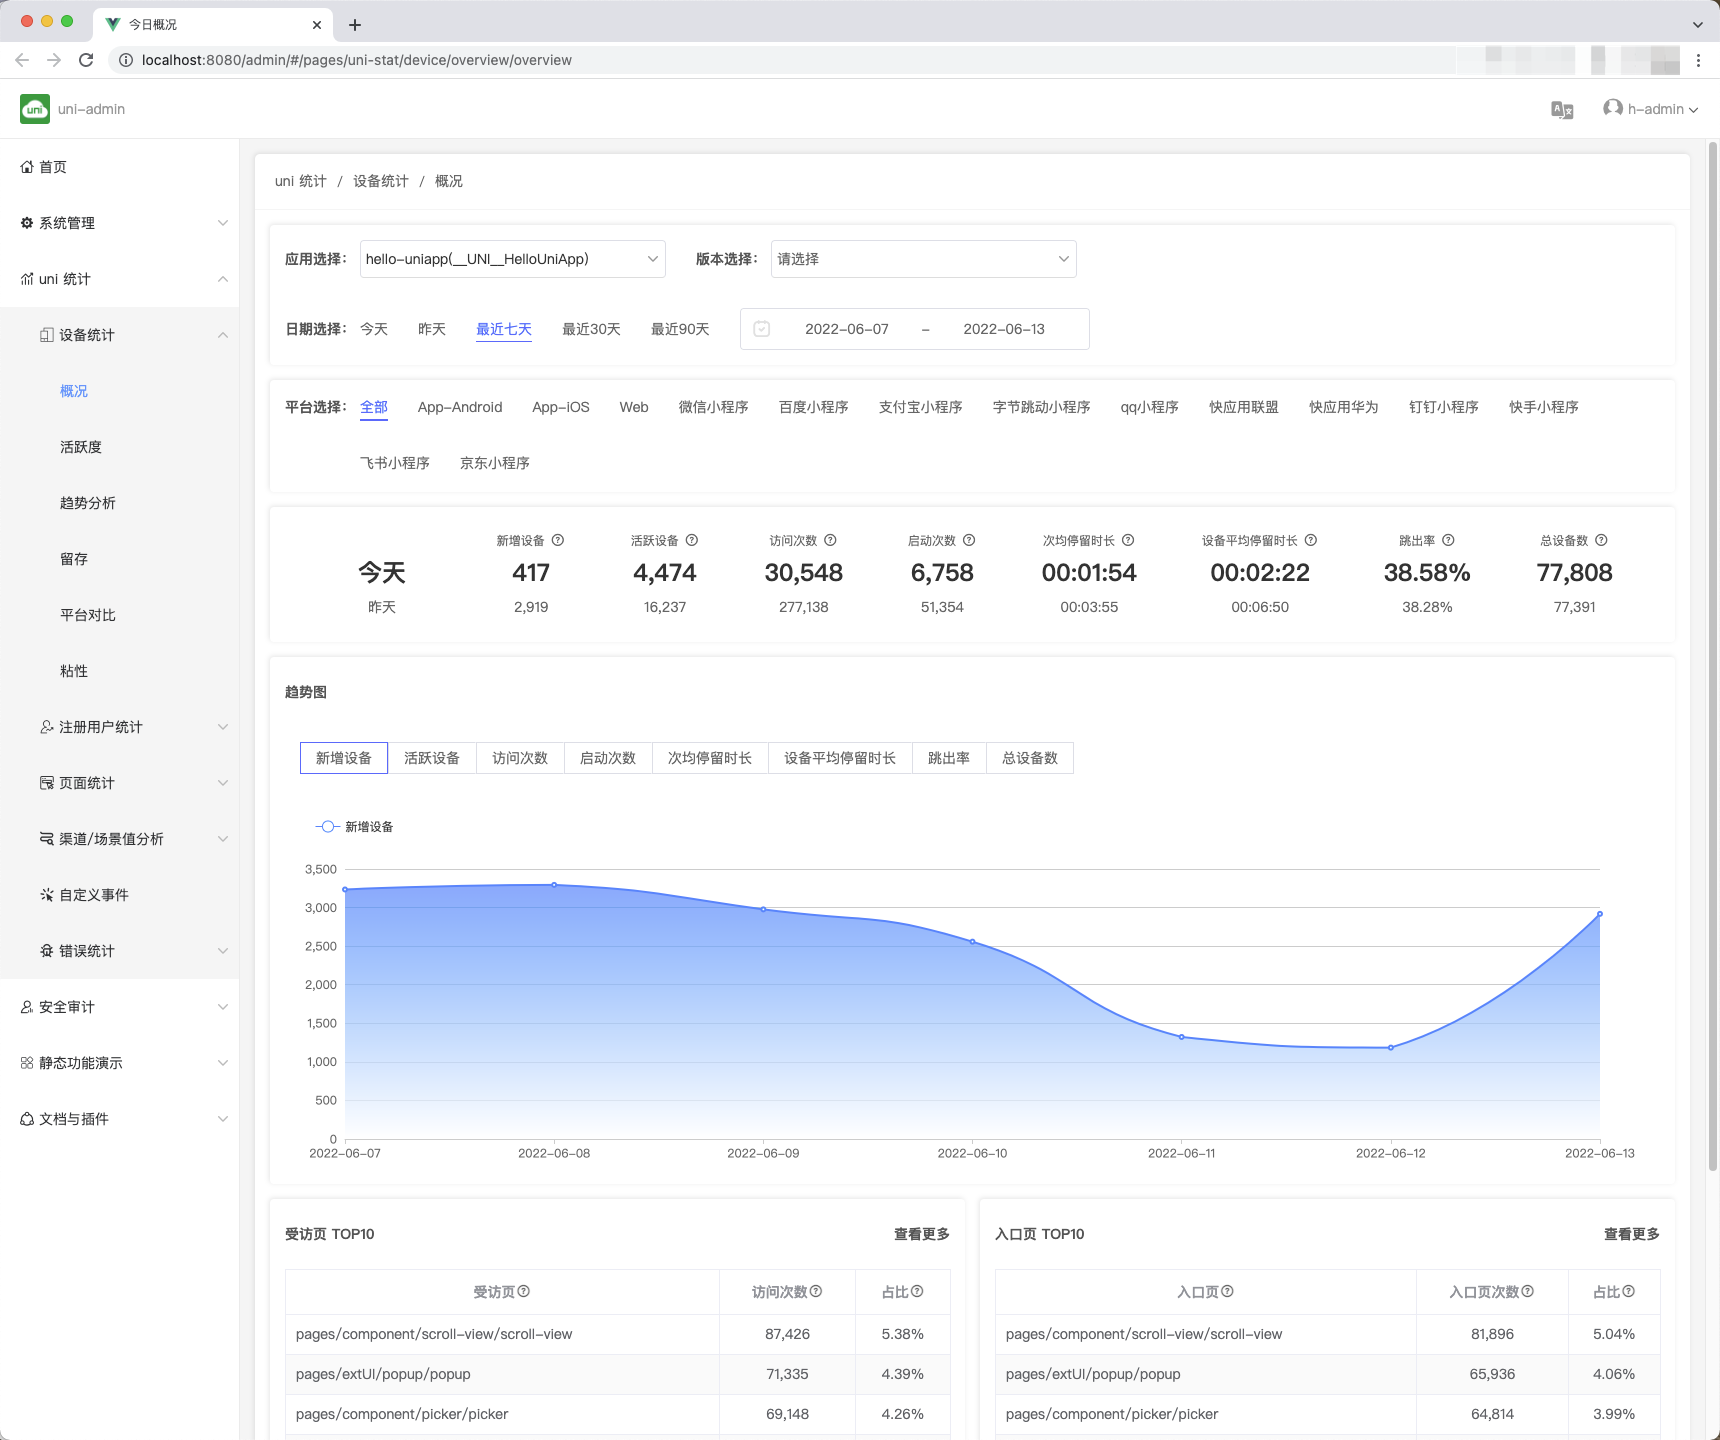
# uni-stats 2.0
uni Statistics 2.0 is an open source, full-end, cloud-integrated statistical platform that is more suitable for uni-app. stat-v2.html)
1. Full end
Full-end traffic statistics, one report can view the operation data of all devices (iOS, Android, Web and various mini programs).
There is no need to connect different SDKs at each end, and there is no need to view data in different reports. At present, there is only one solution known in the market that can see the business panorama in one report.
2. Open source, free, free to customize
Regardless of the SDK that collects data in the front-end, the cloud function that receives data in the cloud, the cloud function that runs batch statistics in the cloud, and the report that displays the statistical results, all these codes are all open source.
Front-end custom management, back-end custom statistical dimensions, free custom reports, everything can be flexibly customized.
3. Private deployment, data automatic control
Using traditional saas statistical products, all data are reported to statistical service providers.
uni Statistics 2.0 is implemented based on uniCloud, cloud functions and statistical data are all hosted in the developer's own service space (Alibaba Cloud or Tencent Cloud optional), and developers have complete control over their own statistical data.
4. The default function is rich
- 设备统计
- 注册用户统计(基于uni-id)
- Page Statistics
- New, active, retained, bounce rate analysis
- Channel analysis: auxiliary channel promotion
- Error statistics and reporting: auxiliary product quality improvement
- Custom management, open source and extensible reports
5. Effective Error Analysis
Traditional statistical platforms do not have js error statistics. Developers cannot know on which devices their js code will report errors.
The error information of uni statistics is more comprehensive, including js front-end errors and app native layer crashes. Help developers make applications better.
6. More suitable for uni-app and uniCloud
uni statistics goes deep into the bottom layer of uni-app and uniCloud framework, and provides many functions that other statistics platforms cannot provide:
- uni-app full-end recognition, no need to connect to different sdk, no need to switch between different reports and accumulate data by yourself
- Automatically identify uni-app routes and automatically capture page titles (based on navigationBar or uni-title components)
- Automatically capture js errors and report native crash logs on the app side
- Compatible with the uni-app channel package packaging system, automatically identifying the channel package
- Based on the uni-id account system, automatically issue new, active and retained reports of registered users (not devices)
- Compatible with uniCloud opendb specification, statistics various data from the server
7. Open Ecosystem
uni statistics is open source and based on the uni-admin plug-in specification provides a plug-in mechanism, and more plug-in authors will provide various statistical plug-ins (such as e-commerce statistics, content statistics, etc.). See Plugin Market
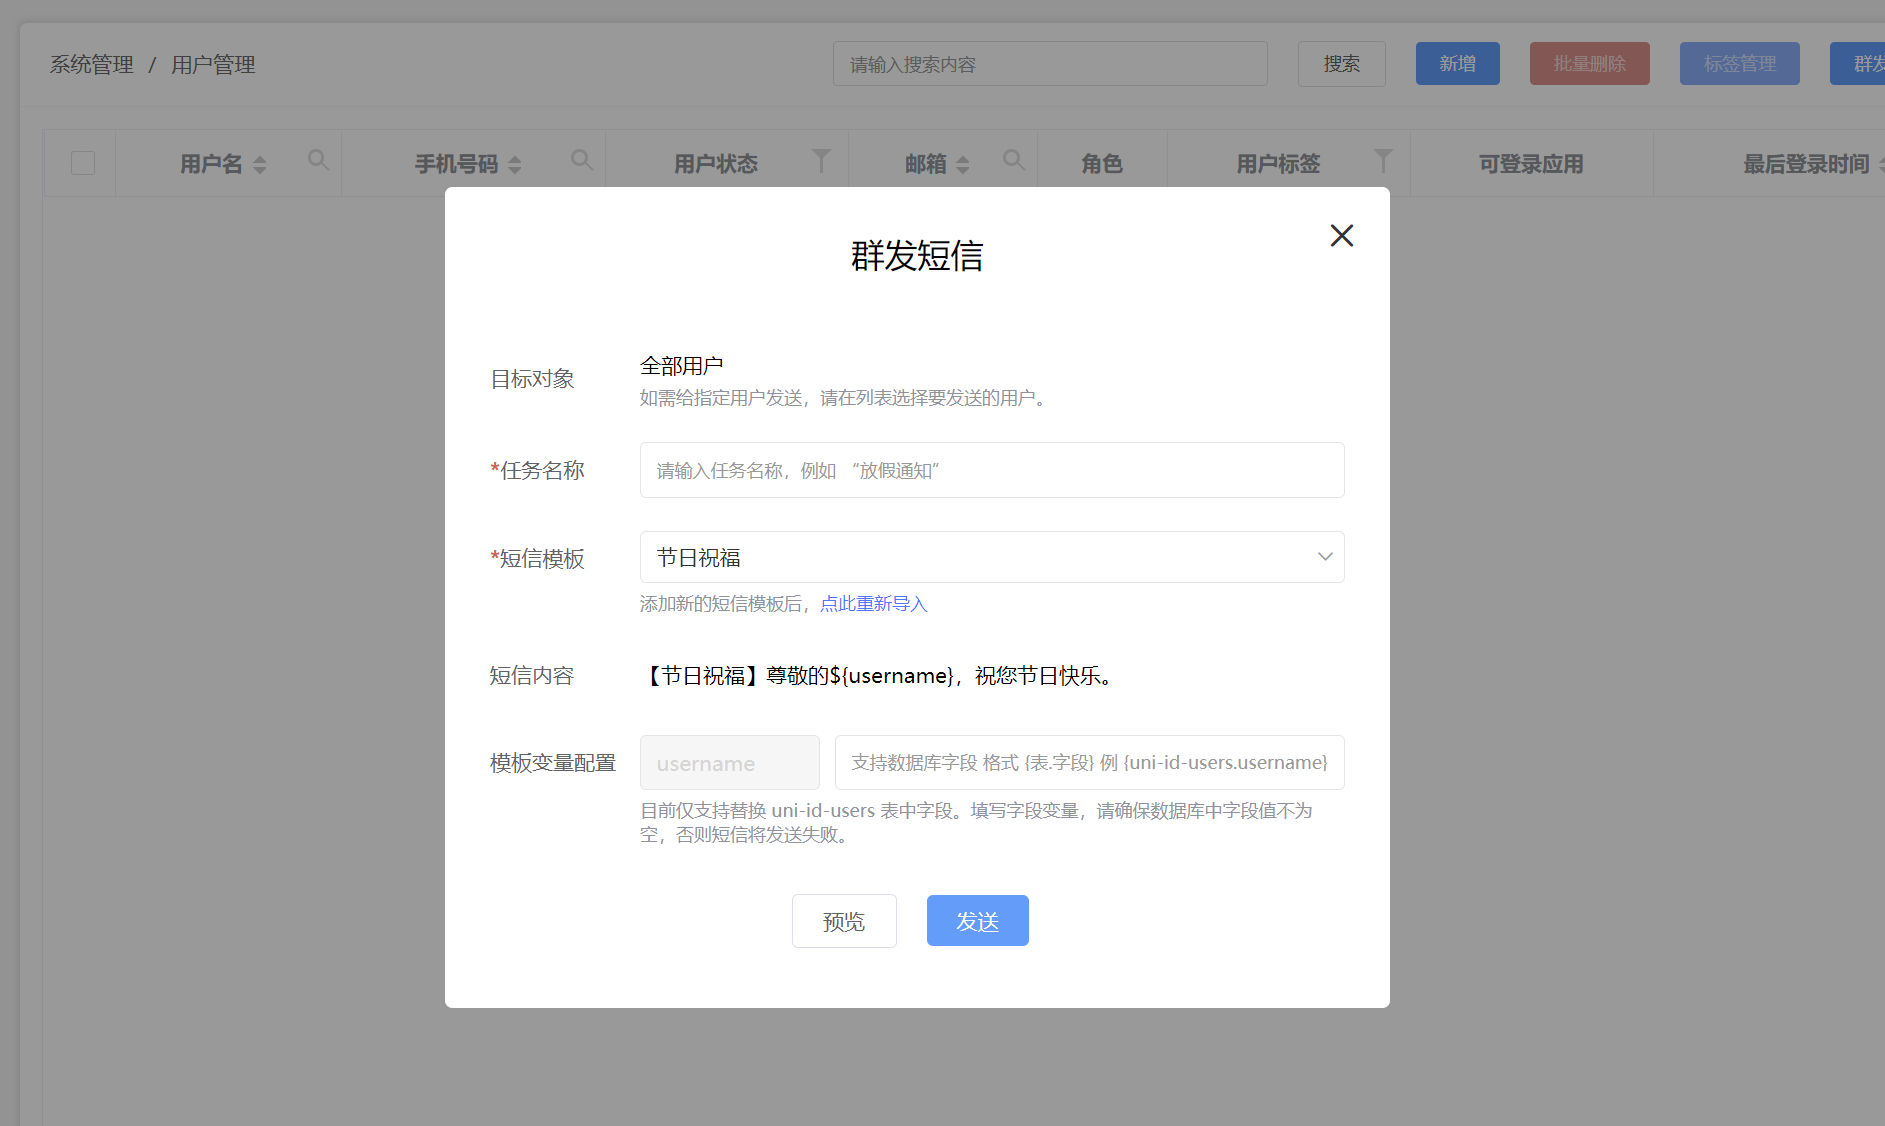
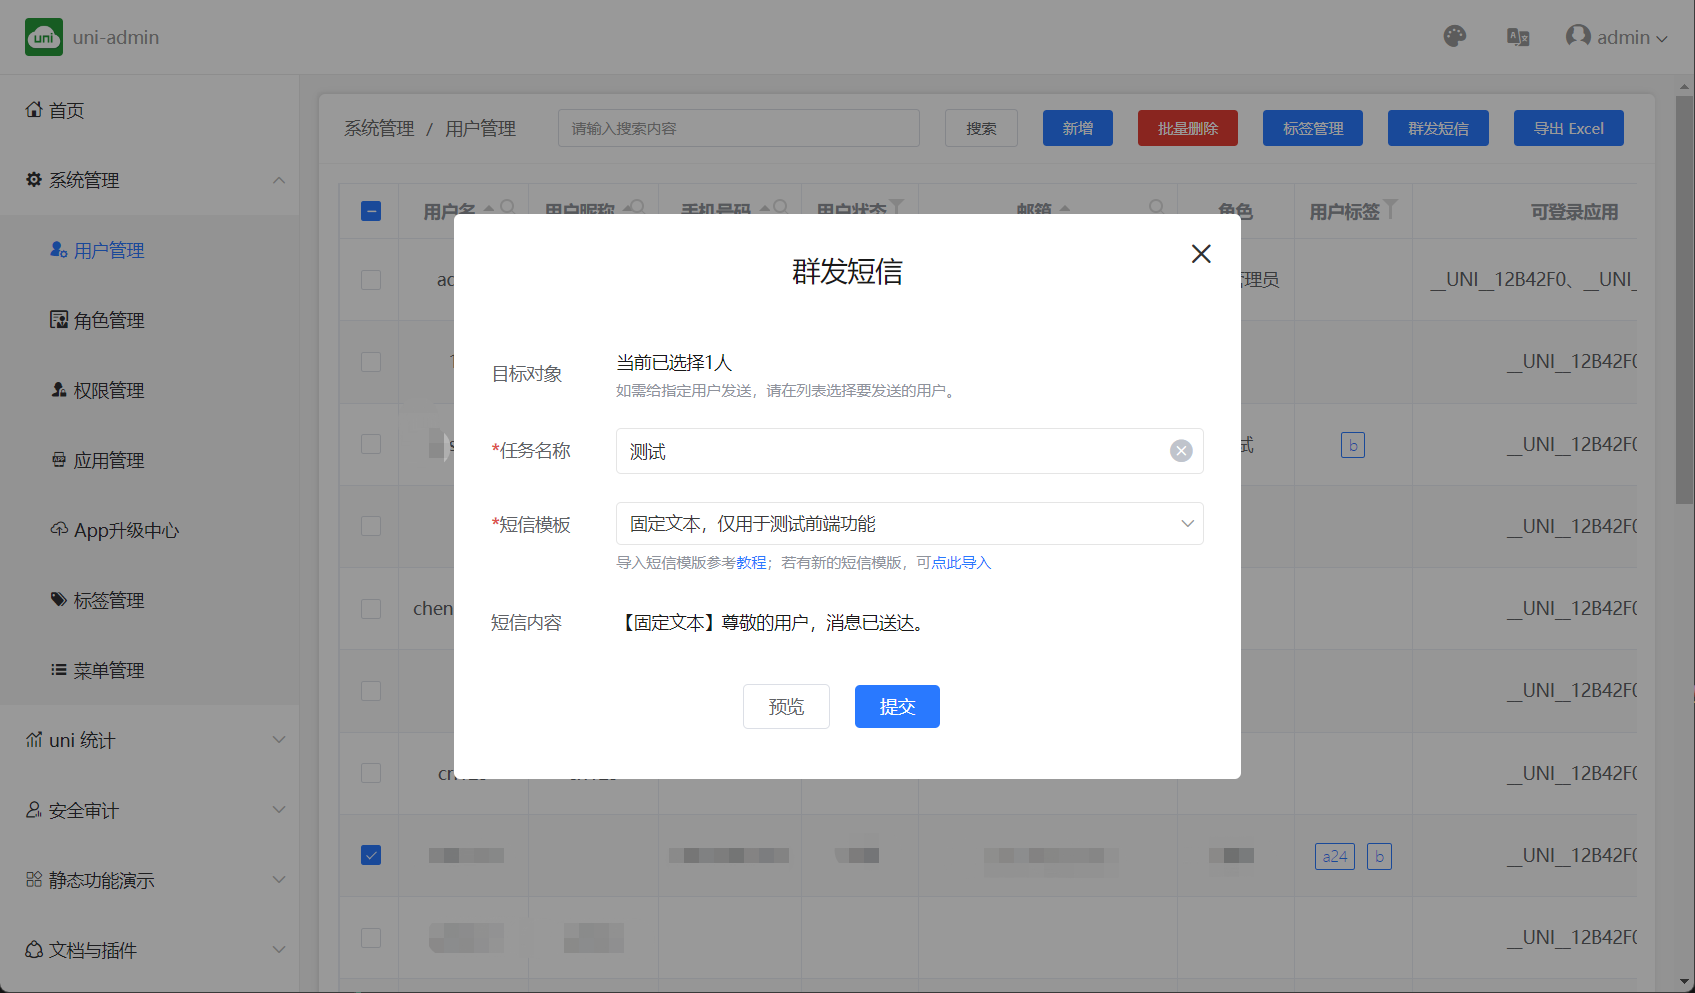
# Group SMS uni-admin 2.1.0+
If there are scenarios such as customer care, membership services, e-commerce activities, and new product launches that need to send text messages to users, there is no need for development. You can select users/tags in the uni-admin console to send text messages to users in groups, saving time and efficiency. At the same time, it supports dynamic replacement of SMS template variables to make SMS more personalized.
# Features
- Support group text messages to specified users, all users, and users with specified labels
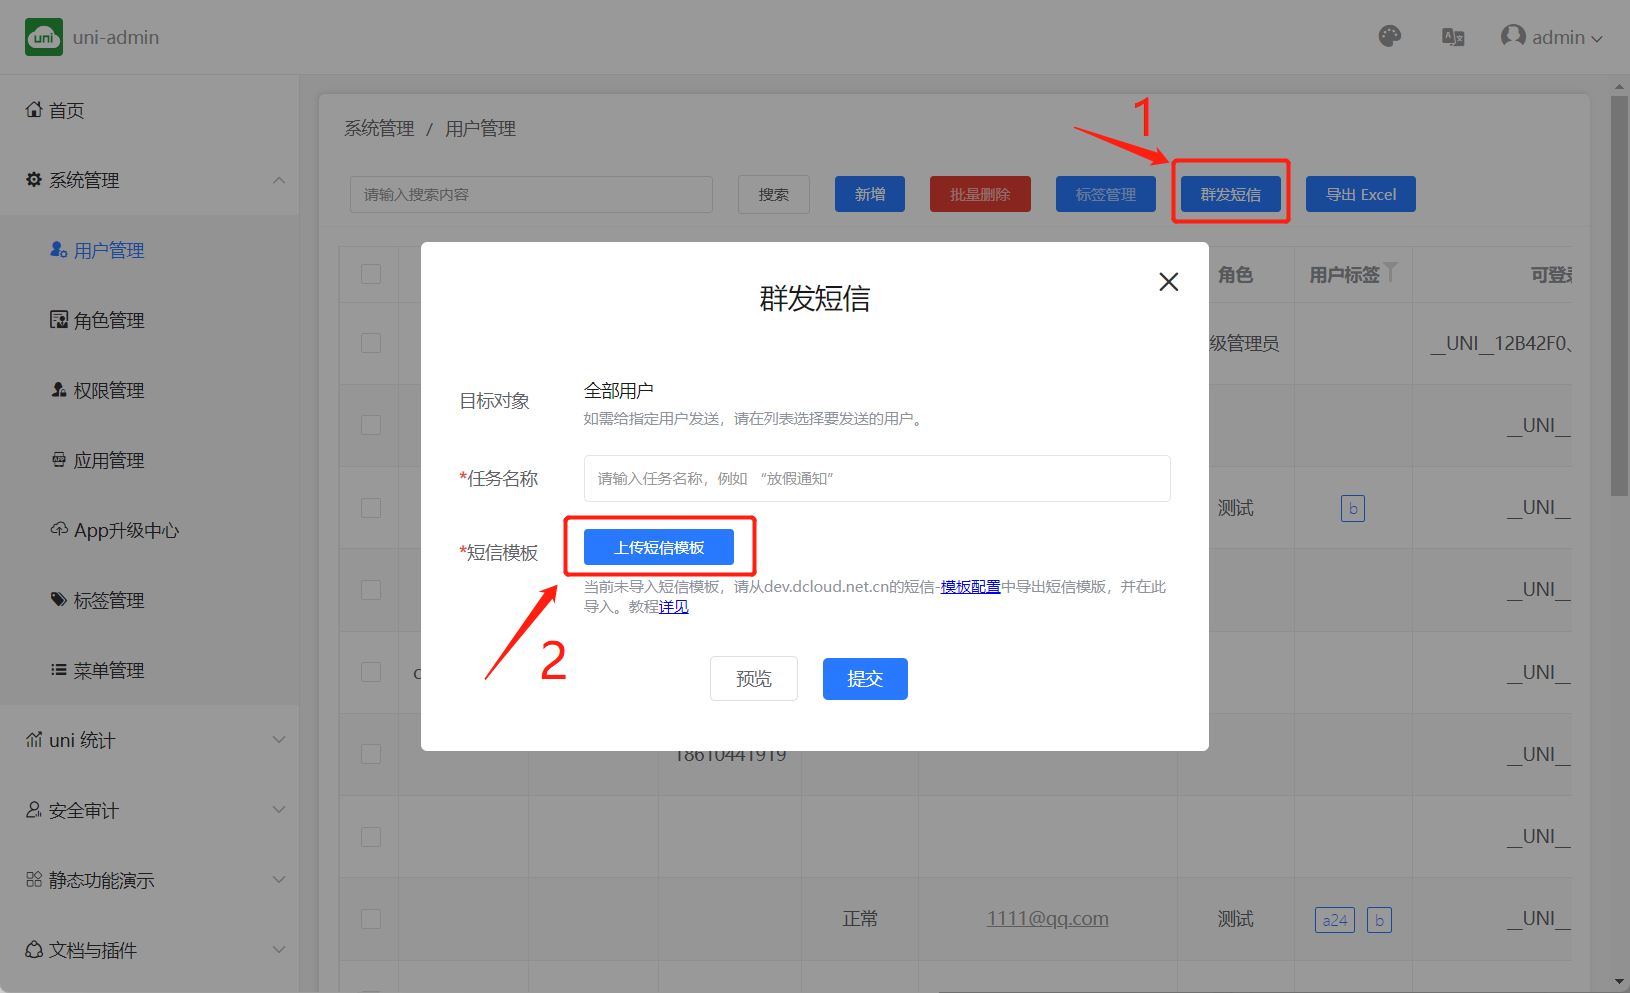
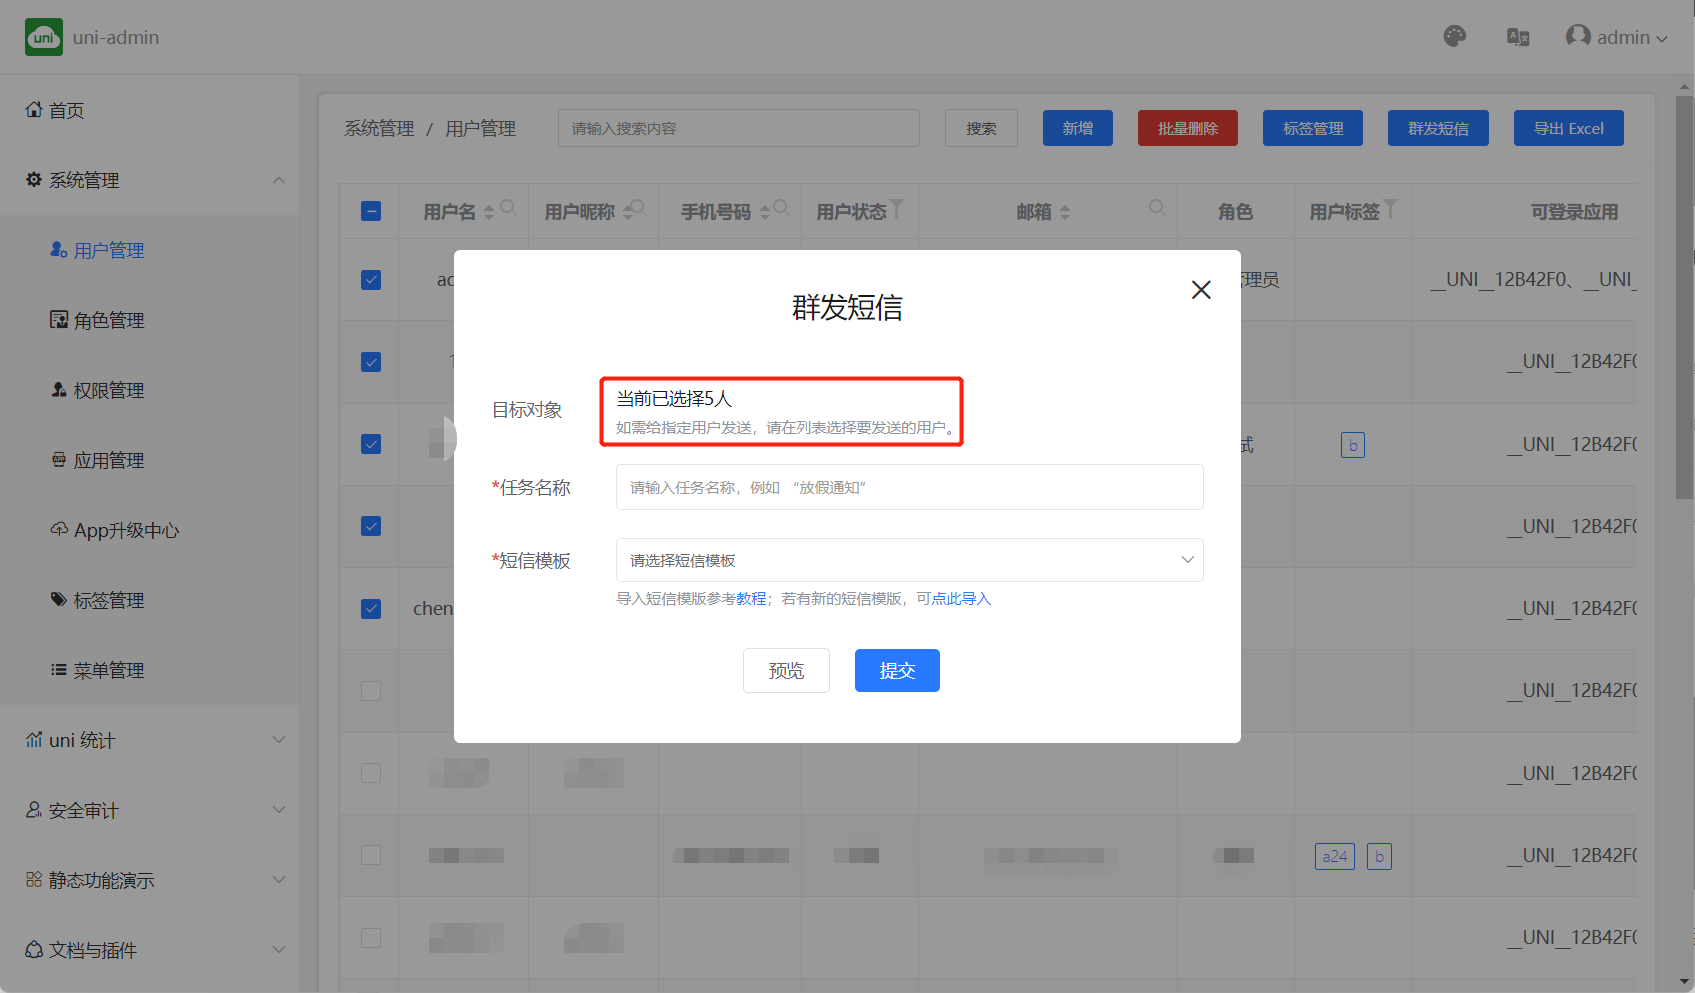
- Designated users: After checking the users who want to receive text messages in the user list (must have a mobile phone number), click "Send Messages" to create a text message task.
- All users: Click "Send SMS" directly on the user list interface to create an SMS task.
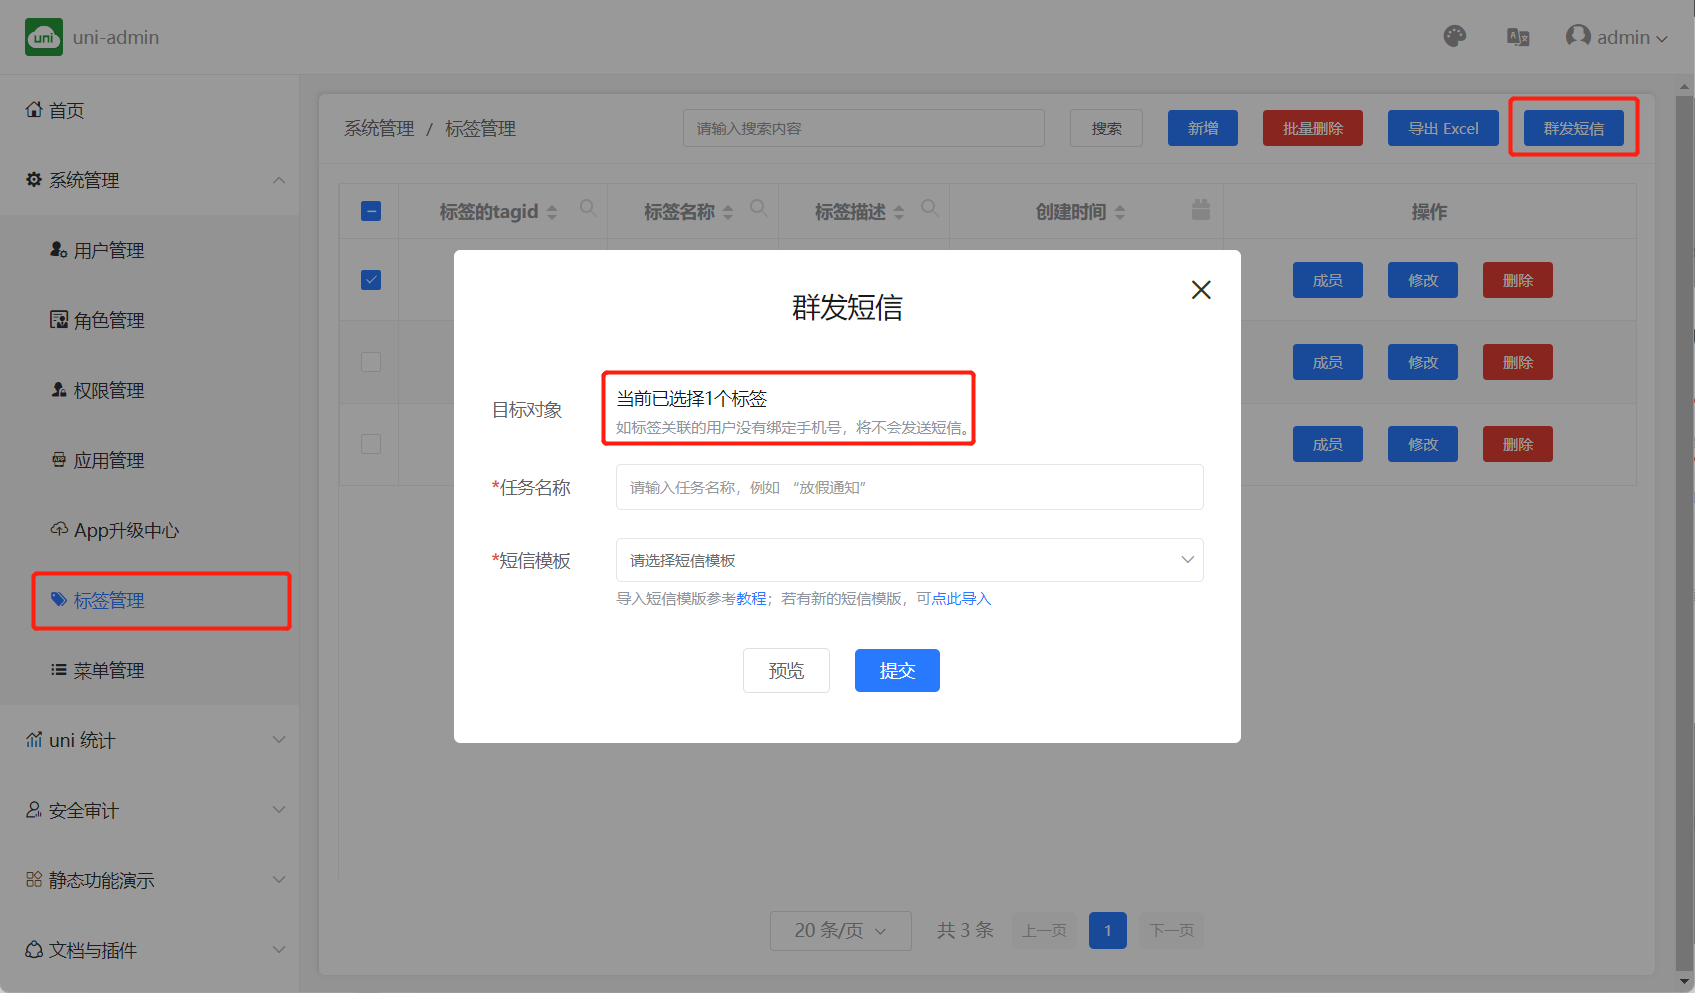
- Designate tagged users: After checking the tag in the user tag list (if the user associated with the tag does not have a mobile phone number, no SMS will be sent), click "Group SMS" to create a SMS task.
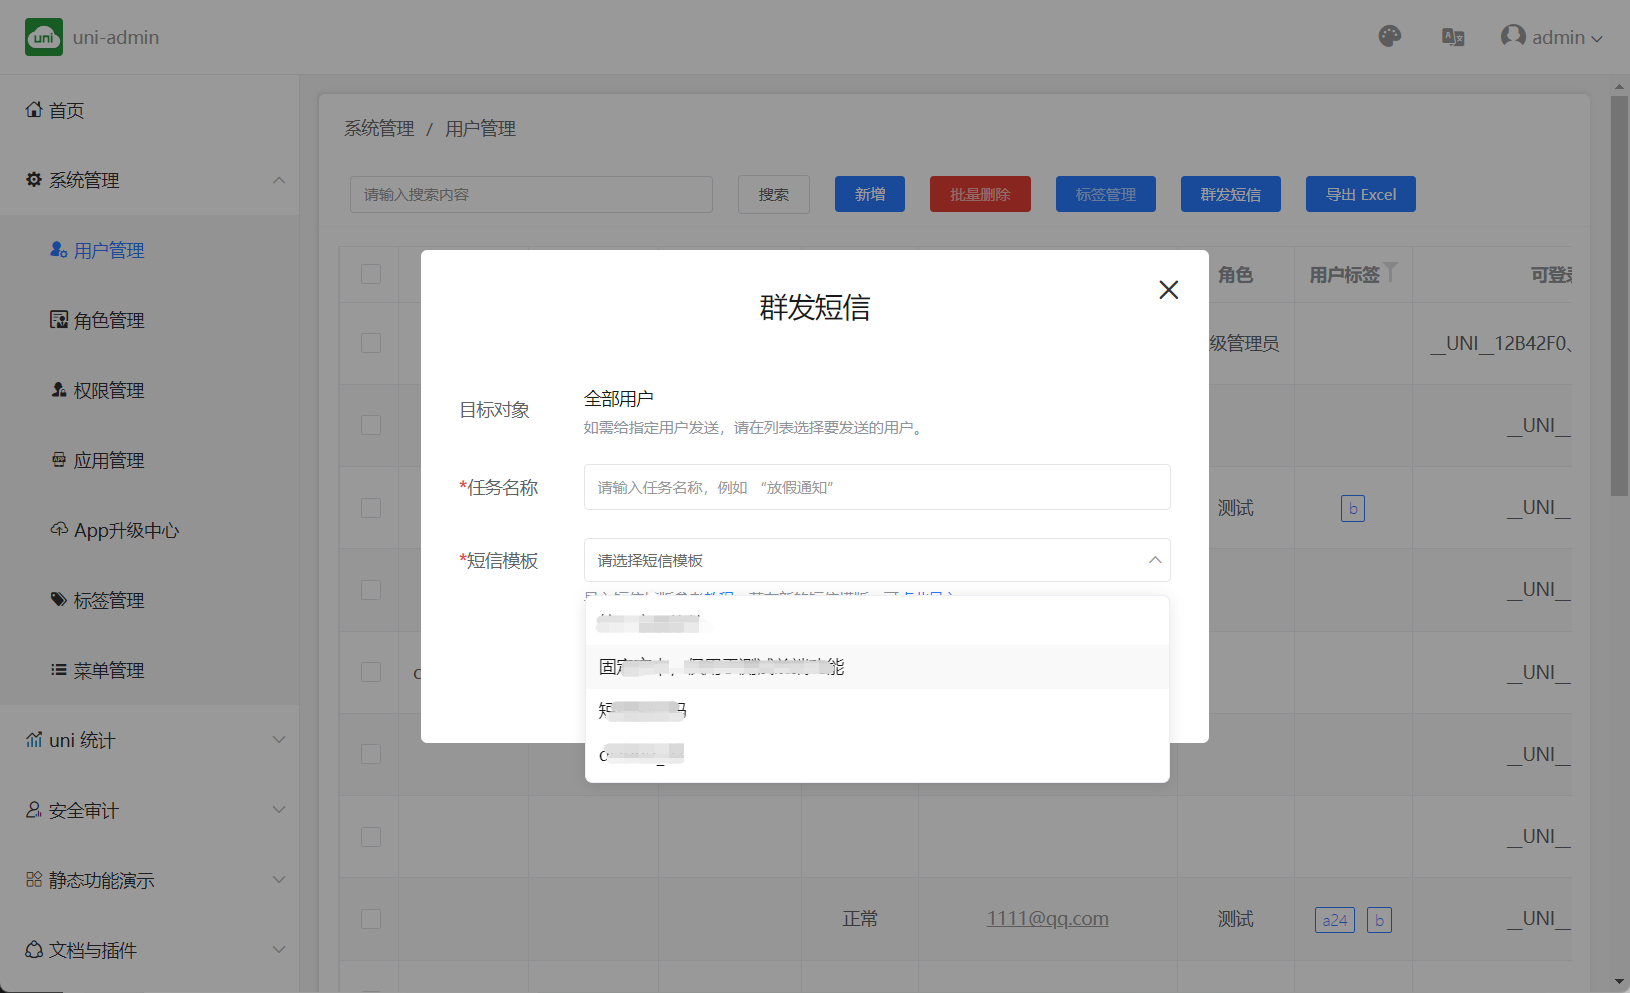
- Support variable replacement in SMS templates with "Fixed Text" and "Database Fields"
- Fixed text: fixed string, all users will receive the same content, for example:
DCloud - Database fields: You can associate specified fields in the database, and the content is more personalized. The format is
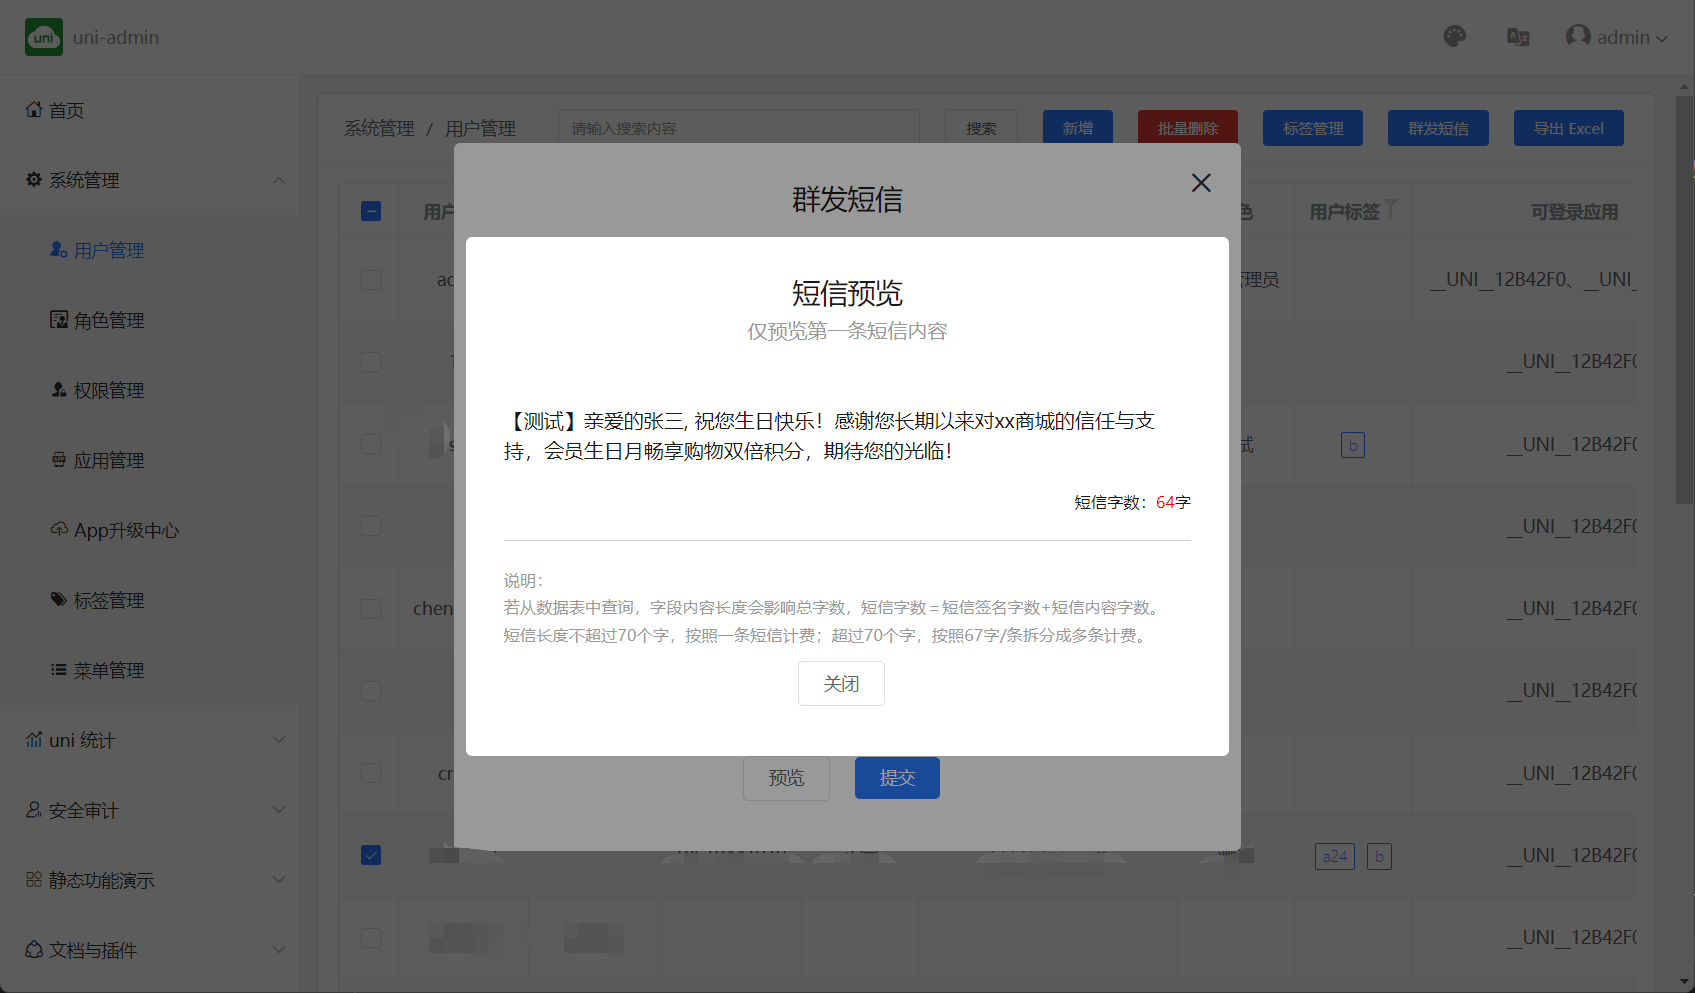
{database table name.field}, for example:{uni-id-users.username}currently only supportsuni-id-userstable - Support to preview the text messages of the first 5 people before sending, which is used to detect whether the template variables are configured correctly and improve the sending success rate.
# Usage
Step 1: Activate SMS service
如您首次使用请登录uniCloud控制台开通并充值
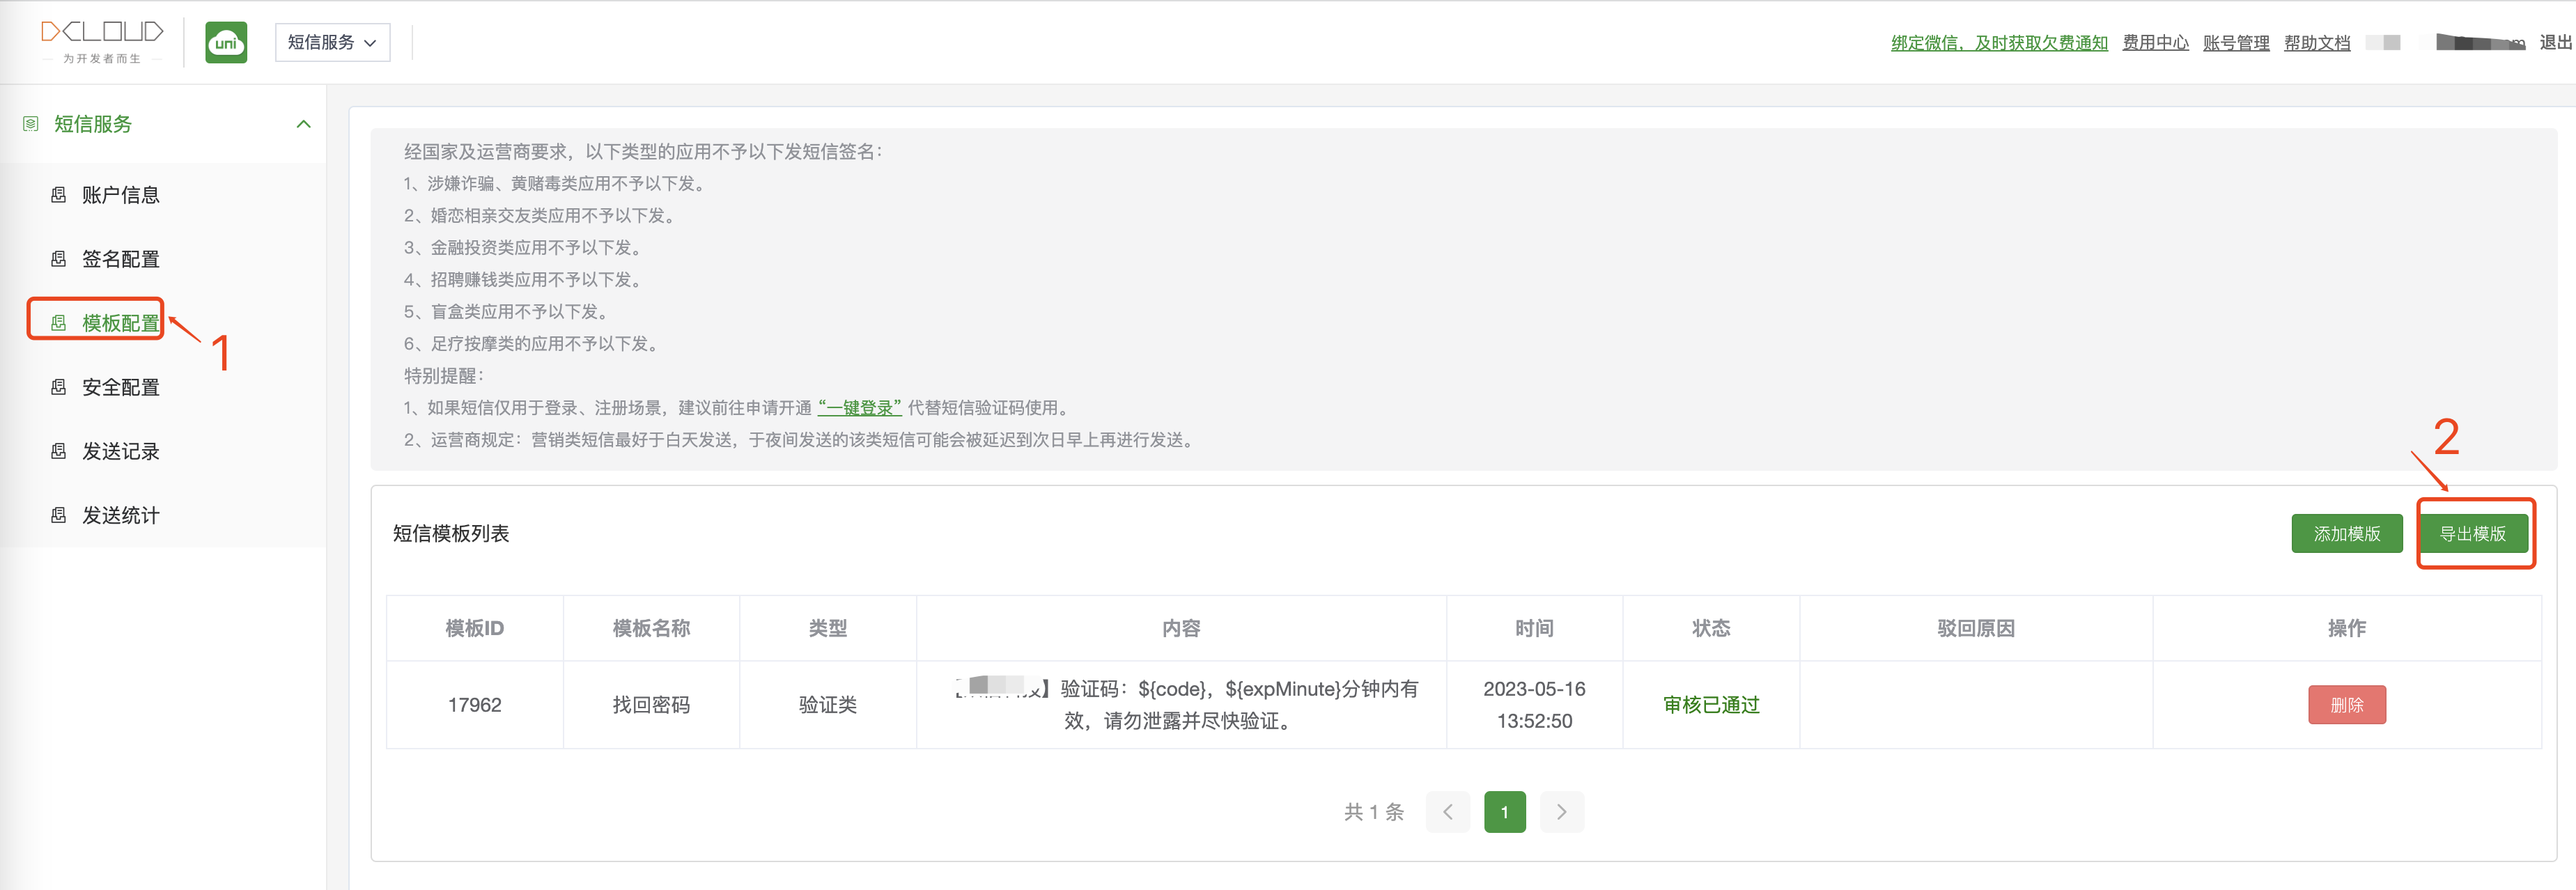
Step 2: Add signature and template
在uniCloud控制台-短信服务-签名配置添加短信签名
在uniCloud控制台-短信服务-模板配置内申请自定义模板
For example: [TEST] Dear ${username}, happy birthday to you! Thank you for your long-term trust and support to xx mall. Members can enjoy double shopping points on their birthday month. We look forward to your visit!
Step 3: Export SMS Template
在短信模板页面-点击”导出模板“按钮,导出短信模板。
Step 4: Send SMS via uni-admin console
If you have not deployed uni-admin, please install [uni-admin] in the plug-in market (https://ext.dcloud.net.cn/plugin?id=3268)
For first use, configure SMS API key in uni-config-center/uni-sms-co/config.json
{
    "smsKey": "your smsKey",
    "smsSecret": "your smsSecret"
}
配置完成后,登录uni-admin控制台,打开用户管理页面,请按照图示步骤上传短信模板(步骤三导出的短信模板):
 短信模板上传成功后,短信模板即可显示,如下:
选择要接收短信的用户,如下:
 或者如果已经对用户进行了分组,可以在标签管理中选择标签后发送短信,如下:
At present, SMS supports fixed text sending and associated data table field sending. The following describes how to send in two ways
fixed text sending
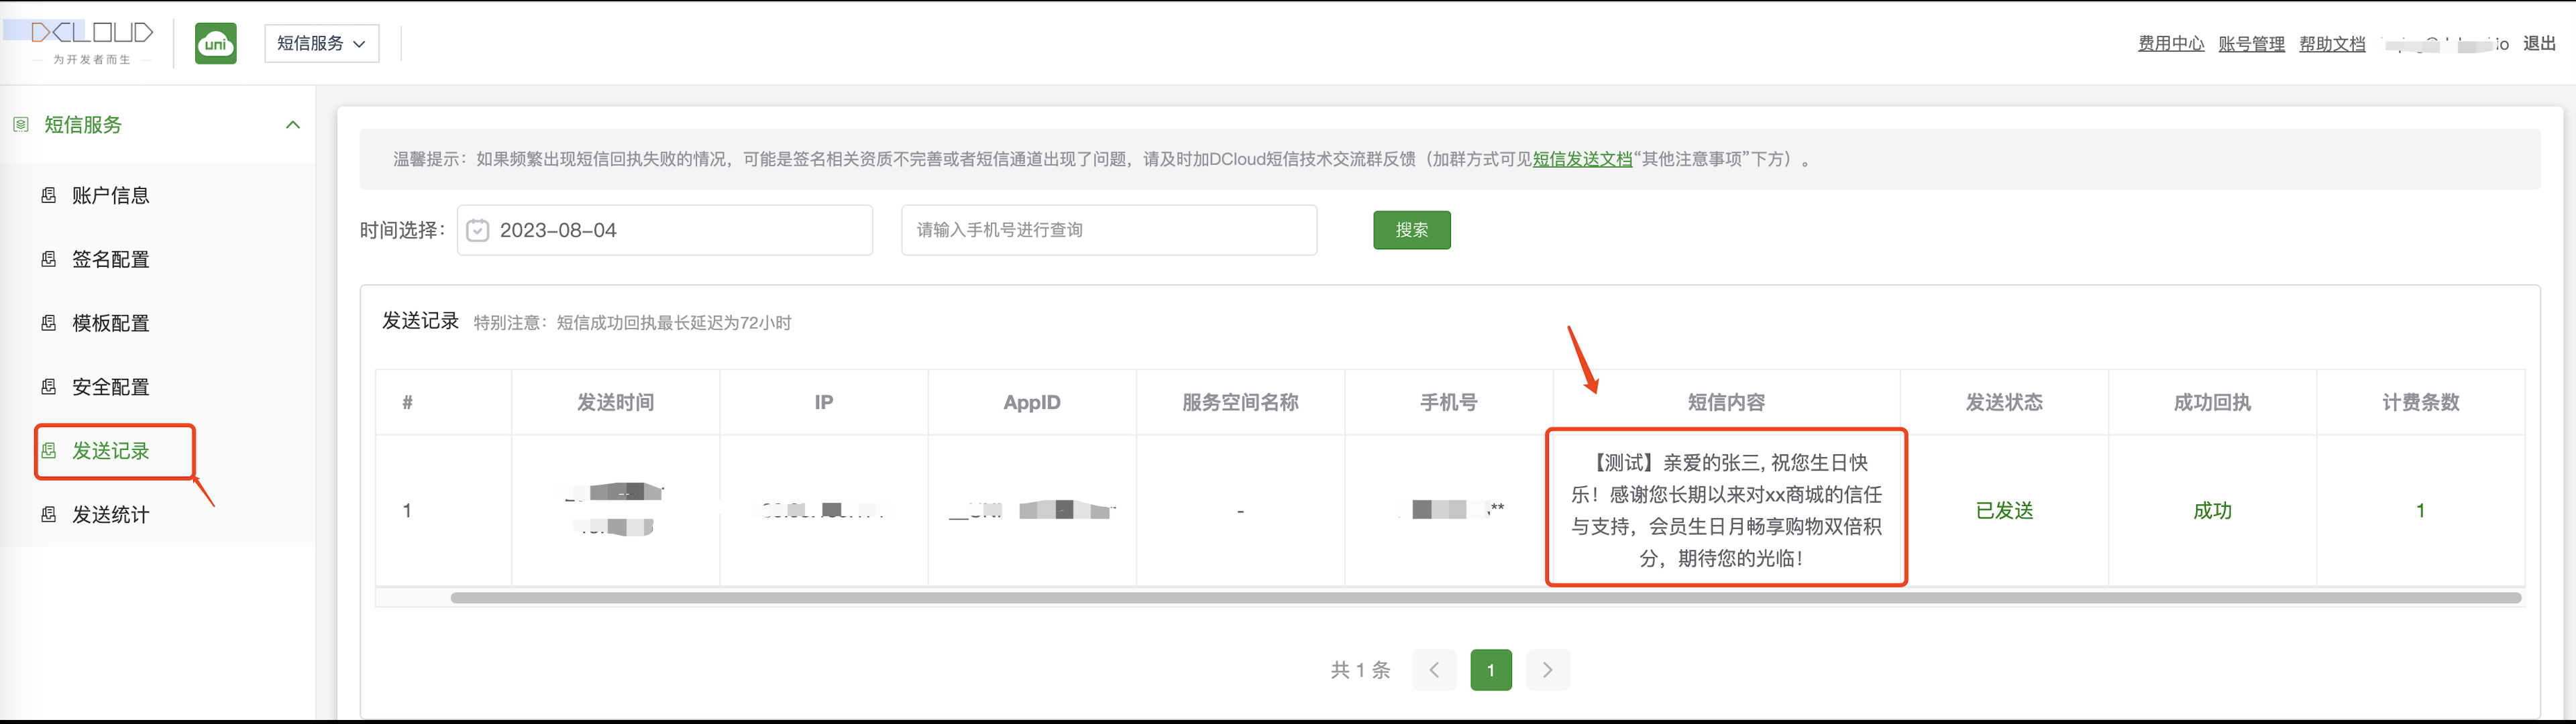
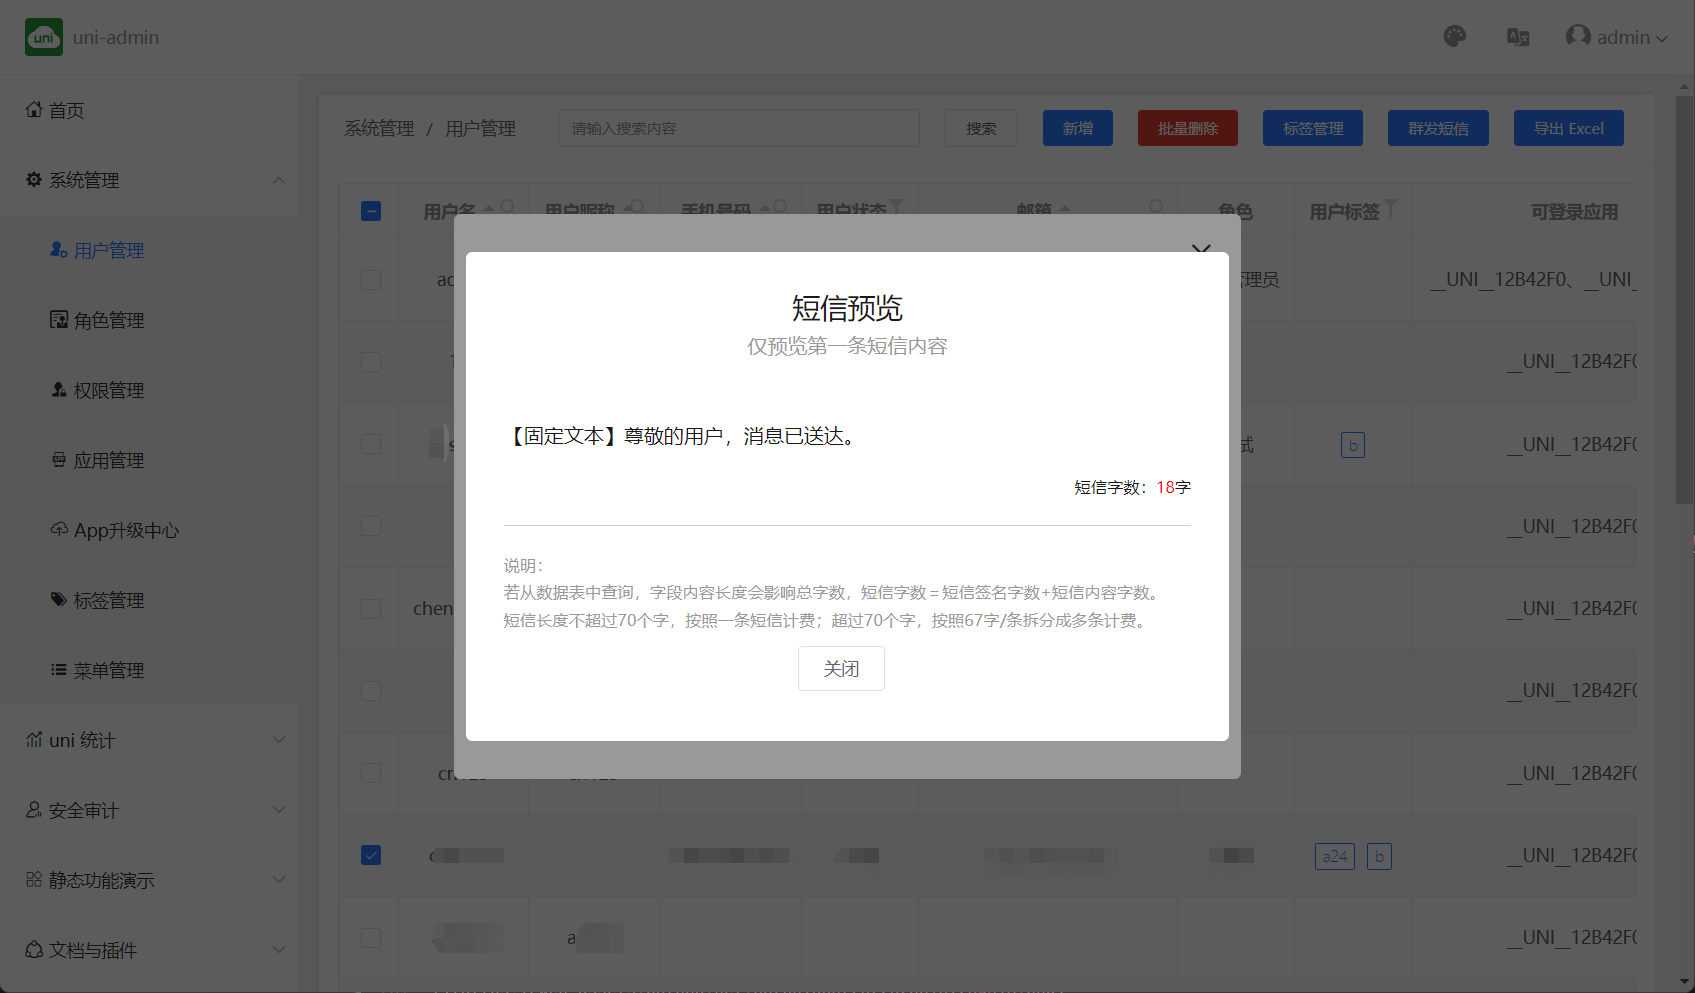 确认短信内容无误后,点击提交即可发送短信,发送短信之后可以在uniCloud控制台-短信服务-发送记录查看发送记录。
Use datatable fields to send as template variables
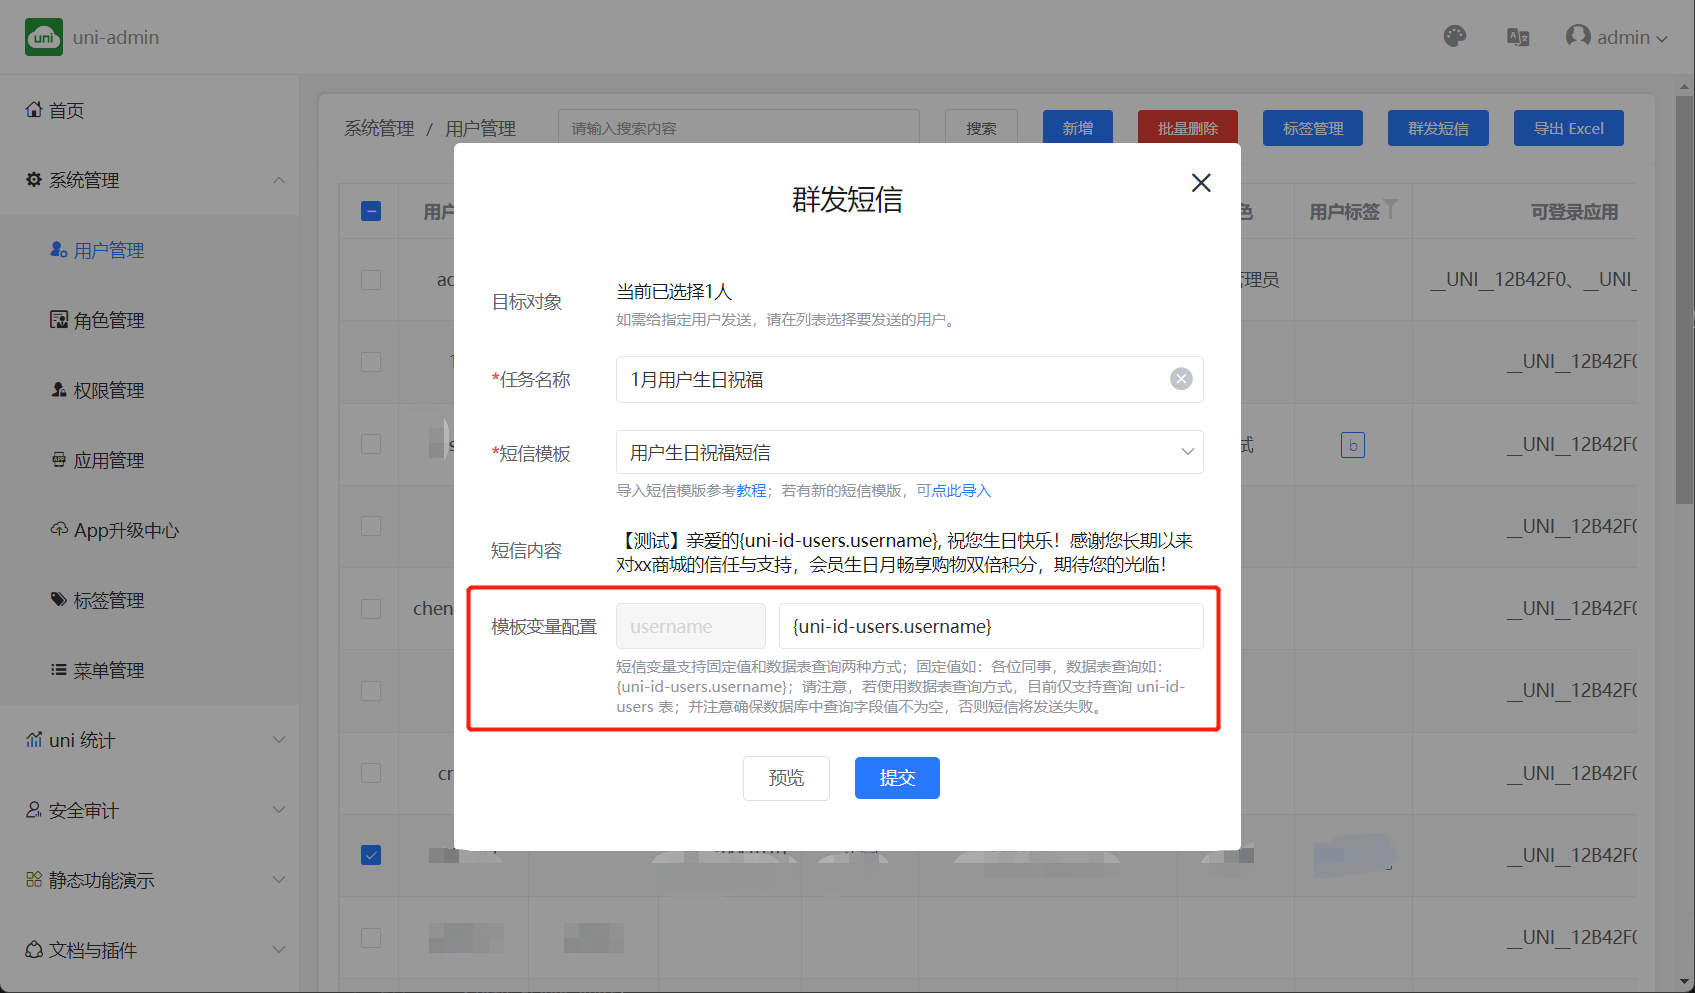 As above, the text message variable field is "username", and the configuration replacement field is the username field in the uni-id-users table, and the text message variable will be replaced when sending a text message.
SMS variables support two methods of fixed value and data table query; fixed value such as: colleagues, data table query such as: {uni-id-users.username}; please note that if you use the data table query method, currently only supports query uni -id-users table; and pay attention to ensure that the value of the query field in the database is not empty, otherwise the SMS will fail to be sent.
If you have any questions, you can consult in Forum Post or add uniCloud SMS service exchange QQ group (695645208) for consultation
# user-role-permission
uni-admin 框架基于 uni-id,复用 uni-id 的用户、角色、权限系统,详见uni-id。
It should be noted that the dynamic menu of the admin framework also relies on the uni-id permission table (uni-id-permissions).
The menu table (opendb-admin-menus) is defined as follows:
| Fields | Type | Required | Description |
|---|---|---|---|
| menu_id | Object ID | yes | menu_id |
| name | String | yes | menu text |
| icon | String | no | menu icon |
| url | String | No | The page link corresponding to the menu (only menu items without submenus can be configured) |
| sort | Integer | No | Sort in the same level menu, the larger the array, the later |
| parent_id | String | No | Parent menu Id |
| permission | Array | No | Menu permission (only menu items without submenus can be configured) |
| enable | Boolean | yes | menu state: false disable true enable |
| create_date | Timestamp | yes | creation time |
admin provides two built-in methods to facilitate the authentication of login user permissions and roles in the page:
| method | function | input parameter | return value |
|---|---|---|---|
$hasPermission | Identifies whether the logged in user has a permission | String | Boolean |
$hasRole | Identifies whether the logged in user has a role | String | Boolean |
<template>
  <view>
    <!-- Users with user/add permissions can see the add button -->
    <button v-if="$hasPermission('USER_ADD')">新增</button>
    <!-- Users with admin role can see the delete button -->
    <button v-if="$hasRole('admin')">删除</button>
  </view>
</template>
# Create multiple login accounts for the system and set different permissions
The following is an example of adding an ordinary member role. After logging in to the admin system, users of this role can only view the data in the user table and cannot change the data.
- First log in to the admin system with the admin account.
- admin sample project address: https://unicloudadmindemo.dcloud.net.cn/#/pages/login/login
- Experience account: admin Password: 123456
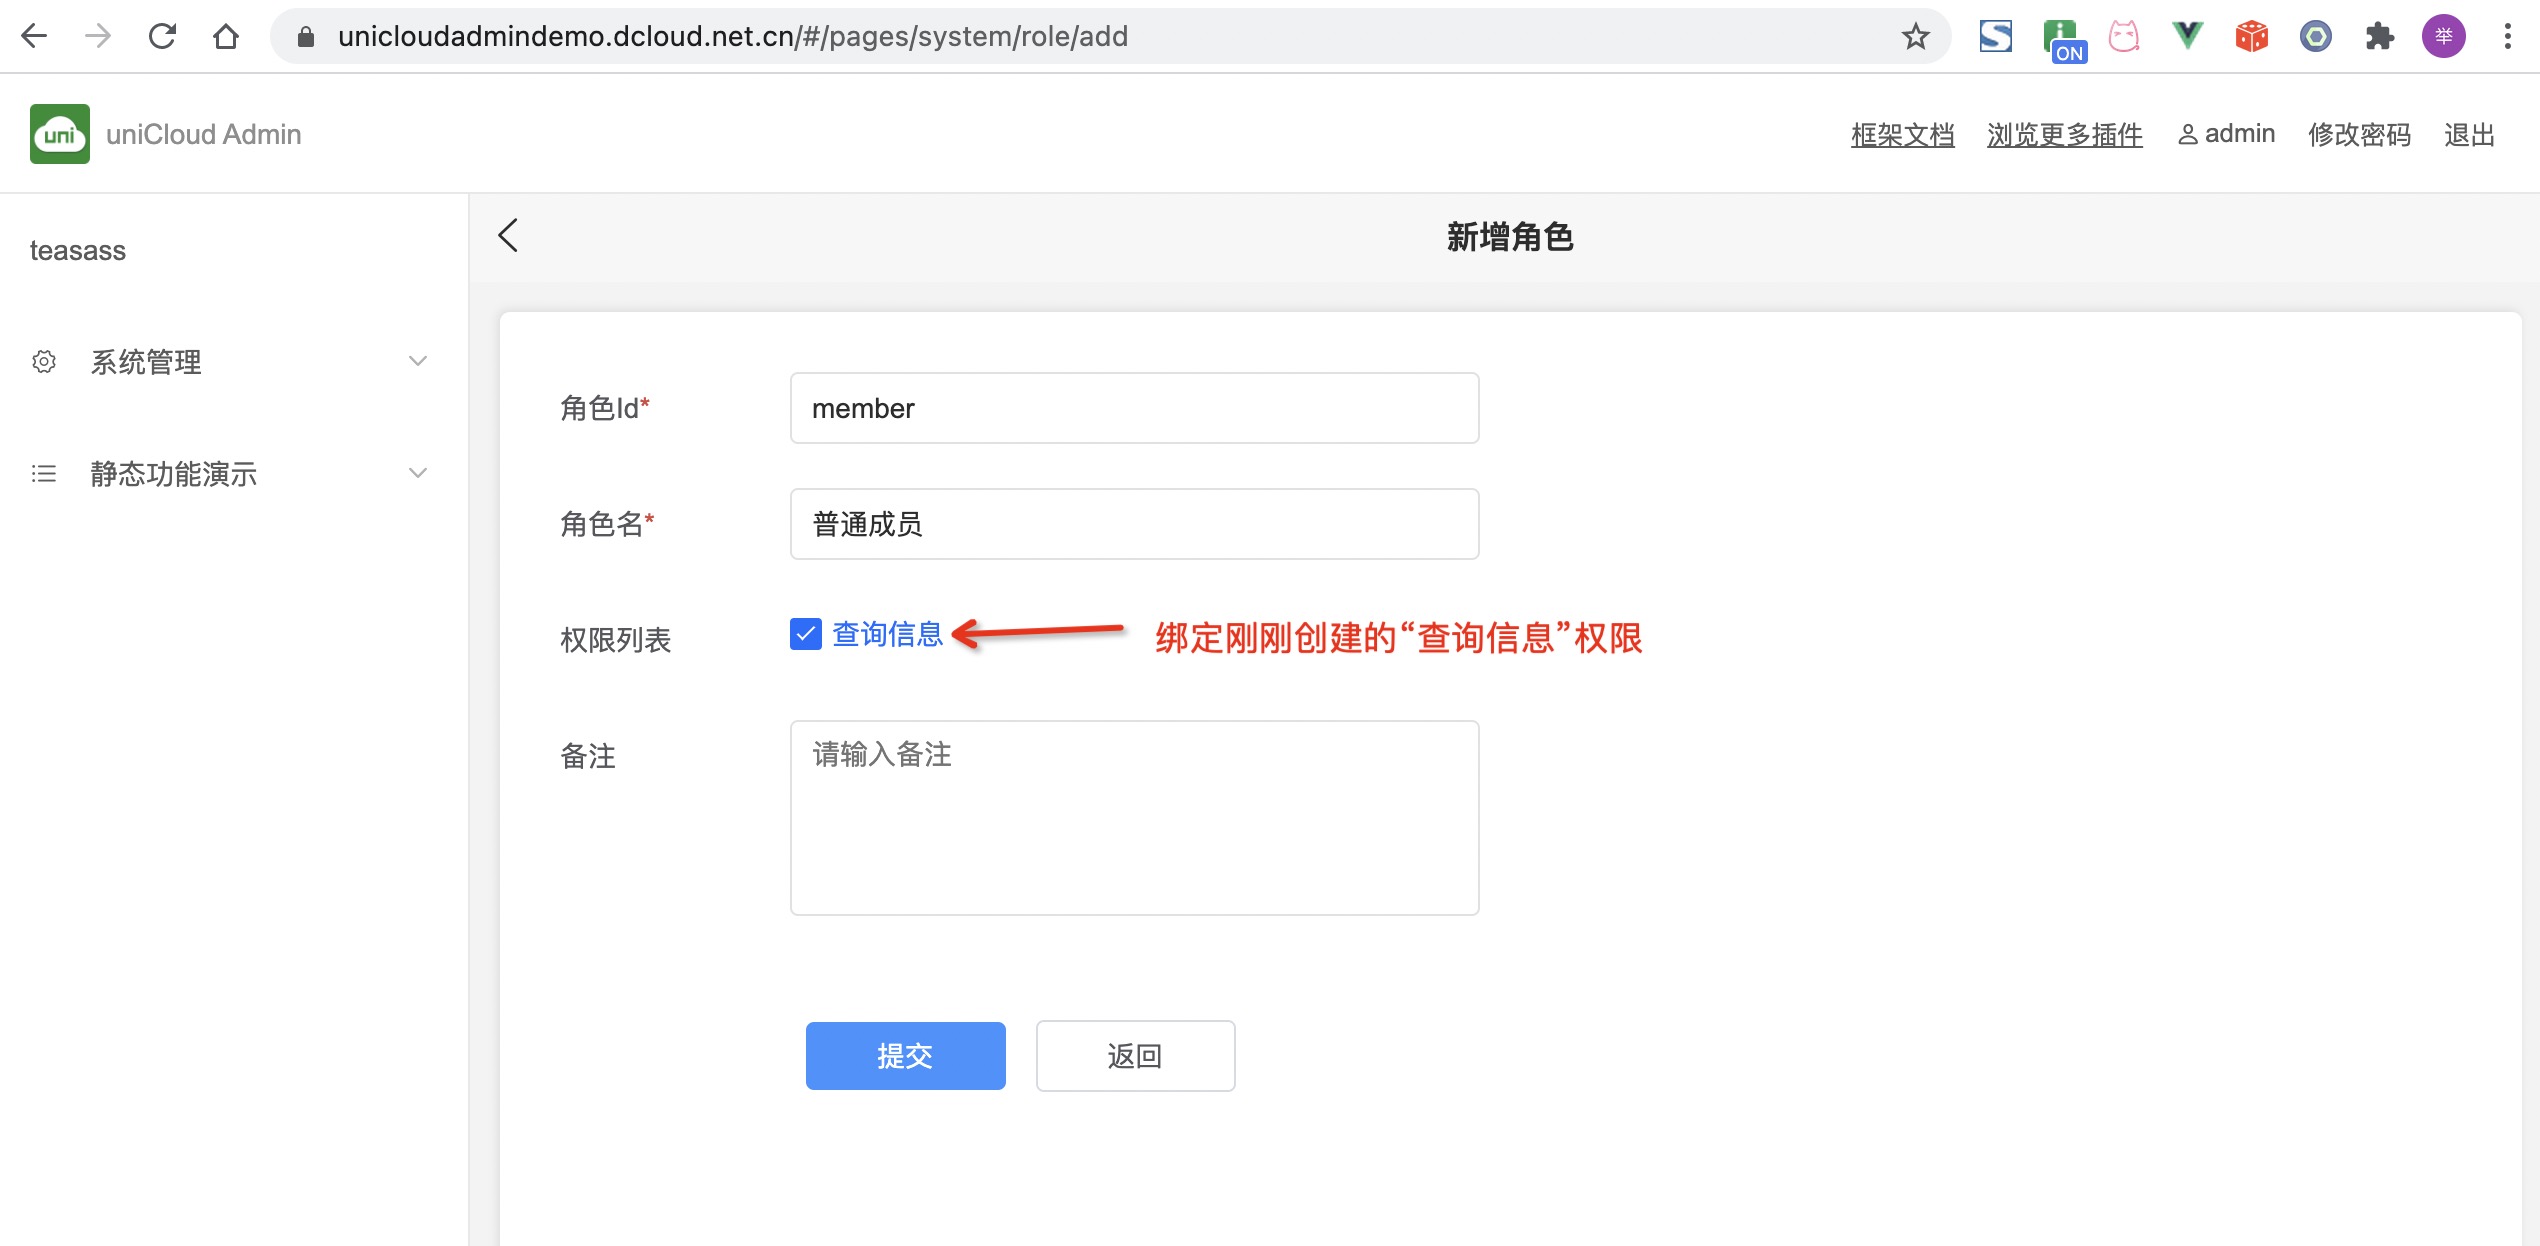
- 创建权限。在uni-admin左侧菜单的权限管理,新增权限“查询信息”,标识为“read”
- 创建角色。在左侧菜单的角色管理里,新增角色“普通成员”,标识为“member”,绑定上面的“查询信息”权限
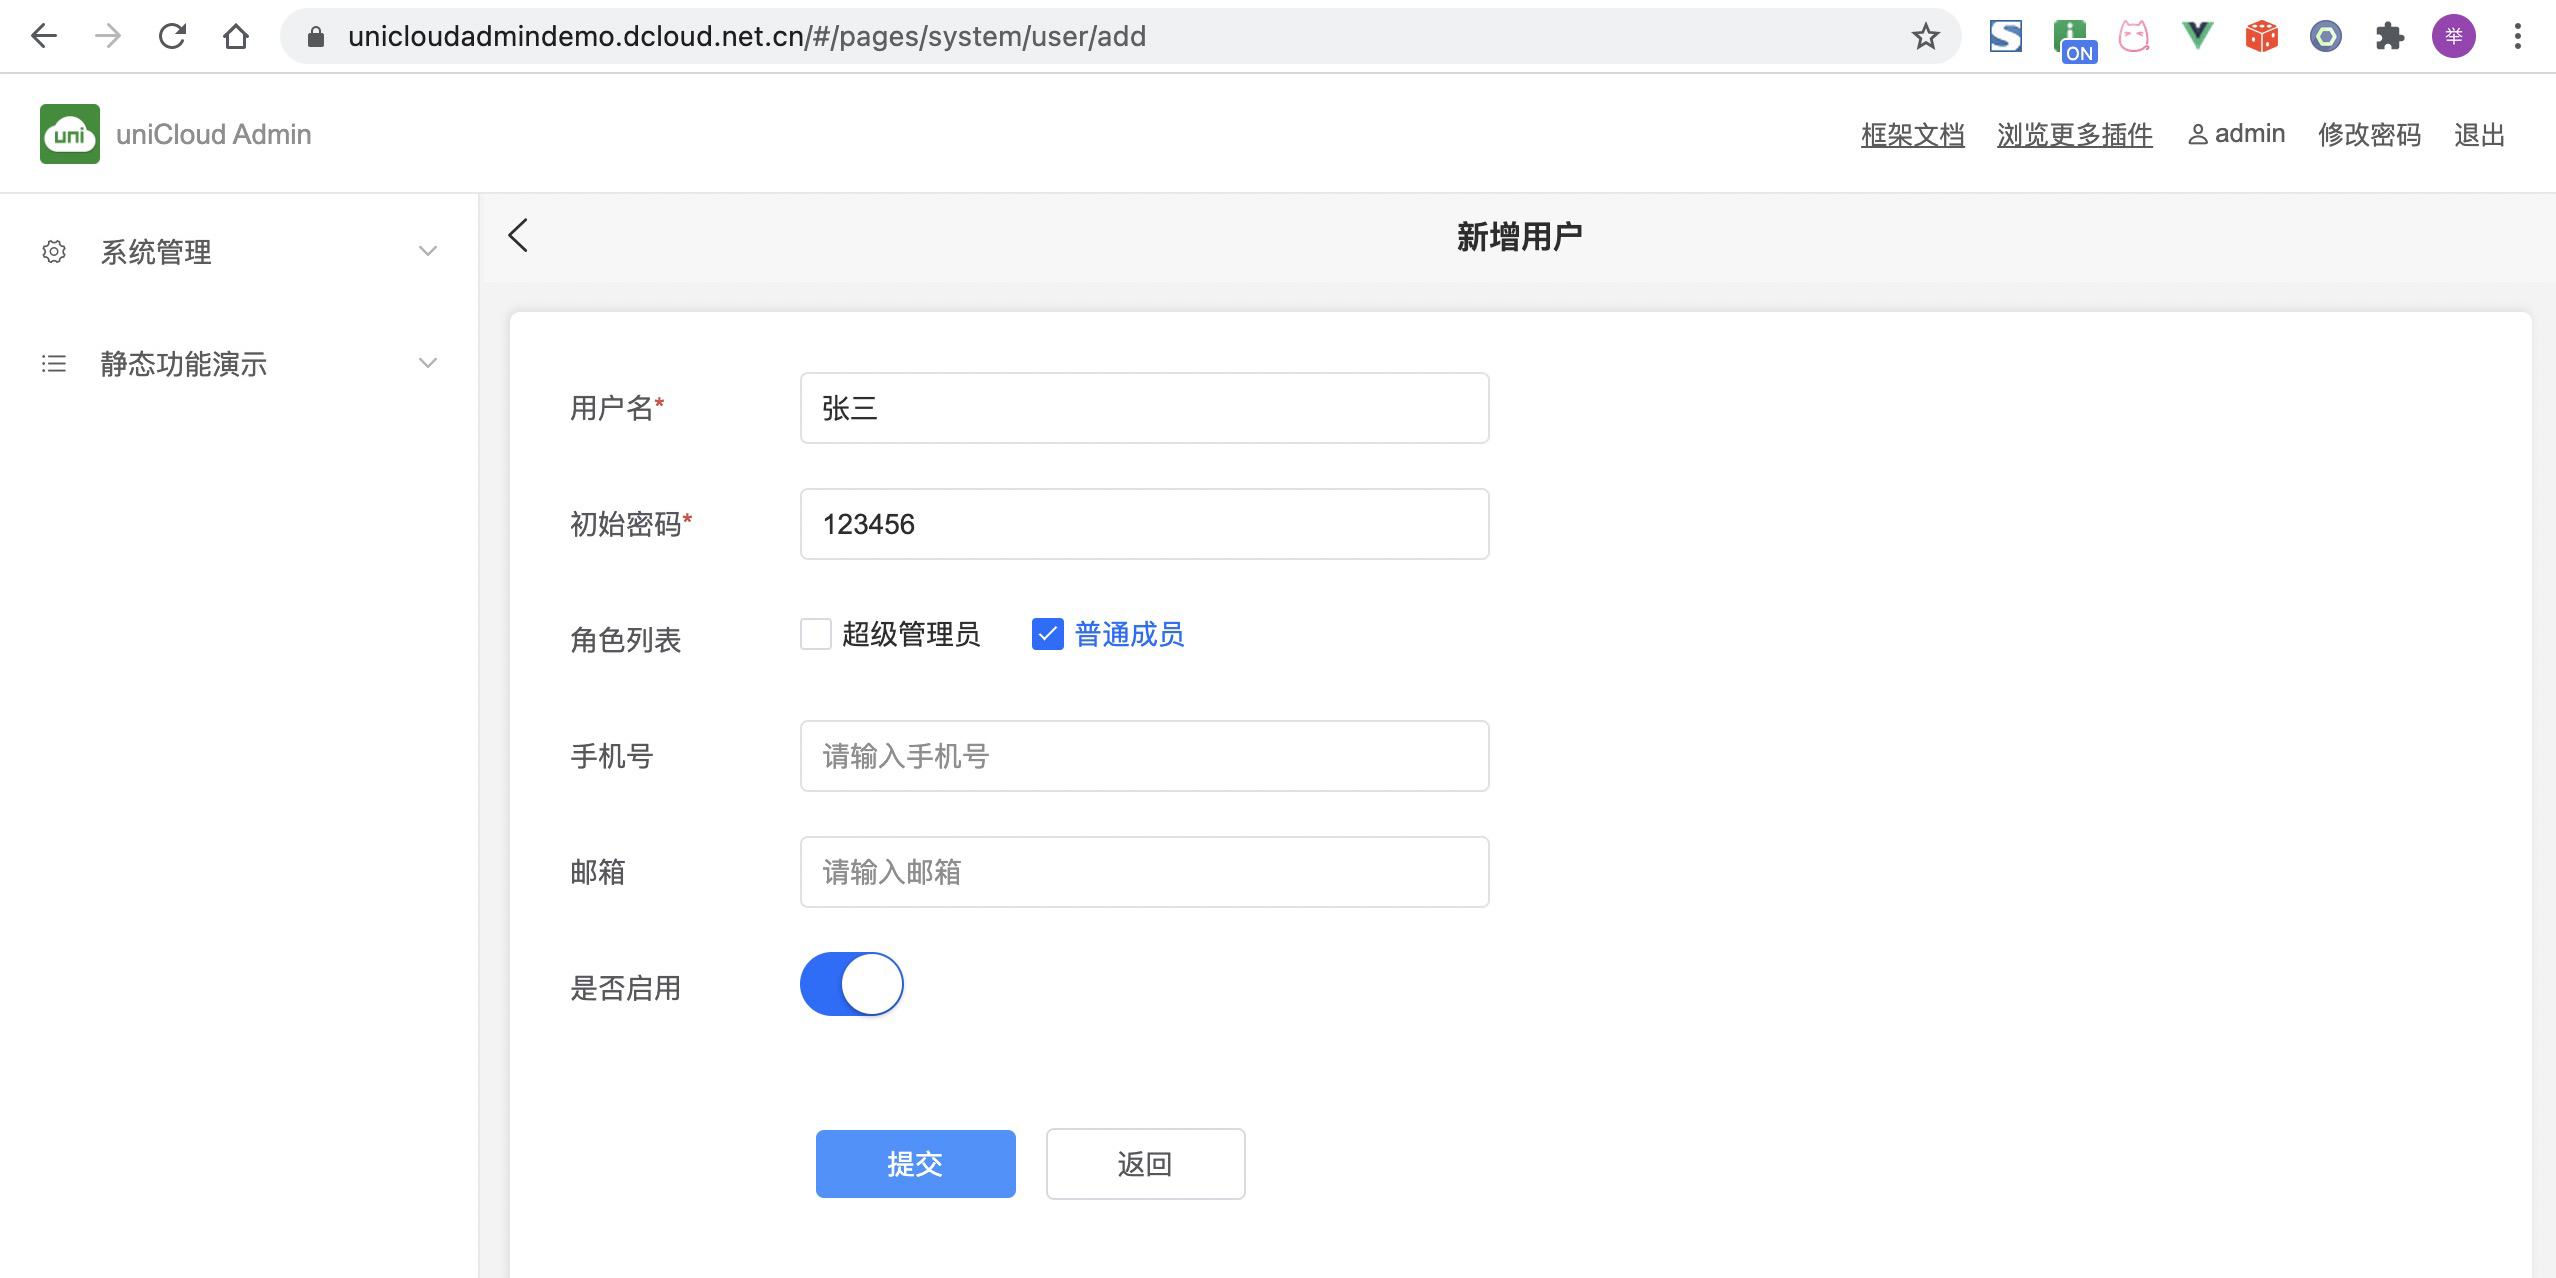
- 创建账户并赋予角色。在左侧菜单的用户管理里,添加用户“张三”,然后给用户赋予角色“普通成员”
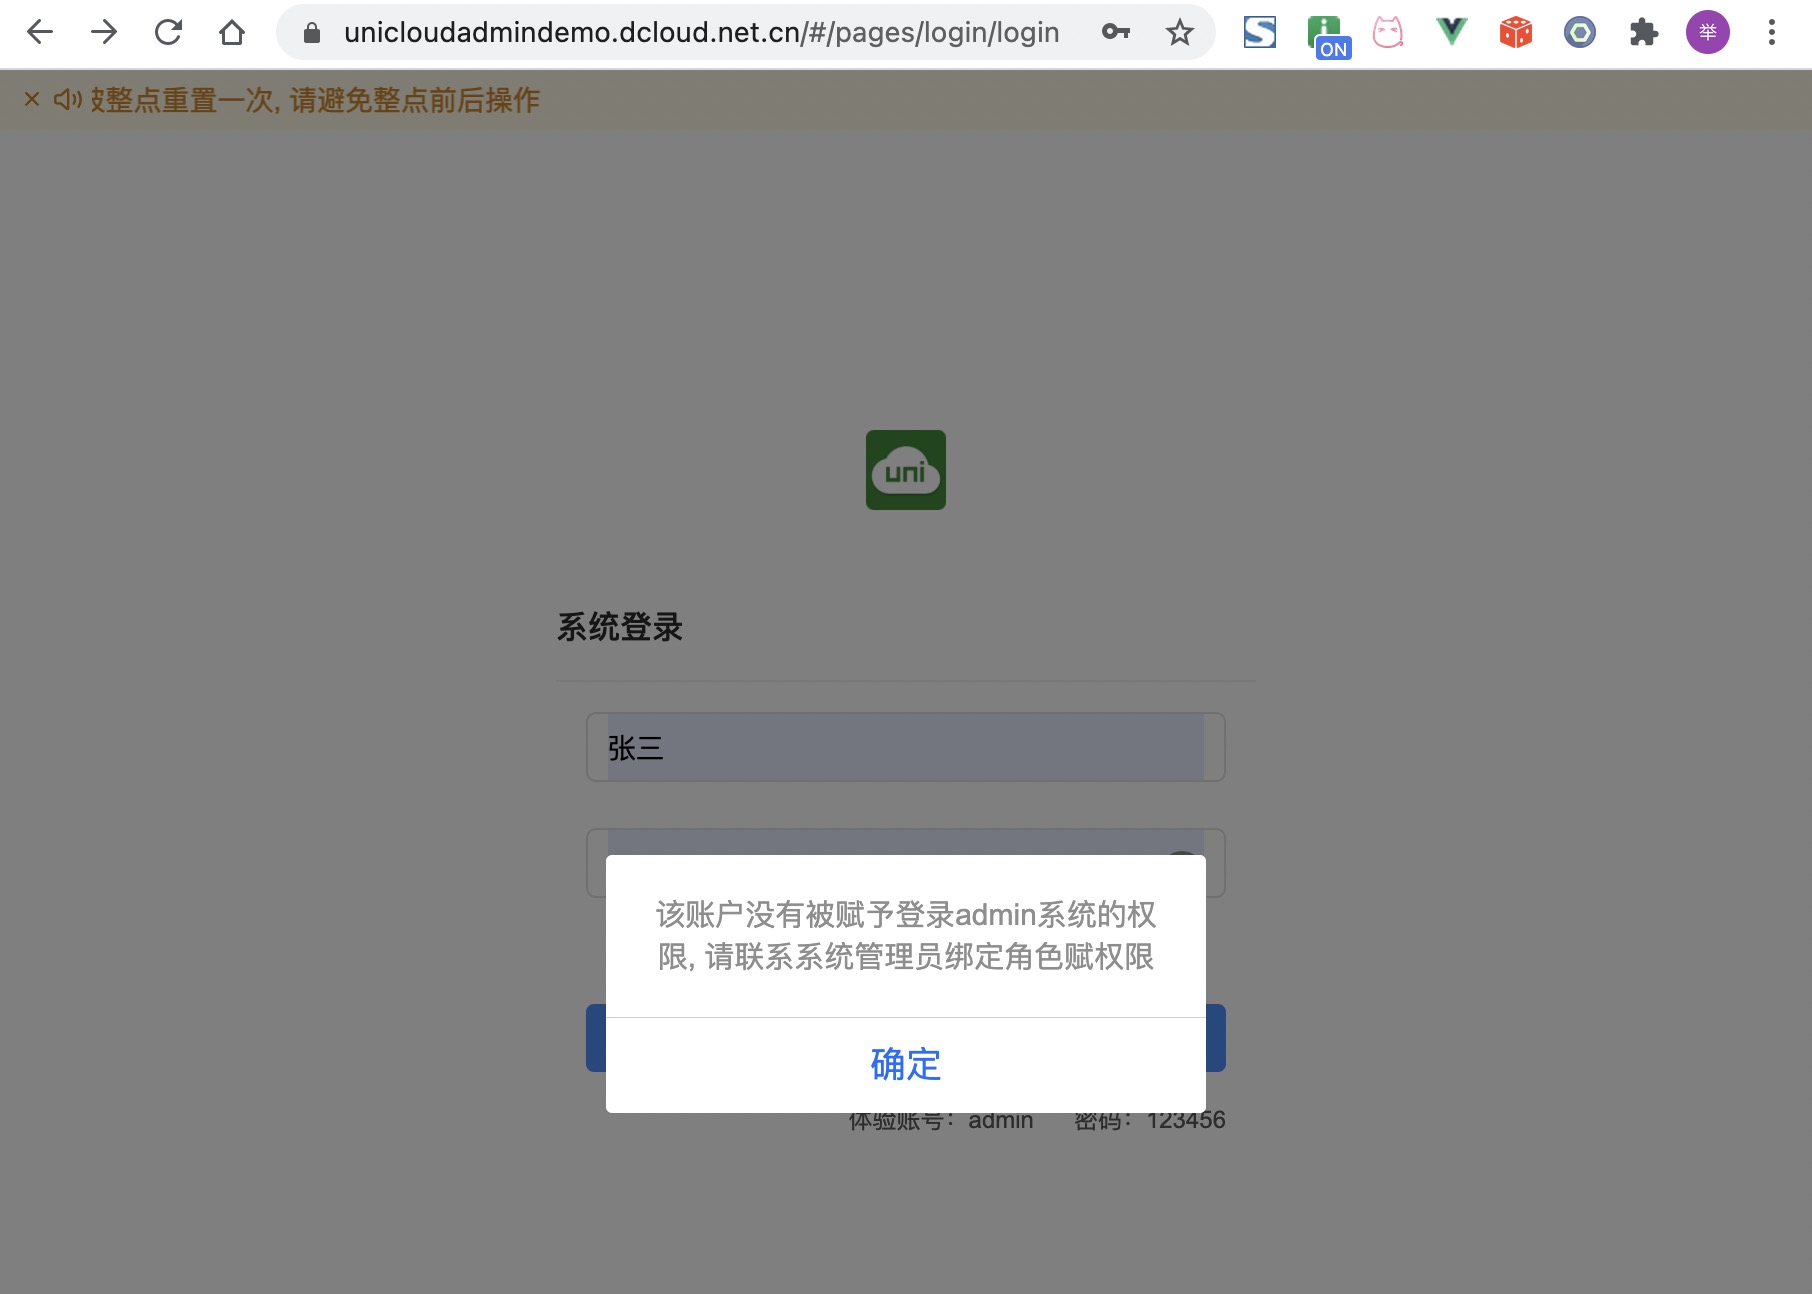
- 如果你退出账户,登录刚刚创建的账户张三。我们发现会提示:该账户没有被赋予登录admin系统的权限, 请联系系统管理员绑定角色赋权限。因为:你登录的账户没有访问任何admin系统菜单的权限,所以不能访问admin系统。
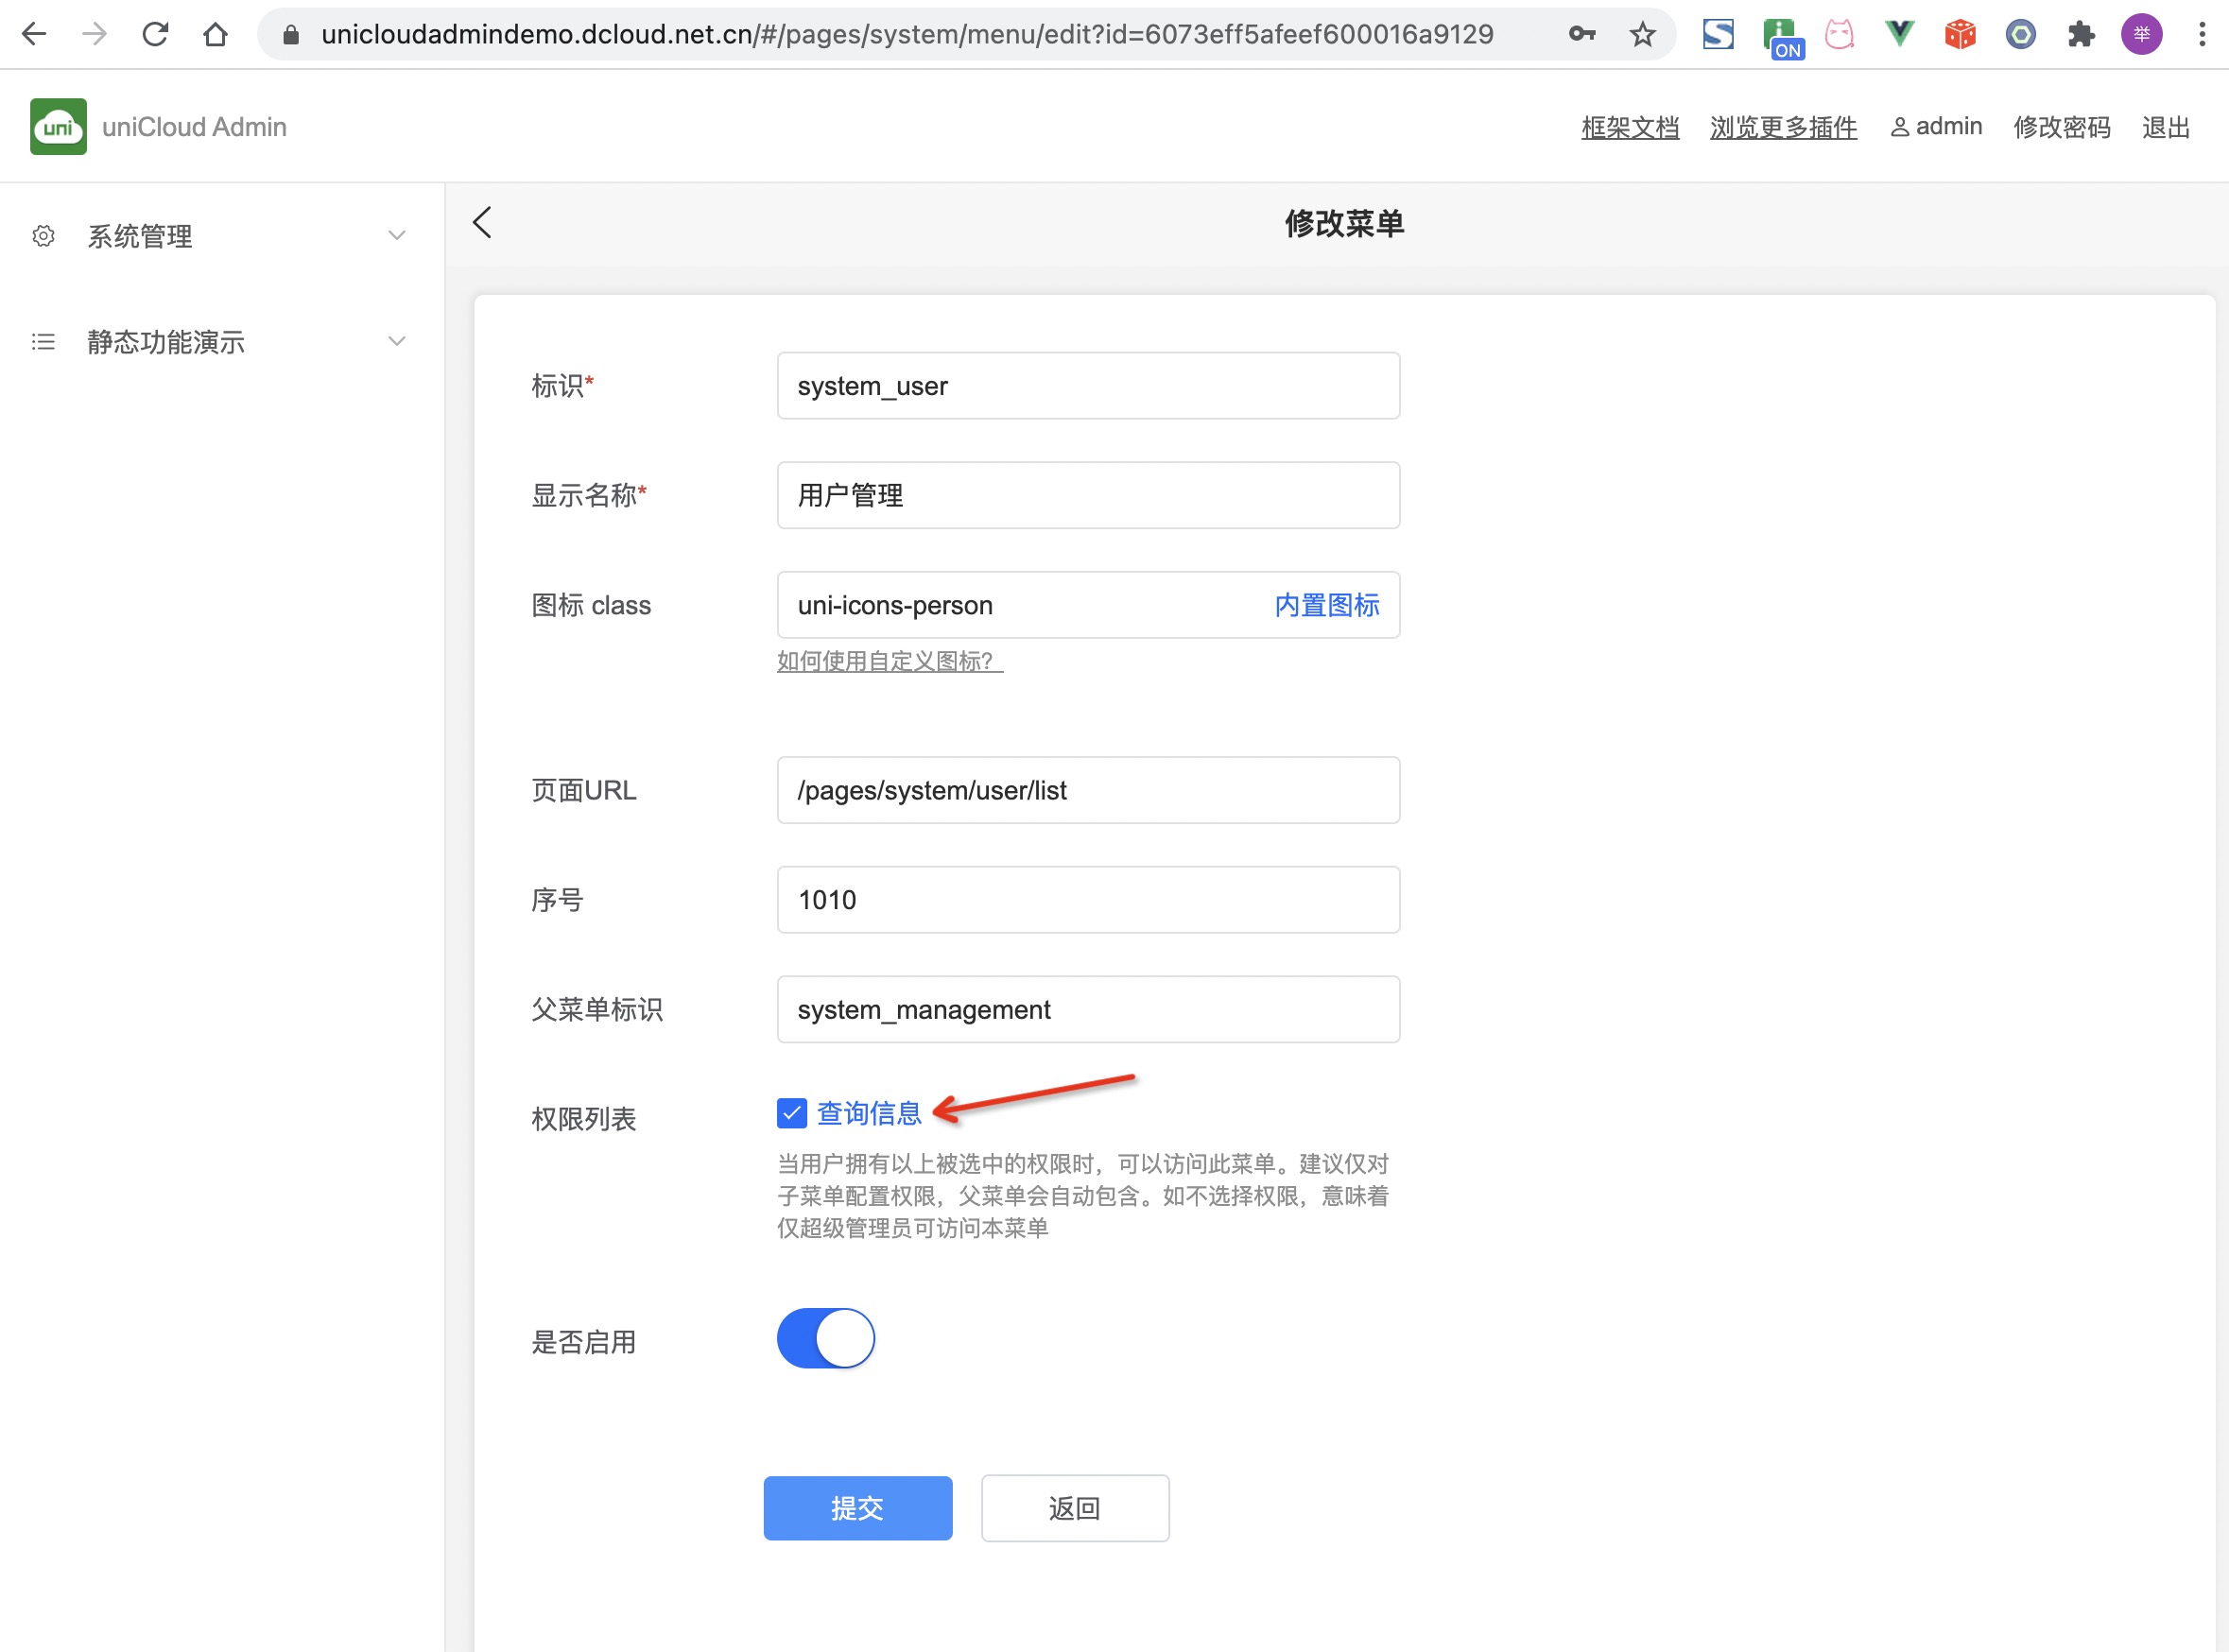
- 设置有查询信息权限的人,拥有访问admin系统菜单"用户管理"的权限。在左侧菜单的菜单管理里,找到菜单“用户管理”,点修改,在权限列表里勾选“查询信息”,也就是有查询信息权限的人,可以看到本菜单
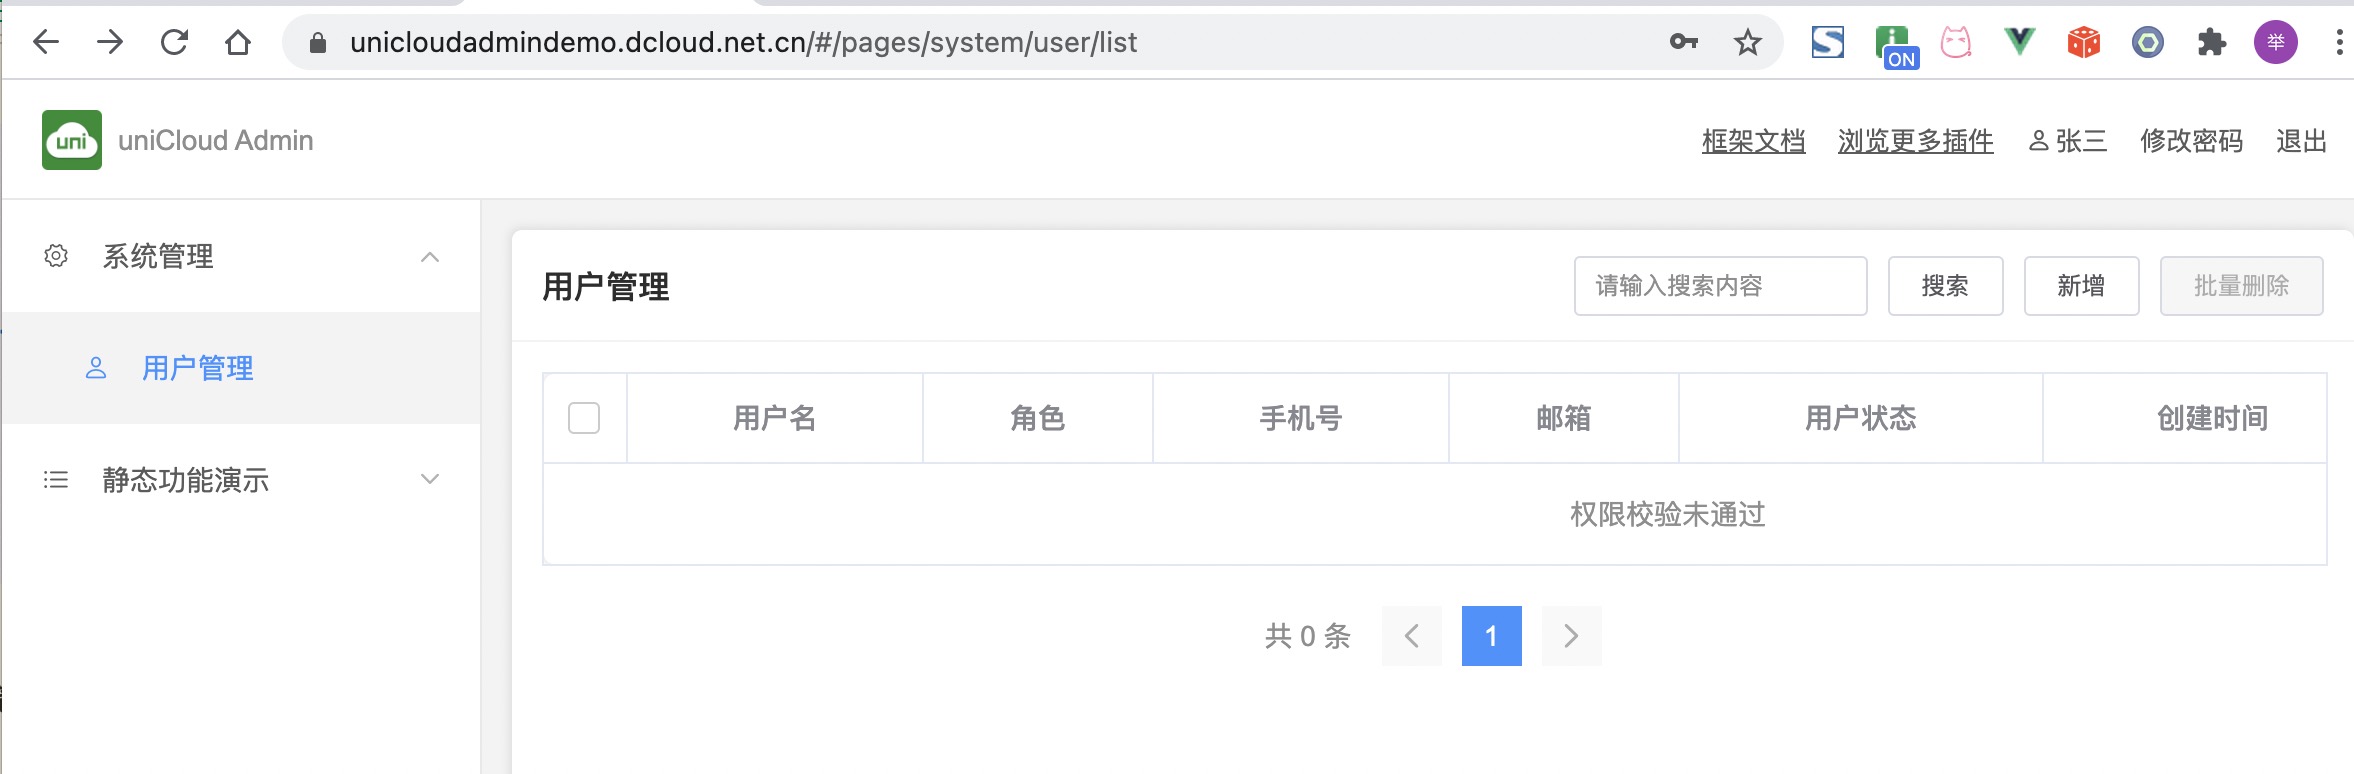
- 这时你用账户“张三”登录,就能进入到admin系统。但你会看到如下图提示“权限校验未通过”。因为刚刚仅为该用户赋予了访问菜单的权限。还未赋予访问uni-id-users表的阅读权限
- 需要在hbuilderx中将表uni-id-users的schema文件中设置新角色的权限,将permission下的read节点配置为
"read": "'read' in auth.permission",并上传到云端。当然这在示例项目不能实现,需要你自己搭建admin系统,重复以上步骤,点此下载uni-admin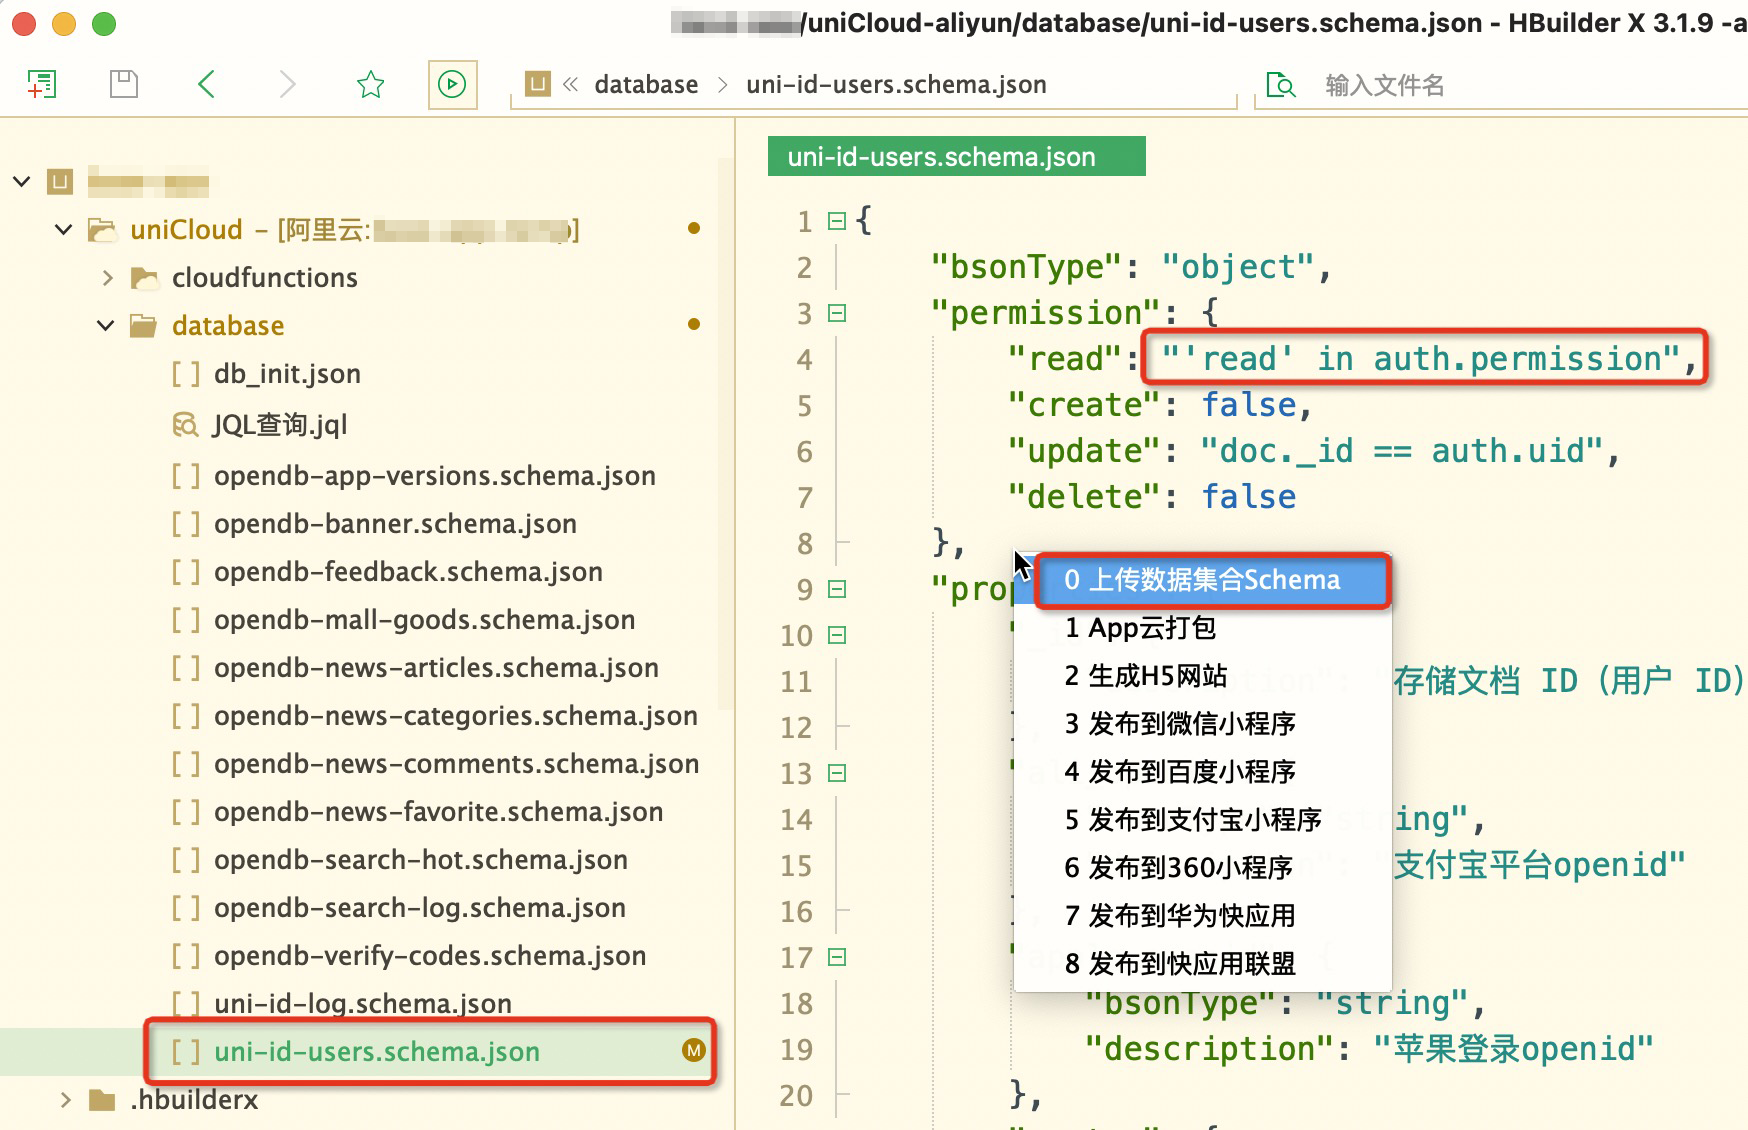
- At this point, you can refresh the page to access the data list of user management
# icon icon
The admin framework has a built-in set of icon icons. In the Static Function Demonstration - Icon menu, click the icon to copy the class definition of the icon.
With the style selected, enter the style name in the form on the New Menu page. Menu items without styles will have no icons.
Of course, you can also use a third-party icon library. Take the icon using elementUI as an example, import the style file of the icon library in app.vue:
<style>
  /* 注意此处仅为 icon 使用示例,建议引入纯净图标库,避免增加不必要的 css */
  @import 'https://unpkg.com/element-ui/lib/theme-chalk/index.css';
</style>
Just use the icon's class name on the label: el-icon-s-tools
# Add new page
To add new pages, you can develop your own pages, or you can download plug-ins from the plug-in market. If you need to add a menu to the page, see [Menu management] above (#%E9%9D%99%E6%80%81%E8%8F%9C%E5%8D%95%E5%92%8C%E5%8A %A8%E6%80%81%E8%8F%9C%E5%8D%95).
The development page is not limited to the development method:
- You can add ordinary pages, call functions in the front end, and operate with cloud functions in the background
- You can use cloud function single-file routing, a uni-cloud-router single-file routing is included by default in the project, or you can use Other single-file routes for the plugin marketplace
- You can use clientdb to directly operate the database on the front end, and configure the db schema in the background for permission and format verification
- uni-admin pages can be generated using schema2code. This is the most common and efficient page development mode. See details
Note: When using uni-cloud-router, the folders and files under the controller should not be named the same. For example, the writing of app/room cannot tell whether
appis the fileapp.jsor the folderapp`
# Develop your own page
The development page in admin is the same as the uni-app development vue page.
# Download the plug-in from the plug-in market and register it in the dynamic menu on the left of the admin
Steps for usage:
- Import plugins from Plugin Market
- In HBuilder X 3.1+ select the project to add the plugin
- Right-click on the db_init.json file of the plugin and click "Initialize Cloud Database"
- Add [Menu to be added] in the menu management
- Refresh admin to see the new menu in the menu bar
---------------------------------- Dividing line-------------- --------------------------
# admin plugin development
We are not only users of plugins, but also developers of plugins, so how to develop a uni-admin plugin?
For the admin plug-in, the function can be developed in the project, and then this function can be stripped into a plug-in. The process of other developers using the plugin is to restore the plugin to a function in the project.
The admin plugin includes cloud functions and front-end pages. It must be based on the uni-id account and permission system. It does not limit the development method of cloud functions. You can write ordinary cloud functions yourself, use any single-route cloud function framework, or use clientDB. .
The admin plugin cannot be an overall project and cannot contain a manifest. It is more similar to a page template.
Directory structure of the _admin plugin: _
├── uniCloud
│   ├── cloudfunctions          # 云函数
│   └── database
│       ├── xxx.schema.json     # 数据库schema文件
│       └── db_init.json        # 数据库初始化文件
├── js_sdk                      # js sdk
├── pages                       # 页面
│   └── your-page               # 你的页面
└── %pluginId%-menu.json        # 向uni-admin左侧菜单注册新菜单的声明文件。pluginId 为你上传插件市场时填的插件id。uni_module下不需要pluginId,直接就是menu.json
%pluginId%-menu.json configuration
This file is used for the dynamic menu on the left side of the plugin registration uni-admin.
pluginId is the plugin id you filled in when uploading the plugin marketplace (each plugin in the plugin marketplace has a unique id).
If your plugin id is "xxx-yyy", then place xxx-yyy-menu.json in the root directory of the plugin, and configure the content in the following format. (pluginId is not required under uni_module, it is directly menu.json)
[
  {
    "menu_id": "xxx-yyy",
    "name": "显示名称",
    "icon": "",
    "url": "/pages/system/permission/list",
    "sort": 1,
    "parent_id": "system_management",
    "permission": []
  }
]
In the above example:
menu_iddoes not repeat the menu_id in the previous admin system. An admin plugin can register multiple menusiconis the class name of uni-icons in uni-uisortmenu sorting, the smaller the number, the higher the sortingparent_idThemenu_idof this menu's parent menu. If the parent menu is not needed, i.e. registered in the root menu, please deleteparent_id. The "system_management" in the example is themenu_idof the system management menu that comes with uni-adminpermissionis permission management. Generally, the plugin author does not configure this item, but the plugin user decides how to control the permission on their specific project.
After the plugin containing %pluginId%-menu.json is imported into the project, run uni-admin, the menu management module will automatically read the menu configuration in this json file, generate [to be added menu], configuration and admin [manage dynamic menu] The same is true. The plug-in author can visually click on the interface to confirm the addition, and then the menu can be added to his project.
Although menu initialization can also be done via db_init.json, this is not recommended. It is easy to conflict with the user's database. The %pluginId%-menu.json method is still recommended.
About uni-admin and uni-cloud-router public modules uni-admin comes with a single routing framework, uni-cloud-router, and then comes with a uni-admin cloud function that uses this uni-cloud-router. But the plugin author's plugin cannot be written in the uni-admin directory. The cloud function of the plug-in must be prefixed with the plug-in id. If you want to combine all the cloud functions of your plug-in into one cloud function, you can create a new cloud function of your own, and reference the uni-cloud-router public module in it.
Use schema2code to generate admin page
Most of the form pages of the admin plug-in can be automatically generated by the schema2code tool that comes with uniCloud, which can directly generate a complete page of database additions, deletions, changes, and inquiries. So making a plugin in uni-admin is very simple.
First, configure DB Schema in the database, and then use the schema2code generation code tool provided by the uniCloud web console to quickly generate data display, new, Modified, deleted page code, and comes with form validation. See: schema2code
To prevent file conflicts with user projects, the plugin's page should have the plugin's prefix, such as pages/xxx-page. The built-in database schema file is also recommended to be prefixed.
The following is a list of existing uni-admin plugins, you can refer to: [https://ext.dcloud.net.cn/?cat1=7&cat2=74&orderBy=UpdatedDate](https://ext.dcloud.net.cn/? cat1=7&cat2=74&orderBy=UpdatedDate)
How to upload plugin market after plugin development
For more information about plug-in uploads, please refer to Summary of DCloud Plug-in Development Guide and the admin plug-in section. Plug-in authors can submit plug-ins according to this document. On the upload and release page of the plug-in market, select the Admin plug-in of the uniCloud category.
# Use the tripartite component library in uni-admin
uni-admin supports all three-party Vue UI libraries, including non-uni-app UI libraries such as elementUI, but note that these for h5 ui libraries can only be used in browsers and cannot be adapted to apps and applets, as follows.
Take the use of the element-ui framework as an example:
Install UI framework
npm i element-ui -S
Reference in main.js
import elementUI from "element-ui";
import "element-ui/lib/theme-chalk/index.css";

Vue.use(elementUI);
Notice:
- The button, input and other components of uni-app are coated with a layer of HTML tags such as button and input, which is the same as the WeChat applet. If you use a for html library, its css element selectors may need to be adjusted to work as expected.
- To avoid the file coverage problem caused by the "front-end web hosting" where the developer directly deploys the 'client project' and 'administrator project' to the same cloud service space.
The base path where the uni-admin framework runs is
/admin/by default. After deploying to the front-end web hosting, you need to access it throughhttps://your domain name/admin/, and the routing mode must be hash. If you want to customize the base path of the project's running, modify the value ofh5 -> router -> basein themanifest.jsonfile.
# common problem
# Using uni-admin to create a new user cannot log in, and it will prompt "This account has no permission to log in"?
用户登录逻辑:登录时系统检测没有菜单会提示“暂无权限登录”,需要给新账号绑定角色,角色有菜单方可登录
# admin账号密码忘记了,如何重置admin账号密码?
有两个方案
方案一:
- 去数据库把原来的admin账号的role角色改成空数组(这样你就可以再次注册admin2账号)
- 注册admin2账号,并用admin2账号登录,去用户管理把原先的admin账号的密码重置成123456。
- 此时就可以登录原来的admin账号了,最后去数据库把admin2账号删了。
方案二:
- 使用uni-id或uni-id-co注册一个普通的账号,比如账户名:test 密码:123456
- 前往uniCloud web控制台 - 云数据库 - 打开uni-id-users表 - 找到刚注册的test账号,复制其password字段的值,修改admin账号的password跟test账号的password一致。
- 此时admin账号的密码就已经重置为123456了