
English
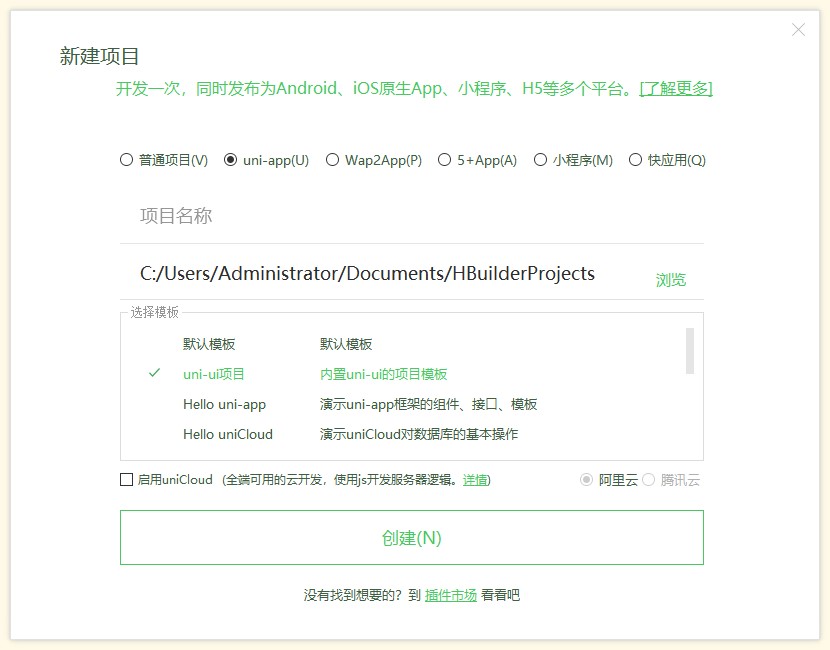
uni-ui supports HBuilderX to directly create a new project template, npm installation and separate import of individual components, etc.

Due to the unique easycom technology of uni-app, you can directly use various Vue components that meet the rules without reference and registration.
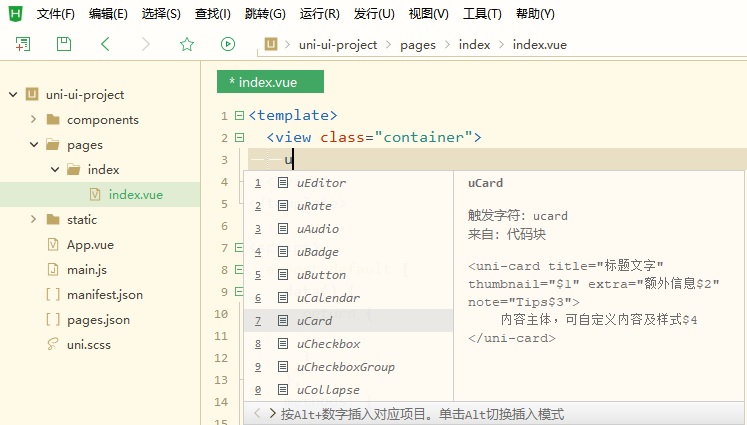
Type u in the code area, pull up a list of various built-in or uni-ui components, and select one to use the component.
Place the cursor on the component name and press F1 to view the component's documentation.

If you have not created a uni-ui project template, you can also install a required component separately in your project through uni_modules. The following table is the list of extension components of uni-ui. Click each component on the details page to import the components to the project. After importing, you can use it directly without import and registration.
| Component Name | Component Description |
|---|---|
| uni-badge | digital badge |
| uni-calendar | Calendar |
| uni-card | card |
| uni-collapse | Collapse Panel |
| uni-combox | combo box |
| uni-countdown | Countdown |
| uni-data-checkbox | data selector |
| uni-data-picker | Data-driven picker picker |
| uni-dateformat | date format |
| uni-datetime-picker | date picker |
| uni-drawer | Drawer |
| uni-easyinput | Enhanced Input Box |
| uni-fab | floating button |
| uni-fav | Favorite button |
| uni-file-picker | File selection and upload |
| uni-forms | Forms |
| uni-goods-nav | Commodities Navigation |
| uni-grid | Gongge |
| uni-group | group |
| uni-icons | icon |
| uni-indexed-list | indexed list |
| uni-link | Hyperlink |
| uni-list | list |
| uni-load-more | Load More |
| uni-nav-bar | custom navigation bar |
| uni-notice-bar | Notice Bar |
| uni-number-box | number input box |
| uni-pagination | Pagination |
| uni-popup | popup layer |
| uni-rate | rating |
| uni-row | layout-row |
| uni-search-bar | search bar |
| uni-segmented-control | segmented-control |
| uni-steps | step bar |
| uni-swipe-action | Swipe Action |
| uni-swiper-dot | Carousel indicator dot |
| uni-table | table |
| uni-tag | tag |
| uni-title | Chapter Title |
| uni-transition | Transition Animation |
Use the uni_modules method to install the component library, which can be imported directly through the plug-in market, and the components can be quickly updated through the right-click menu. No reference or registration is required, and the uni-ui component can be used directly in the page. Click to install uni-ui component library
Note: Downloading the latest components currently only supports uni_modules , and the non-uni_modules version supports up to the 1.2.10 version of the component
If you cannot upgrade to the uni_modules version, you can use uni_modules to install the corresponding components and copy the components to the corresponding directory.
For example, to update uni-list and uni-badge, copy all the directories under uni_modules>uni-list>components and uni_modules>uni-badege>components to the following directory:
Directory example
┌─components              组件目录
│  ├─uni-list             list 列表目录
│  │  └─uni-list.vue      list 组件文件
│  ├─uni-list-item        list-item 列表目录
│  │  └─uni-list-item.vue list 组件文件
│  ├─uni-badge         	  badge 角标目录
│  │  └─uni-badge.vue     badge 组件文件
│  └─ //....              更多组件文件
├─pages                   业务页面文件存放的目录
│  ├─index
│  │  └─index.vue         index示例页面
├─main.js                 Vue初始化入口文件
├─App.vue                 应用配置,用来配置App全局样式以及监听 应用生命周期
├─manifest.json           配置应用名称、appid、logo、版本等打包信息,详见
└─pages.json              配置页
uni_modulesIf you want to import all uni-ui components into the project at once, you only need to import one uni-ui component click to import .
If other components are not automatically imported, you can right-click on the uni-ui component directory and select Install third-party plug-in dependencies.
You can use npm to install the uni-ui library in the vue-cli project, or use npm directly in the HBuilderX project.
Note The cli project does not compile the components under
node_modulesby default, resulting in the failure of functions such as conditional compilation, resulting in component exceptions// vue.config.js module.exports = { transpileDependencies:['@dcloudio/uni-ui'] }
Prepare for sass
For the vue-cli project, please install sass and sass-loader first. If you use it in HBuliderX, you can skip this step.
npm i sass -D 或 yarn add sass -D
npm i sass-loader@10.1.1 -D 或 yarn add sass-loader@10.1.1 -D
If
nodeversion is less than 16, sass-loader please use a version lower than @11.0.0, [sass-loader@11.0.0 does not support vue@2.6.12](https://stackoverflow.com/questions/ 66082397/typeerror-this-getoptions-is-not-a-function) Ifnodeversion is greater than 16,sass-loaderrecommendsv8.xversion
Anso uni-ui
npm i @dcloudio/uni-ui 或 yarn add @dcloudio/uni-ui
Configure easycom
After using npm to install uni-ui, you need to configure easycom rules, so that the components installed by npm support easycom
Open pages.json in the project root directory and add the easycom node:
// pages.json
{
	"easycom": {
		"autoscan": true,
		"custom": {
			// uni-ui rules are configured as follows
			"^uni-(.*)": "@dcloudio/uni-ui/lib/uni-$1/uni-$1.vue"
		}
	},

	// Other content
	pages:[
		// ...
	]
}
Use components in template:
<uni-badge text="1"></uni-badge>
<uni-badge text="2" type="success" @click="bindClick"></uni-badge>
<uni-badge text="3" type="primary" :inverted="true"></uni-badge>
Notice
easycom , if you refer to the component yourself, there may be a problem that the component cannot be foundvue.config.js:// Create a vue.config.js file in the root directory and configure it as follows
module.exports = {
transpileDependencies: ['@dcloudio/uni-ui']
}
// If it is vue3 + vite, no need to add configuration
uni-ui does not support installing using Vue.use()