English
English
# uni-pay 2
本文档适用于
uni-pay 2.0.0及以上版本,需 HBuilderX 3.6.5 及以上版本。旧版本文档请访问:uni-pay 1.x 文档
# Introduction
Payment is an important means of realization, but its development is complicated. At different ends, a lot of code has to be written on the front end and back end to connect to WeChat payment, Alipay and other channels.
The amount involved is not a trivial matter, generating business orders, obtaining the cash register, initiating payment, payment status query, payment asynchronous callback, failure processing, initiating refund, refund status query, payment statistics... many links, a lot of code, and errors High rate.
Why can't there be an open source, high-quality project? It can avoid repeated development, and you can use it with peace of mind, without worrying about writing bugs from scratch.
uni-pay was born out of necessity.
The previous uni-pay 1.x version is only a public module, which allows developers to use it immediately without studying the back-end development of Alipay, WeChat and other payment platforms, and without writing different codes for them.
However, developers still need to write front-end pages and cloud functions by themselves, and there is still a certain degree of difficulty and workload in development. Especially for novices, the threshold is high and error-prone.
Starting from uni-pay 2.0, front-end pages and cloud objects are supplemented, allowing developers to use it out of the box.
**Note: uni-pay 2 still has a built-in uni-pay public module, which is backward compatible with uni-pay 1.x, that is, one-click upgrade from uni-pay 1.x to uni-pay 2.x, and will not affect your old projects. **
After the developer introduces uni-pay into the project, functions such as WeChat payment and Alipay payment do not need to be developed by themselves. Due to the openness and clear hierarchical structure of the source code, it is also very convenient to adjust if there are secondary development needs.
Plug-in market address: https://ext.dcloud.net.cn/plugin?name=uni-pay
Online experience address
Note: The online experience address uses the free version of Alibaba Cloud, and the number of requests for the free version is limited. If the request fails, it is normal, and you can directly import the sample project to bind your own space experience.

The functions of uni-pay include:
page
- Payment cash register component (let users choose payment channels) Component Details
- Successful payment result page (uni-ad advertisement can be configured to increase developer revenue) uni-AD advertising network
Cloud object (uni-pay-co)
- WeChat payment
- WeChat APP payment
- WeChat MiniApp Payment
- WeChat official account payment
- WeChat mobile phone external browser H5 payment
- WeChat PC scan code payment
- Alipay payment
- Alipay APP payment
- Alipay MiniApp payment
- Alipay mobile phone external browser H5 payment (support Alipay payment in the H5 page of WeChat APP)
- Alipay PC scan code payment
- common interface
- payment asynchronous callback
- Query order
- initiate a refund
- Check Refund
- close order
- Get the currently supported payment methods
- Get the openid of the current paying user
- ios内购支付
- WeChat payment
支付统计(内置于uni-admin的支付统计中)
- 收款趋势
- 转换漏斗分析
- 价值用户排行
- 订单明细
# uni-pay composition
uni-pay云端一体模板,包含前端页面、云对象、云端公共模块、uni-config-center配置、opendb数据表等内容。以及内置于uni-admin的支付统计报表。
# uni_modules for uni-pay
uni_modules of uni-pay contains front-end pages, cloud objects and public modules. The directory structure is as follows:
├─uni_modules                                         存放[uni_module](/uni_modules)规范的插件。
│    ├─其他module
│    └─uni-pay
│        ├─uniCloud
│        │    └─cloudfunctions                        云函数目录
│        │        ├─common                            云端公共模块目录
│        │            └─uni-pay                       uni-pay公共模块
│        │        └─uni-pay-co                        集成调用uni-pay方法的云对象
│        │            ├─common                        公用逻辑
│        │            ├─config                        配置
│        │            │  └─permission.js              调用接口所需的权限配置
│        │            ├─dao                           数据库操作相关API
│        │            ├─lang                          国际化目录
│        │            ├─lib                           基础功能(不建议修改此目录下文件)
│        │            │  ├─alipay.js                  支付宝平台相关API
│        │            │  ├─common.js                  一些通用API
│        │            │  ├─crypto.js                  跨云函数通信加解密API
│        │            │  ├─qrcode.js                  云端生成二维码的插件(来自于npm i qrcode的压缩版)
│        │            │  ├─wxpay.js                   微信支付平台相关API
│        │            ├─middleware                    中间件
│        │            ├─notify                        异步通知逻辑(你自己的异步通知逻辑写在这里)
│        │            └─service                       云对象方法的服务实现
│        ├─components                                 组件目录
│        │    └─uni-pay                               uni-pay收银台弹窗组件
│        │        └─uni-pay.vue
│        ├─js_sdk                                     js sdk目录
│        │    └─js_sdk.js
│        ├─pages                                      页面目录
│        │    └─success
│        │        └─success.js                        支付成功结果页
│        ├─static                                     静态资源目录
│        ├─changelog.md                               更新日志
│        ├─package.json                               包管理文件
│        └─readme.md                                  插件自述文件
Complete uni-app project directory structure [see also](https://uniapp.dcloud.net.cn/frame?id=%E7%9B%AE%E5%BD%95%E7%BB%93%E6% 9E%84)
# uni-config-center configuration of uni-pay
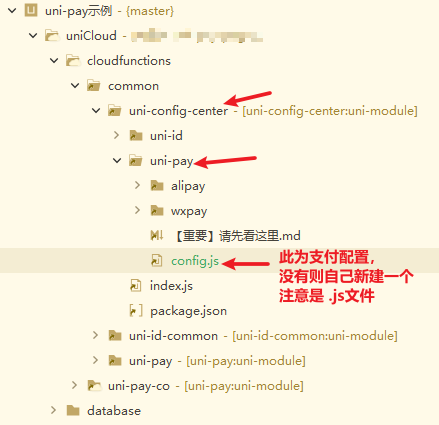
The payment configuration is not in the plugin directory, it is stored in uniCloud/cloudfunctions/common/uni-config-center/uni-pay/config.js View payment configuration introduction
# uni-pay opendb data table
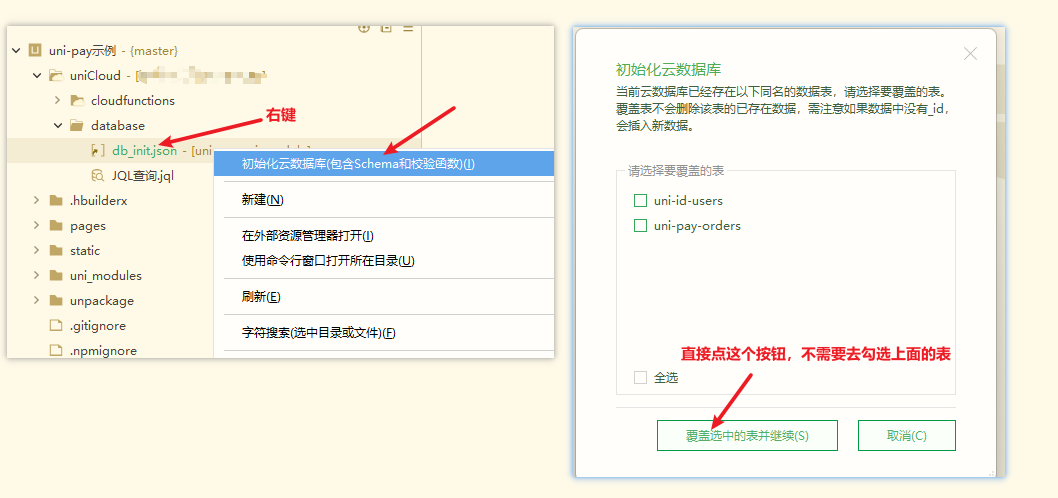
The payment plug-in needs to create the following tables before it can run normally. You can right-click to execute the db_init.json function of initializing the database that comes with the plug-in to create the table.
- Payment Order Form uni-pay-orders
# Example project running tutorial
Before docking your own project, it is recommended to run through the sample project first. If you can run through the sample project, it means that your configuration and certificate must be correct, and then integrate uni-pay into your own project.
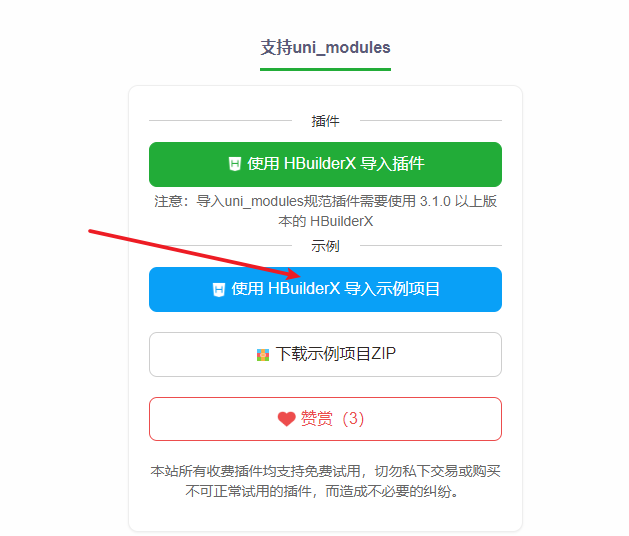
- Import the
uni-paysample project from the plug-in market. Go to the plug-in market
- Open
uni-payconfiguration file, configuration file address:uniCloud/cloudfunctions/common/uni-config-center/uni-pay/config.jsView payment configuration introduction - Upload the public module
uni-config-center(right click, upload the public module, every time you modify the payment configuration, you need to re-upload this module to take effect) - Upload public module
uni-pay(right click, upload public module) - Upload the cloud object
uni-pay-co(right click, upload and deploy. Of course, right click on the uniCloud directory to upload in batches) - Database initialization
- Run the startup project, Choose to use the cloud function environment in the HBuilderX console
注意:测试支付回调必须选择云端云函数环境

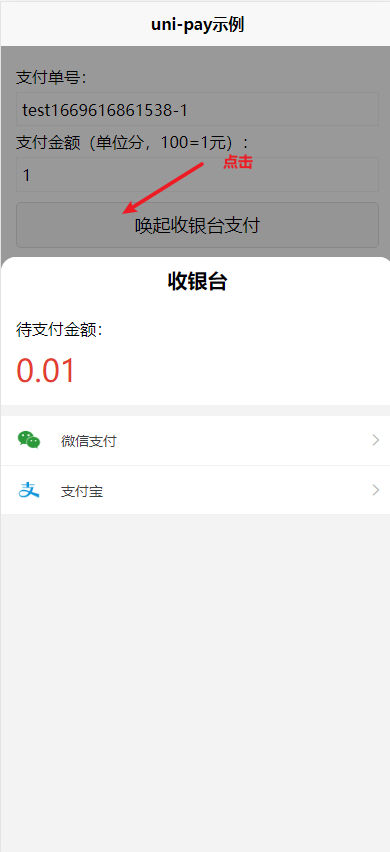
- Click on the front-end page to invoke the payment at the cashier. If the payment can be made normally, it means that the sample project has run successfully, and you can start docking your own project. Docking own project
# config-center configuration of uni-pay
Developers need to apply to activate payment services in the payment background of WeChat and Alipay, and will get various credentials after success, and these credentials must be configured in the configuration of uni-pay.
The configuration file is in uniCloud/cloudfunctions/common/uni-config-center/uni-pay/config.js
# Complete payment configuration example
Here are WeChat and Alipay full platform payment configuration samples. If only some payment methods are used, there will be a dedicated sub-channel chapter later.
const fs = require('fs');
const path = require('path')
module.exports = {
	// Uniform - payment callback address, the format is "service space ID":"URL address"
	"notifyUrl": {
		// 测试环境服务空间-支付回调地址
		"mp-b267e273-19a7-4288-99c7-f6f27f9c5b77": "https://fc-mp-b267e273-19a7-4288-99c7-f6f27f9c5b77.next.bspapp.com/uni-pay-co",
		// 线上环境服务空间-支付回调地址(如果只有一个服务空间,则只需要配置线上环境服务空间即可)
		"mp-499e2a37-0c77-418a-82aa-3e5820ecb057": "https://fc-mp-499e2a37-0c77-418a-82aa-3e5820ecb057.next.bspapp.com/uni-pay-co",
	},
	"notifyKey":"5FB2CD73C7B53918728417C50762E6D45FB2CD73C7B53918728417C50762E6D4", // 跨云函数通信时的加密密钥,建议手动改下,不要使用默认的密钥,长度保持在64位以上即可
	// WeChat payment related
	"wxpay": {
		"enable": true, // 是否启用微信支付
		// WeChat- MiniApp payment
		"mp": {
			"appId": "", // 小程序的appid
			"secret": "", // 小程序的secret
			"mchId": "", // 商户id
			"key": "", // v2的api key
			"pfx": fs.readFileSync(__dirname + '/wxpay/apiclient_cert.p12'), // v2需要用到的证书
			"v3Key": "", // v3的api key
			"appCertPath": path.join(__dirname, 'wxpay/apiclient_cert.pem'), // v3需要用到的证书
			"appPrivateKeyPath": path.join(__dirname, 'wxpay/apiclient_key.pem'), // v3需要用到的证书
			"version": 2, // 启用支付的版本 2代表v2版本 3 代表v3版本
		},
		// WeChat - APP payment
		"app": {
			"appId": "", // app开放平台下的应用的appid
			"secret": "", // app开放平台下的应用的secret
			"mchId": "", // 商户id
			"key": "", // v2的api key
			"pfx": fs.readFileSync(__dirname + '/wxpay/apiclient_cert.p12'), // v2需要用到的证书
			"v3Key": "", // v3的api key
			"appCertPath": path.join(__dirname, 'wxpay/apiclient_cert.pem'), // v3需要用到的证书
			"appPrivateKeyPath": path.join(__dirname, 'wxpay/apiclient_key.pem'), // v3需要用到的证书
			"version": 2, // 启用支付的版本 2代表v2版本 3 代表v3版本
		},
		// WeChat - scan code to pay
		"native": {
			"appId": "", // 可以是小程序或公众号或app开放平台下的应用的任意一个appid
			"secret": "", // secret
			"mchId": "", // 商户id
			"key": "", // v2的api key
			"pfx": fs.readFileSync(__dirname + '/wxpay/apiclient_cert.p12'), // v2需要用到的证书
			"v3Key": "", // v3的api key
			"appCertPath": path.join(__dirname, 'wxpay/apiclient_cert.pem'), // v3需要用到的证书
			"appPrivateKeyPath": path.join(__dirname, 'wxpay/apiclient_key.pem'), // v3需要用到的证书
			"version": 2, // 启用支付的版本 2代表v2版本 3 代表v3版本
		},
		// WeChat - official account payment
		"jsapi": {
			"appId": "", // 公众号的appid
			"secret": "", // 公众号的secret
			"mchId": "", // 商户id
			"key": "", // v2的api key
			"pfx": fs.readFileSync(__dirname + '/wxpay/apiclient_cert.p12'), // v2需要用到的证书
			"v3Key": "", // v3的api key
			"appCertPath": path.join(__dirname, 'wxpay/apiclient_cert.pem'), // v3需要用到的证书
			"appPrivateKeyPath": path.join(__dirname, 'wxpay/apiclient_key.pem'), // v3需要用到的证书
			"version": 2, // 启用支付的版本 2代表v2版本 3 代表v3版本
		},
		// WeChat - mobile phone external browser H5 payment
		"mweb": {
			"appId": "", // 可以是小程序或公众号或app开放平台下的应用的任意一个appid
			"secret": "", // secret
			"mchId": "", // 商户id
			"key": "", // v2的api key
			"pfx": fs.readFileSync(__dirname + '/wxpay/apiclient_cert.p12'), // v2需要用到的证书
			"v3Key": "", // v3的api key
			"appCertPath": path.join(__dirname, 'wxpay/apiclient_cert.pem'), // v3需要用到的证书
			"appPrivateKeyPath": path.join(__dirname, 'wxpay/apiclient_key.pem'), // v3需要用到的证书
			"version": 2, // 启用支付的版本 2代表v2版本 3 代表v3版本
			// scene information, required
			"sceneInfo": {
				"h5_info": {
					"type": "Wap", // 此值固定Wap
					"wap_url": "", // 你的H5首页地址,必须和你发起支付的页面的域名一致。
					"wap_name": "", // 你的H5网站名称
				}
			}
		},
	},
	// 支付宝相关(加签方式选证书模式,加密算法选RSA2)
	"alipay": {
		"enable": true, // 是否启用支付宝支付
		// Alipay- MiniApp payment configuration
		"mp": {
			"appId": "", // 支付宝小程序appid
			"privateKey": "", // 支付宝商户私钥
			"appCertPath": path.join(__dirname, 'alipay/appCertPublicKey.crt'), // 支付宝商户公钥路径
			"alipayPublicCertPath": path.join(__dirname, 'alipay/alipayCertPublicKey_RSA2.crt'), // 支付宝公钥路径
			"alipayRootCertPath": path.join(__dirname, 'alipay/alipayRootCert.crt'), // 支付宝根证书路径
		},
		// Alipay - APP payment configuration
		"app": {
			"appId": "", // 支付宝开放平台下应用的appid
			"privateKey": "", // 支付宝商户私钥
			"appCertPath": path.join(__dirname, 'alipay/appCertPublicKey.crt'), // 支付宝商户公钥路径
			"alipayPublicCertPath": path.join(__dirname, 'alipay/alipayCertPublicKey_RSA2.crt'), // 支付宝公钥路径
			"alipayRootCertPath": path.join(__dirname, 'alipay/alipayRootCert.crt'), // 支付宝根证书路径
		},
		// Alipay - H5 payment configuration (including: website QR code, mobile phone H5, need to apply for Alipay face-to-face payment interface permission)
		"native": {
			"appId": "", // 支付宝开放平台下应用的appid
			"privateKey": "", // 支付宝商户私钥
			"appCertPath": path.join(__dirname, 'alipay/appCertPublicKey.crt'), // 支付宝商户公钥路径
			"alipayPublicCertPath": path.join(__dirname, 'alipay/alipayCertPublicKey_RSA2.crt'), // 支付宝公钥路径
			"alipayRootCertPath": path.join(__dirname, 'alipay/alipayRootCert.crt'), // 支付宝根证书路径
		}
	},
	// ios in-app purchase related
	"appleiap" :{
		// ios in-app purchase payment
		"app": {
			"password": "", // App 专用共享密钥,App 专用共享密钥是用于接收此 App 自动续期订阅收据的唯一代码。如果您要将此 App 转让给其他开发者或不想公开主共享密钥,建议使用 App 专用共享密钥。非自动续订场景不需要此参数
			"timeout": 10000, // 请求超时时间,单位:毫秒
			"sandbox": false, // 是否是沙箱环境(本地调试ios走的是沙箱环境,故要设置为true,正式发布后,需要设置为false)
		}
	}
}
If you have any questions about how to obtain the parameters in the payment configuration, please click Get payment configuration help
Notice
WeChat Pay supports both V2 and V3 versions
Take WeChat MiniApp payment as an example
V2 version
"mp": {
	"appId": "", // 小程序的appid
	"secret": "", // 小程序的secret
	"mchId": "", // 商户id
	"key": "", // v2的api key
	"pfx": fs.readFileSync(__dirname + '/wxpay/apiclient_cert.p12'), // v2需要用到的证书
	"version": 2, // 启用支付的版本 2代表v2版本 3 代表v3版本
},
V3 version
"mp": {
	"appId": "", // 小程序的appid
	"secret": "", // 小程序的secret
	"mchId": "", // 商户id
	"v3Key": "", // v3的api key
	"appCertPath": path.join(__dirname, 'wxpay/apiclient_cert.pem'), // v3需要用到的证书
	"appPrivateKeyPath": path.join(__dirname, 'wxpay/apiclient_key.pem'), // v3需要用到的证书
	"version": 3, // 启用支付的版本 2代表v2版本 3 代表v3版本
},
Of course, you can also configure all of them, so that you can easily switch between V2 and V3
"mp": {
	"appId": "", // 小程序的appid
	"secret": "", // 小程序的secret
	"mchId": "", // 商户id
	"key": "", // v2的api key
	"pfx": fs.readFileSync(__dirname + '/wxpay/apiclient_cert.p12'), // v2需要用到的证书
	"v3Key": "", // v3的api key
	"appCertPath": path.join(__dirname, 'wxpay/apiclient_cert.pem'), // v3需要用到的证书
	"appPrivateKeyPath": path.join(__dirname, 'wxpay/apiclient_key.pem'), // v3需要用到的证书
	"version": 2, // 启用支付的版本 2代表v2版本 3 代表v3版本
},
# Payment callback configuration
The node corresponding to the payment configuration is notifyUrl
example
// Uniform - payment callback address, the format is "service space ID":"URL address"
"notifyUrl": {
	// 测试环境服务空间-支付回调地址
	"mp-b267e273-19a7-4288-99c7-f6f27f9c5b77": "https://fc-mp-b267e273-19a7-4288-99c7-f6f27f9c5b77.next.bspapp.com/uni-pay-co",
	// 线上环境服务空间-支付回调地址(如果只有一个服务空间,则只需要配置线上环境服务空间即可)
	"mp-499e2a37-0c77-418a-82aa-3e5820ecb057": "https://fc-mp-499e2a37-0c77-418a-82aa-3e5820ecb057.next.bspapp.com/uni-pay-co",
},
The format is "Service Space ID": "URLized Address"
**How to obtain the service space ID? **
Click here to enter the service space list, find the service space used by your project, and copy its service space ID

**How to obtain the URL address? **
Click here to enter the service space list, find the service space used by your project, click the service space name to enter the space details page, and click the left menu [Cloud Function/ Cloud Object] - Click the [Details] button on the right side of the [uni-pay-co] cloud object
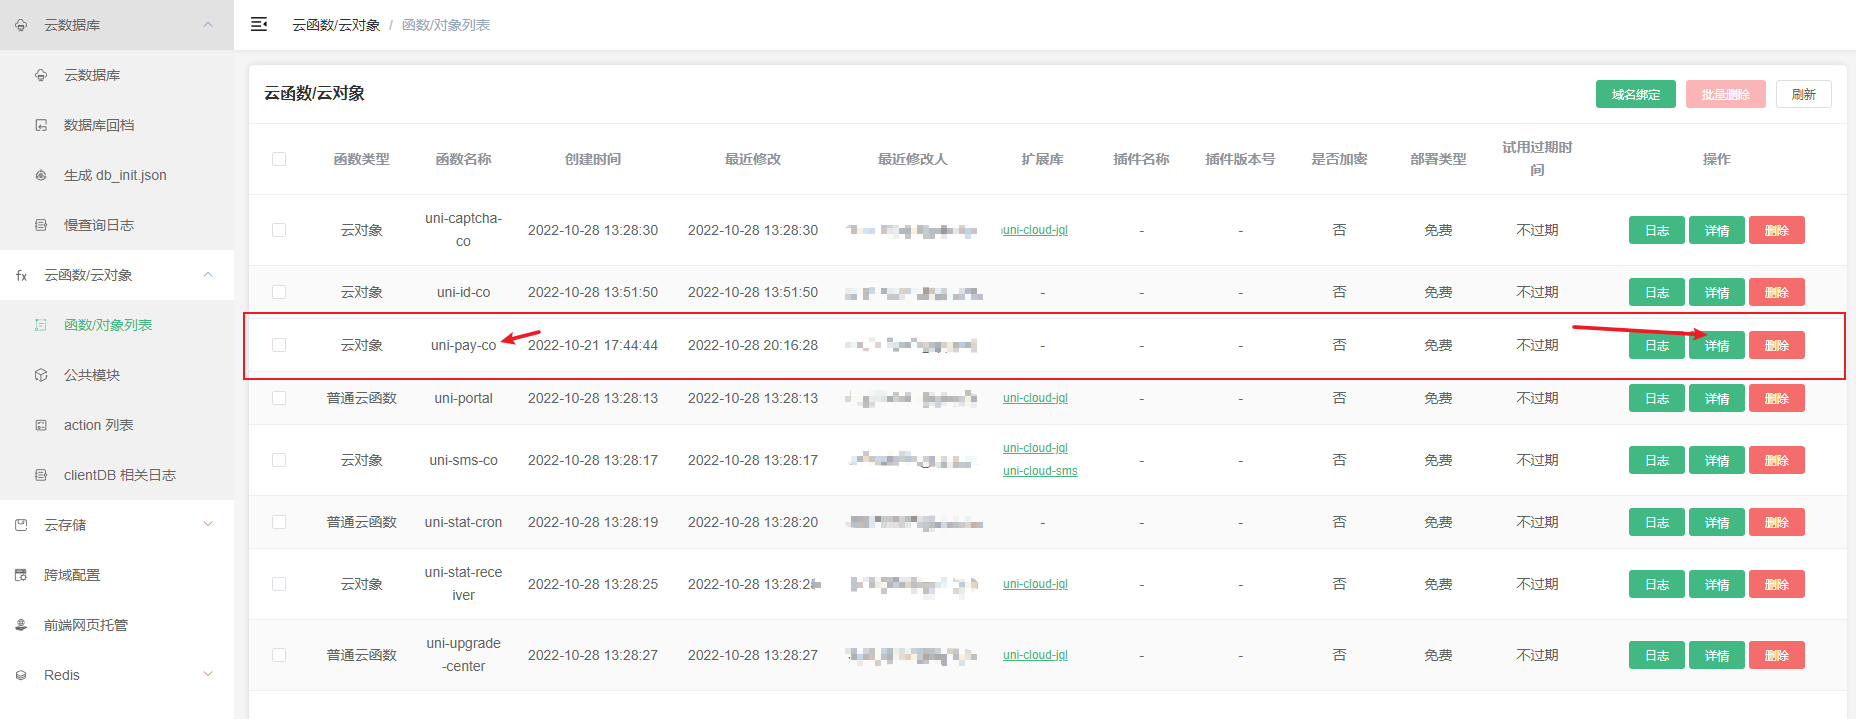
After entering the details, click [Copy Path] below, and the copied content is [URL Address]

# Sub-channel payment configuration example
The configuration sample above is a full-terminal configuration sample of WeChat and Alipay. If you only use one payment scenario, such as WeChat payment in the WeChat official account, you can see the sub-channel payment configuration example in the following chapters.
# WeChat APP payment
The node corresponding to the payment configuration is wxpay.app
const fs = require('fs');
const path = require('path')
module.exports = {
	// Uniform - payment callback address, the format is "service space ID":"URL address"
	"notifyUrl": {
		// 测试环境服务空间-支付回调地址
		"mp-b267e273-19a7-4288-99c7-f6f27f9c5b77": "https://fc-mp-b267e273-19a7-4288-99c7-f6f27f9c5b77.next.bspapp.com/uni-pay-co",
		// 线上环境服务空间-支付回调地址(如果只有一个服务空间,则只需要配置线上环境服务空间即可)
		"mp-499e2a37-0c77-418a-82aa-3e5820ecb057": "https://fc-mp-499e2a37-0c77-418a-82aa-3e5820ecb057.next.bspapp.com/uni-pay-co",
	},
	// WeChat payment related
	"wxpay": {
		"enable": true, // 是否启用微信支付
		// WeChat - APP payment
		"app": {
			"appId": "", // app开放平台下的应用的appid
			"secret": "", // app开放平台下的应用的secret
			"mchId": "", // 商户id
			"key": "", // v2的api key
			"pfx": fs.readFileSync(__dirname + '/wxpay/apiclient_cert.p12'), // v2需要用到的证书
			"v3Key": "", // v3的api key
			"appCertPath": path.join(__dirname, 'wxpay/apiclient_cert.pem'), // v3需要用到的证书
			"appPrivateKeyPath": path.join(__dirname, 'wxpay/apiclient_key.pem'), // v3需要用到的证书
			"version": 2, // 启用支付的版本 2代表v2版本 3 代表v3版本
		},
	},
}
# WeChat MiniApp Payment
The node corresponding to the payment configuration is wxpay.mp
const fs = require('fs');
const path = require('path')
module.exports = {
	// Uniform - payment callback address, the format is "service space ID":"URL address"
	"notifyUrl": {
		// 测试环境服务空间-支付回调地址
		"mp-b267e273-19a7-4288-99c7-f6f27f9c5b77": "https://fc-mp-b267e273-19a7-4288-99c7-f6f27f9c5b77.next.bspapp.com/uni-pay-co",
		// 线上环境服务空间-支付回调地址(如果只有一个服务空间,则只需要配置线上环境服务空间即可)
		"mp-499e2a37-0c77-418a-82aa-3e5820ecb057": "https://fc-mp-499e2a37-0c77-418a-82aa-3e5820ecb057.next.bspapp.com/uni-pay-co",
	},
	// WeChat payment related
	"wxpay": {
		"enable": true, // 是否启用微信支付
		// WeChat- MiniApp payment
		"mp": {
			"appId": "", // 小程序的appid
			"secret": "", // 小程序的secret
			"mchId": "", // 商户id
			"key": "", // v2的api key
			"pfx": fs.readFileSync(__dirname + '/wxpay/apiclient_cert.p12'), // v2需要用到的证书
			"v3Key": "", // v3的api key
			"appCertPath": path.join(__dirname, 'wxpay/apiclient_cert.pem'), // v3需要用到的证书
			"appPrivateKeyPath": path.join(__dirname, 'wxpay/apiclient_key.pem'), // v3需要用到的证书
			"version": 2, // 启用支付的版本 2代表v2版本 3 代表v3版本
		},
	},
}
# WeChat official account payment
The node corresponding to the payment configuration is wxpay.jsapi
const fs = require('fs');
const path = require('path')
module.exports = {
	// Uniform - payment callback address, the format is "service space ID":"URL address"
	"notifyUrl": {
		// 测试环境服务空间-支付回调地址
		"mp-b267e273-19a7-4288-99c7-f6f27f9c5b77": "https://fc-mp-b267e273-19a7-4288-99c7-f6f27f9c5b77.next.bspapp.com/uni-pay-co",
		// 线上环境服务空间-支付回调地址(如果只有一个服务空间,则只需要配置线上环境服务空间即可)
		"mp-499e2a37-0c77-418a-82aa-3e5820ecb057": "https://fc-mp-499e2a37-0c77-418a-82aa-3e5820ecb057.next.bspapp.com/uni-pay-co",
	},
	// WeChat payment related
	"wxpay": {
		"enable": true, // 是否启用微信支付
		// WeChat - official account payment
		"jsapi": {
			"appId": "", // 公众号的appid
			"secret": "", // 公众号的secret
			"mchId": "", // 商户id
			"key": "", // v2的api key
			"pfx": fs.readFileSync(__dirname + '/wxpay/apiclient_cert.p12'), // v2需要用到的证书
			"v3Key": "", // v3的api key
			"appCertPath": path.join(__dirname, 'wxpay/apiclient_cert.pem'), // v3需要用到的证书
			"appPrivateKeyPath": path.join(__dirname, 'wxpay/apiclient_key.pem'), // v3需要用到的证书
			"version": 2, // 启用支付的版本 2代表v2版本 3 代表v3版本
		},
	},
}
# WeChat mobile phone external browser H5 payment
The node corresponding to the payment configuration is wxpay.mweb
const fs = require('fs');
const path = require('path')
module.exports = {
	// Uniform - payment callback address, the format is "service space ID":"URL address"
	"notifyUrl": {
		// 测试环境服务空间-支付回调地址
		"mp-b267e273-19a7-4288-99c7-f6f27f9c5b77": "https://fc-mp-b267e273-19a7-4288-99c7-f6f27f9c5b77.next.bspapp.com/uni-pay-co",
		// 线上环境服务空间-支付回调地址(如果只有一个服务空间,则只需要配置线上环境服务空间即可)
		"mp-499e2a37-0c77-418a-82aa-3e5820ecb057": "https://fc-mp-499e2a37-0c77-418a-82aa-3e5820ecb057.next.bspapp.com/uni-pay-co",
	},
	// WeChat payment related
	"wxpay": {
		"enable": true, // 是否启用微信支付
		// WeChat - mobile phone external browser H5 payment
		"mweb": {
			"appId": "", // 可以是小程序或公众号或app开放平台下的应用的任意一个appid
			"secret": "", // secret
			"mchId": "", // 商户id
			"key": "", // v2的api key
			"pfx": fs.readFileSync(__dirname + '/wxpay/apiclient_cert.p12'), // v2需要用到的证书
			"v3Key": "", // v3的api key
			"appCertPath": path.join(__dirname, 'wxpay/apiclient_cert.pem'), // v3需要用到的证书
			"appPrivateKeyPath": path.join(__dirname, 'wxpay/apiclient_key.pem'), // v3需要用到的证书
			"version": 2, // 启用支付的版本 2代表v2版本 3 代表v3版本
			// scene information, required
			"sceneInfo": {
				"h5_info": {
					"type": "Wap", // 此值固定Wap
					"wap_url": "", // 你的H5首页地址,必须和你发起支付的页面的域名一致。
					"wap_name": "", // 你的H5网站名称
				}
			}
		},
	},
}
# WeChat PC scan code payment
The node corresponding to the payment configuration is wxpay.native
const fs = require('fs');
const path = require('path')
module.exports = {
	// Uniform - payment callback address, the format is "service space ID":"URL address"
	"notifyUrl": {
		// 测试环境服务空间-支付回调地址
		"mp-b267e273-19a7-4288-99c7-f6f27f9c5b77": "https://fc-mp-b267e273-19a7-4288-99c7-f6f27f9c5b77.next.bspapp.com/uni-pay-co",
		// 线上环境服务空间-支付回调地址(如果只有一个服务空间,则只需要配置线上环境服务空间即可)
		"mp-499e2a37-0c77-418a-82aa-3e5820ecb057": "https://fc-mp-499e2a37-0c77-418a-82aa-3e5820ecb057.next.bspapp.com/uni-pay-co",
	},
	// WeChat payment related
	"wxpay": {
		"enable": true, // 是否启用微信支付
		// WeChat - scan code to pay
		"native": {
			"appId": "", // 可以是小程序或公众号或app开放平台下的应用的任意一个appid
			"secret": "", // secret
			"mchId": "", // 商户id
			"key": "", // v2的api key
			"pfx": fs.readFileSync(__dirname + '/wxpay/apiclient_cert.p12'), // v2需要用到的证书
			"v3Key": "", // v3的api key
			"appCertPath": path.join(__dirname, 'wxpay/apiclient_cert.pem'), // v3需要用到的证书
			"appPrivateKeyPath": path.join(__dirname, 'wxpay/apiclient_key.pem'), // v3需要用到的证书
			"version": 2, // 启用支付的版本 2代表v2版本 3 代表v3版本
		},
	},
}
# Alipay APP payment
The node corresponding to the payment configuration is alipay.app
const fs = require('fs');
const path = require('path')
module.exports = {
	// Uniform - payment callback address, the format is "service space ID":"URL address"
	"notifyUrl": {
		// 测试环境服务空间-支付回调地址
		"mp-b267e273-19a7-4288-99c7-f6f27f9c5b77": "https://fc-mp-b267e273-19a7-4288-99c7-f6f27f9c5b77.next.bspapp.com/uni-pay-co",
		// 线上环境服务空间-支付回调地址(如果只有一个服务空间,则只需要配置线上环境服务空间即可)
		"mp-499e2a37-0c77-418a-82aa-3e5820ecb057": "https://fc-mp-499e2a37-0c77-418a-82aa-3e5820ecb057.next.bspapp.com/uni-pay-co",
	},
	// 支付宝相关(加签方式选证书模式,加密算法选RSA2)
	"alipay": {
		"enable": true, // 是否启用支付宝支付
		// Alipay - APP payment configuration
		"app": {
			"appId": "", // 支付宝开放平台下应用的appid
			"privateKey": "", // 支付宝商户私钥
			"appCertPath": path.join(__dirname, 'alipay/appCertPublicKey.crt'), // 支付宝商户公钥路径
			"alipayPublicCertPath": path.join(__dirname, 'alipay/alipayCertPublicKey_RSA2.crt'), // 支付宝公钥路径
			"alipayRootCertPath": path.join(__dirname, 'alipay/alipayRootCert.crt'), // 支付宝根证书路径
		},
	}
}
# Alipay MiniApp payment
The node corresponding to the payment configuration is alipay.mp
const fs = require('fs');
const path = require('path')
module.exports = {
	// Uniform - payment callback address, the format is "service space ID":"URL address"
	"notifyUrl": {
		// 测试环境服务空间-支付回调地址
		"mp-b267e273-19a7-4288-99c7-f6f27f9c5b77": "https://fc-mp-b267e273-19a7-4288-99c7-f6f27f9c5b77.next.bspapp.com/uni-pay-co",
		// 线上环境服务空间-支付回调地址(如果只有一个服务空间,则只需要配置线上环境服务空间即可)
		"mp-499e2a37-0c77-418a-82aa-3e5820ecb057": "https://fc-mp-499e2a37-0c77-418a-82aa-3e5820ecb057.next.bspapp.com/uni-pay-co",
	},
	// 支付宝相关(加签方式选证书模式,加密算法选RSA2)
	"alipay": {
		"enable": true, // 是否启用支付宝支付
		// Alipay- MiniApp payment configuration
		"mp": {
			"appId": "", // 支付宝小程序appid
			"privateKey": "", // 支付宝商户私钥
			"appCertPath": path.join(__dirname, 'alipay/appCertPublicKey.crt'), // 支付宝商户公钥路径
			"alipayPublicCertPath": path.join(__dirname, 'alipay/alipayCertPublicKey_RSA2.crt'), // 支付宝公钥路径
			"alipayRootCertPath": path.join(__dirname, 'alipay/alipayRootCert.crt'), // 支付宝根证书路径
		},
	}
}
# Alipay mobile phone external browser H5 payment
The node corresponding to the payment configuration is alipay.native (same as the PC scan code configuration node)
const fs = require('fs');
const path = require('path')
module.exports = {
	// Uniform - payment callback address, the format is "service space ID":"URL address"
	"notifyUrl": {
		// 测试环境服务空间-支付回调地址
		"mp-b267e273-19a7-4288-99c7-f6f27f9c5b77": "https://fc-mp-b267e273-19a7-4288-99c7-f6f27f9c5b77.next.bspapp.com/uni-pay-co",
		// 线上环境服务空间-支付回调地址(如果只有一个服务空间,则只需要配置线上环境服务空间即可)
		"mp-499e2a37-0c77-418a-82aa-3e5820ecb057": "https://fc-mp-499e2a37-0c77-418a-82aa-3e5820ecb057.next.bspapp.com/uni-pay-co",
	},
	// 支付宝相关(加签方式选证书模式,加密算法选RSA2)
	"alipay": {
		"enable": true, // 是否启用支付宝支付
		// Alipay - H5 payment configuration (including: website QR code, mobile phone H5, need to apply for Alipay face-to-face payment interface permission)
		"native": {
			"appId": "", // 支付宝开放平台下应用的appid
			"privateKey": "", // 支付宝商户私钥
			"appCertPath": path.join(__dirname, 'alipay/appCertPublicKey.crt'), // 支付宝商户公钥路径
			"alipayPublicCertPath": path.join(__dirname, 'alipay/alipayCertPublicKey_RSA2.crt'), // 支付宝公钥路径
			"alipayRootCertPath": path.join(__dirname, 'alipay/alipayRootCert.crt'), // 支付宝根证书路径
		}
	}
}
# Alipay PC scan code payment
The node corresponding to the payment configuration is alipay.native
const fs = require('fs');
const path = require('path')
module.exports = {
	// Uniform - payment callback address, the format is "service space ID":"URL address"
	"notifyUrl": {
		// 测试环境服务空间-支付回调地址
		"mp-b267e273-19a7-4288-99c7-f6f27f9c5b77": "https://fc-mp-b267e273-19a7-4288-99c7-f6f27f9c5b77.next.bspapp.com/uni-pay-co",
		// 线上环境服务空间-支付回调地址(如果只有一个服务空间,则只需要配置线上环境服务空间即可)
		"mp-499e2a37-0c77-418a-82aa-3e5820ecb057": "https://fc-mp-499e2a37-0c77-418a-82aa-3e5820ecb057.next.bspapp.com/uni-pay-co",
	},
	// 支付宝相关(加签方式选证书模式,加密算法选RSA2)
	"alipay": {
		"enable": true, // 是否启用支付宝支付
		// Alipay - H5 payment configuration (including: website QR code, mobile phone H5, need to apply for Alipay face-to-face payment interface permission)
		"native": {
			"appId": "", // 支付宝开放平台下应用的appid
			"privateKey": "", // 支付宝商户私钥
			"appCertPath": path.join(__dirname, 'alipay/appCertPublicKey.crt'), // 支付宝商户公钥路径
			"alipayPublicCertPath": path.join(__dirname, 'alipay/alipayCertPublicKey_RSA2.crt'), // 支付宝公钥路径
			"alipayRootCertPath": path.join(__dirname, 'alipay/alipayRootCert.crt'), // 支付宝根证书路径
		}
	}
}
# ios in-app purchase payment
The node corresponding to the payment configuration is appleiap.app
const fs = require('fs');
const path = require('path')
module.exports = {
	// Uniform - payment callback address, the format is "service space ID":"URL address"
	"notifyUrl": {
		// 测试环境服务空间-支付回调地址
		"mp-b267e273-19a7-4288-99c7-f6f27f9c5b77": "https://fc-mp-b267e273-19a7-4288-99c7-f6f27f9c5b77.next.bspapp.com/uni-pay-co",
		// 线上环境服务空间-支付回调地址(如果只有一个服务空间,则只需要配置线上环境服务空间即可)
		"mp-499e2a37-0c77-418a-82aa-3e5820ecb057": "https://fc-mp-499e2a37-0c77-418a-82aa-3e5820ecb057.next.bspapp.com/uni-pay-co",
	},
	// ios in-app purchase related
	"appleiap" :{
		// ios in-app purchase payment
		"app": {
			"password": "", // App 专用共享密钥,App 专用共享密钥是用于接收此 App 自动续期订阅收据的唯一代码。如果您要将此 App 转让给其他开发者或不想公开主共享密钥,建议使用 App 专用共享密钥。非自动续订场景不需要此参数
			"timeout": 10000, // 请求超时时间,单位:毫秒
			"sandbox": false, // 是否是沙箱环境(本地调试ios走的是沙箱环境,故要设置为true,正式发布后,需要设置为false)
		}
	}
}
# Tutorials integrated into your own project
Before docking your own project, it is recommended to run through the sample project, if you can run through the sample project, it means that your configuration and certificate must be correct, and then integrate uni-pay into your own project.
# Install the plugin
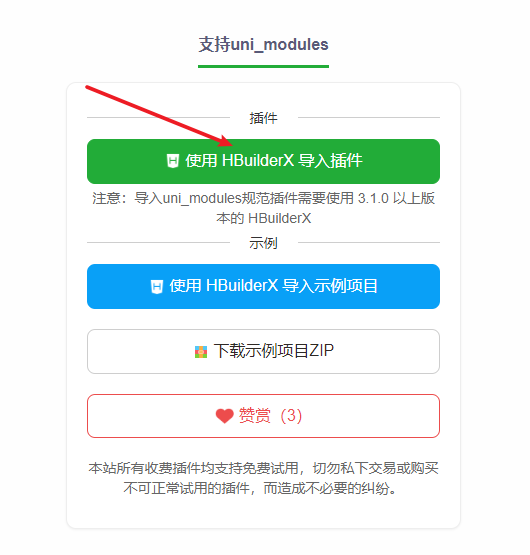
- Import the
uni-payplug-in from the plug-in market to your own project. Go to the plug-in market
- Copy the
uni-payconfiguration file in the sample project you just ran, configuration file address:uniCloud/cloudfunctions/common/uni-config-center/uni-pay/config.jsto your project View payment configuration introduction
- Upload the public module
uni-config-center(right click, upload the public module, every time you modify the payment configuration, you need to re-upload this module to take effect) - Upload public module
uni-pay(right click, upload public module) - Upload the cloud object
uni-pay-co(right click, upload deployment) - Database initialization
- Add
subPackagessubpackage page configuration to the project root directorypages.json(if the page has been automatically configured, you can ignore this step)
"pages": [
	...你的页面
],
"subPackages": [
	{
		"root": "uni_modules/uni-pay/pages",
		"pages": [
			{
				"path": "success/success",
				"style": {
					"navigationBarTitleText": "支付成功",
					"backgroundColor": "#F8F8F8"
				}
			},
			{
				"path": "ad-interactive-webview/ad-interactive-webview",
				"style": {
					"navigationBarTitleText": "ad",
					"backgroundColor": "#F8F8F8"
				}
			}
		]
	}
],
- The installation is complete
# Front-end page integration
Open the page where you need to make payment, usually the page after the business order is submitted to display the cash register.
- The page puts a
uni-paycomponent tag in thetemplate, declares the ref, and then calls the API of the component. as follows
注意:vue3下ref不可以等于组件名,因此这里 ref="pay" 而不能是 ref="uniPay"
<template>
	<view>
		<button @click="open">唤起收银台支付</button>
		<uni-pay ref="pay"></uni-pay>
	</view>
</template>
- Write the code in the script, and execute the method when the payment is clicked:
<script>
	export default {
		data() {
			return {
				total_fee: 1, // 支付金额,单位分 100 = 1元
				order_no: "", // 业务系统订单号(即你自己业务系统的订单表的订单号)
				out_trade_no: "", // 插件支付单号
				description: "测试订单", // 支付描述
				type: "test", // 支付回调类型 如 recharge 代表余额充值 goods 代表商品订单(可自定义,任意英文单词都可以,只要你在 uni-pay-co/notify/目录下创建对应的 xxx.js文件进行编写对应的回调逻辑即可)
				custom:{
					a: "a",
					b: 1
				}
			}
		},
		methods: {
			/**
			 * 发起支付(唤起收银台,如果只有一种支付方式,则收银台不会弹出来,会直接使用此支付方式)
			 * 在调用此api前,你应该先创建自己的业务系统订单,并获得订单号 order_no,把order_no当参数传给此api,而示例中为了简化跟支付插件无关的代码,这里直接已时间戳生成了order_no
			 */
			open() {
				this.order_no = `test`+Date.now(); // 模拟生成订单号
				this.out_trade_no = `${this.order_no}-1`; // 模拟生成插件支付单号
				// 打开支付收银台
				this.$refs.pay.open({
					total_fee: this.total_fee, // 支付金额,单位分 100 = 1元
					order_no: this.order_no, // 业务系统订单号(即你自己业务系统的订单表的订单号)
					out_trade_no: this.out_trade_no, // 插件支付单号
					description: this.description, // 支付描述
					type: this.type, // 支付回调类型
					custom: this.custom, // 自定义数据
				});
			}
		}
	}
</script>
# Cloud payment callback integration
When the user's payment is successful, we need to increase the balance of the user or mark the payment success of the business order, which is realized through asynchronous callback notification.
**Tips: The asynchronous callback notification is written in the uni-pay-co/notify directory, create two js files in this directory, namely recharge.js and goods.js files, and copy the following code to In the 2 js files you created. **
code show as below
'use strict';
/**
 * 此处建议只改下订单状态,保证能及时返回给第三方支付服务器成功状态
 * 限制4秒内必须执行完全部的异步回调逻辑,建议将消息发送、返佣、业绩结算等业务逻辑异步处理(如用定时任务去处理这些异步逻辑)
 * 特别注意:因为金额是前端传的,需要再判断下金额和你业务系统订单中的金额是否一致,如果不一致,直接返回 return false;
 * 特别注意:因为金额是前端传的,需要再判断下金额和你业务系统订单中的金额是否一致,如果不一致,直接返回 return false;
 * 特别注意:因为金额是前端传的,需要再判断下金额和你业务系统订单中的金额是否一致,如果不一致,直接返回 return false;
 */
module.exports = async (obj) => {
	let user_order_success = true;
	let { data = {} } = obj;
	let {
		order_no,
		out_trade_no,
		total_fee
	} = data; // uni-pay-orders 表内的数据均可获取到

	// 此处写你自己的支付成功逻辑开始-----------------------------------------------------------

	// 因为金额total_fee是前端传的,因此有被用户篡改的风险,因此需要判断下total_fee的值是否和你业务订单中的金额一致,如果不一致,直接返回 return false;

	// There are three ways
	// Method 1: Directly write to the database operation
	// Method 2: use await uniCloud.callFunction to call other cloud functions
	// Method 3: Use await uniCloud.httpclient.request to call the http interface address

	// Write your own payment success logic here end -------------------------------------- ---------------------
	// user_order_success = true means your own logic processing is successful, return false means your own processing logic failed.
	return user_order_success;
};
# 特别注意
因为金额 total_fee 是前端传的,因此有被用户篡改的风险,因此需要 判断下total_fee的值是否和你业务订单中的金额一致,如果不一致,直接返回 return false
Notice
Why do you need to create the .js file yourself instead of the plugin creating it for you by default? This is because when the plugin is updated later, the code you write will be overwritten by the updated code of the plugin (one-click merge function), so as long as the plugin is not here file (but your own newly created file), then when the plug-in is updated, it will not overwrite the code in your own newly created file.
in
- Callback logic related to balance recharge can be written in
recharge.js - In
goods.js, you can write the callback logic after the payment of the product order is successful
Which callback logic to call finally depends on what you fill in the type parameter when you create a payment order. If type is filled with recharge, the code logic in recharge.js will be executed after the payment is successful.
That is, the type parameter passed when the front end calls payment
// 打开支付收银台
this.$refs.pay.open({
	type: "recharge", // 支付回调类型 recharge 代表余额充值(当然你可以自己自定义)
});
Note: Every modification needs to re-upload the cloud object uni-pay-co
# 业务在uniCloud上
If your business is on uniCloud, you can use method 1 or method 2 to write custom callback logic.
Method 1: Directly write database operation
Applicable scenarios: simple database operation scenarios
Take recharging the user's balance as an example, the code is as follows
'use strict';
/**
 * 此处建议只改下订单状态,保证能及时返回给第三方支付服务器成功状态
 * 限制4秒内必须执行完全部的异步回调逻辑,建议将消息发送、返佣、业绩结算等业务逻辑异步处理(如用定时任务去处理这些异步逻辑)
 * 特别注意:因为金额是前端传的,需要再判断下金额和你业务系统订单中的金额是否一致,如果不一致,直接返回 return false;
 * 特别注意:因为金额是前端传的,需要再判断下金额和你业务系统订单中的金额是否一致,如果不一致,直接返回 return false;
 * 特别注意:因为金额是前端传的,需要再判断下金额和你业务系统订单中的金额是否一致,如果不一致,直接返回 return false;
 */
module.exports = async (obj) => {
	let user_order_success = true;
	let { data = {} } = obj;
	let {
		order_no,
		out_trade_no,
		total_fee,
		custom = {}
	} = data; // uni-pay-orders 表内的数据均可获取到

	// Write your own payment success logic here to start -------------------------------------- ---------------------
	// Method 1: Directly write to the database operation
	// Here is just a simple demonstration, the actual database statement will be more complicated.
	const db = uniCloud.database();
	const _ = db.command;
	// 获取你的业务订单信息
	let orderRes = await db.collection("你的业务订单表").where({ order_no }).get();
	let orderInfo = orderRes.data[0];
	// 给用户充值余额(此处没有判断total_fee是否和你业务订单的金额一致,正常需要判断下,不过如果是充值余额,则直接按用户付款的金额充值也没问题)
	let res = await db.collection("uni-id-users").doc(orderInfo.user_id).update({
	  balance: _.inc(total_fee)
	});
	if (res && res.updated) {
		user_order_success = true; // 通知插件我的自定义回调逻辑执行成功
	} else {
		user_order_success = false; // 通知插件我的自定义回调逻辑执行失败
	}
	// Write your own payment success logic here end -------------------------------------- ---------------------
	return user_order_success;
};
Method 2: Call other cloud functions or cloud objects directly
Applicable scenarios: scenarios where the business is complex and needs to be written in other cloud functions or cloud objects.
The sample code for calling other cloud functions is as follows
'use strict';
/**
 * 此处建议只改下订单状态,保证能及时返回给第三方支付服务器成功状态
 * 限制4秒内必须执行完全部的异步回调逻辑,建议将消息发送、返佣、业绩结算等业务逻辑异步处理(如用定时任务去处理这些异步逻辑)
 * 特别注意:因为金额是前端传的,需要再判断下金额和你业务系统订单中的金额是否一致,如果不一致,直接返回 return false;
 * 特别注意:因为金额是前端传的,需要再判断下金额和你业务系统订单中的金额是否一致,如果不一致,直接返回 return false;
 * 特别注意:因为金额是前端传的,需要再判断下金额和你业务系统订单中的金额是否一致,如果不一致,直接返回 return false;
 */
const payCrypto = require('../libs/crypto.js'); // 获取加密服务
module.exports = async (obj) => {
	let user_order_success = true;
	let { data = {} } = obj;
	let {
		order_no,
		out_trade_no,
		total_fee
	} = data; // uni-pay-orders 表内的数据均可获取到

	// Write your own payment success logic here to start -------------------------------------- ---------------------
	// Mode 2 Security mode 1 (encryption)
	let encrypted = payCrypto.aes.encrypt({
		data: data, // 待加密的原文
	});

	await uniCloud.callFunction({
		name: "你的云函数名称",
		data: {
			encrypted, // 传输加密数据(通过payCrypto.aes.decrypt解密)
		},
	});
	// let decrypted = payCrypto.aes.decrypt({
	// });

	/*
		// Mode 2 Security mode 2 (only pass an order number out_trade_no, check the database table uni-pay-orders in your own callback to determine whether the status is equal to 1 to determine whether it is really paid)
		await uniCloud.callFunction({
			name: "你的云函数名称",
			data: {
				out_trade_no, // 支付插件订单号
			},
		});
	*/

	// Write your own payment success logic here end -------------------------------------- ---------------------
	// user_order_success = true means your own logic processing is successful, return false means your own processing logic failed.
	return user_order_success;
};
The sample code for calling other cloud objects is as follows
'use strict';
/**
 * 此处建议只改下订单状态,保证能及时返回给第三方支付服务器成功状态
 * 限制4秒内必须执行完全部的异步回调逻辑,建议将消息发送、返佣、业绩结算等业务逻辑异步处理(如用定时任务去处理这些异步逻辑)
 * 特别注意:因为金额是前端传的,需要再判断下金额和你业务系统订单中的金额是否一致,如果不一致,直接返回 return false;
 * 特别注意:因为金额是前端传的,需要再判断下金额和你业务系统订单中的金额是否一致,如果不一致,直接返回 return false;
 * 特别注意:因为金额是前端传的,需要再判断下金额和你业务系统订单中的金额是否一致,如果不一致,直接返回 return false;
 */
const payCrypto = require('../libs/crypto.js'); // 获取加密服务
module.exports = async (obj) => {
	let user_order_success = true;
	let { data = {} } = obj;
	let {
		order_no,
		out_trade_no,
		total_fee
	} = data; // uni-pay-orders 表内的数据均可获取到

	// Write your own payment success logic here to start -------------------------------------- ---------------------
	// Mode 2 Security mode 1 (encryption)
	let encrypted = payCrypto.aes.encrypt({
		data: data, // 待加密的原文
	});
	const cloudObject = uniCloud.importObject('你的云对象名称');
	await cloudObject.rechargeBalance(encrypted); // 传输加密数据(通过payCrypto.aes.decrypt解密)

	// let decrypted = payCrypto.aes.decrypt({
	// });


	/*
		// Mode 2 Security mode 2 (only pass an order number out_trade_no, check the database table uni-pay-orders in your own callback to determine whether the status is equal to 1 to determine whether it is really paid)
		const cloudObject = uniCloud.importObject('你的云对象名称');
		await cloudObject.rechargeBalance(out_trade_no);
	*/

	// Write your own payment success logic here end -------------------------------------- ---------------------
	// user_order_success = true means your own logic processing is successful, return false means your own processing logic failed.
	return user_order_success;
};
# 业务不在uniCloud上
If your business is not on uniCloud, such as back-end services written in java or php, uni-pay can also meet your payment needs. You only need to call the callback interface of your own system in the form of the http interface of callback method 3.
Method 3: Use await uniCloud.httpclient.request to call the external http interface
Applicable scenario: The business is not on uniCloud.
The sample code is as follows
'use strict';
/**
 * 此处建议只改下订单状态,保证能及时返回给第三方支付服务器成功状态
 * 限制4秒内必须执行完全部的异步回调逻辑,建议将消息发送、返佣、业绩结算等业务逻辑异步处理(如用定时任务去处理这些异步逻辑)
 * 特别注意:因为金额是前端传的,需要再判断下金额和你业务系统订单中的金额是否一致,如果不一致,直接返回 return false;
 * 特别注意:因为金额是前端传的,需要再判断下金额和你业务系统订单中的金额是否一致,如果不一致,直接返回 return false;
 * 特别注意:因为金额是前端传的,需要再判断下金额和你业务系统订单中的金额是否一致,如果不一致,直接返回 return false;
 */
const payCrypto = require('../libs/crypto.js'); // 获取加密服务
module.exports = async (obj) => {
	let user_order_success = true;
	let { data = {} } = obj;
	let {
		order_no,
		out_trade_no,
		total_fee
	} = data; // uni-pay-orders 表内的数据均可获取到

	// Write your own payment success logic here to start -------------------------------------- ---------------------
	// There are three ways
	// Method 3: Use await uniCloud.httpclient.request to call the http interface address

	// 方式三安全模式一(加密)uni-pay的版本需 >= 2.1.0
	let encrypted = payCrypto.aes.encrypt({
		mode: "aes-256-ecb",
		data: data, // 待加密的原文
	});
	await uniCloud.httpclient.request("你的服务器接口请求地址", {
		method: "POST",
		data: {
			encrypted, // 传输加密数据(服务端你再自己解密)
		},
	});

	/*
		// Method 3 Security Mode 2 (only pass an order number out_trade_no, execute the url request in your own callback to request the getOrder interface of the uni-pay-co cloud object to determine whether the order is actually paid)
		await uniCloud.httpclient.request("你的服务器接口请求地址", {
			method: "POST",
			data: {
				out_trade_no, // 支付插件订单号
			},
		});
	*/

	// Write your own payment success logic here end -------------------------------------- ---------------------
	// user_order_success = true means your own logic processing is successful, return false means your own processing logic failed.
	return user_order_success;
};
# java解密示例代码
import javax.crypto.Cipher;
import javax.crypto.spec.SecretKeySpec;
import java.nio.charset.StandardCharsets;
import java.util.Base64;

public class CryptoUtil {
    // 调用示例
    public static void main(String[] args) {
        try {
            String encrypted = "es2aF7DWr169X4fvMnlKNg=="; // 待解密的密文
            String key = "12345678901234561234567890123456"; // 必须是固定的32位(只支持数字、英文)
            // 解密
            String decrypted = decrypt(encrypted, key);
            System.out.println("decrypted: " + decrypted);
        } catch (Exception e) {
            e.printStackTrace();
        }
    }

    // 解密函数
    private static String decrypt(String encryptedData, String key) throws Exception {
        if (key.length() > 32) {
            key = key.substring(0, 32);
        }
        byte[] encryptedBytes = Base64.getDecoder().decode(encryptedData);
        byte[] keyBytes = key.getBytes(StandardCharsets.UTF_8);

        SecretKeySpec secretKey = new SecretKeySpec(keyBytes, "AES");
        Cipher cipher = Cipher.getInstance("AES/ECB/PKCS5Padding");
        cipher.init(Cipher.DECRYPT_MODE, secretKey);

        byte[] decryptedBytes = cipher.doFinal(encryptedBytes);
        return new String(decryptedBytes, StandardCharsets.UTF_8);
    }
    // 加密函数
    private static String encrypt(String data, String key) throws Exception {
        if (key.length() > 32) {
            key = key.substring(0, 32);
        }
        byte[] dataBytes = data.getBytes(StandardCharsets.UTF_8);
        byte[] keyBytes = key.getBytes(StandardCharsets.UTF_8);

        SecretKeySpec secretKey = new SecretKeySpec(keyBytes, "AES");
        Cipher cipher = Cipher.getInstance("AES/ECB/PKCS5Padding");
        cipher.init(Cipher.ENCRYPT_MODE, secretKey);

        byte[] encryptedBytes = cipher.doFinal(dataBytes);
        return Base64.getEncoder().encodeToString(encryptedBytes);
    }

}
# php解密示例代码
<?php
	$key = '12345678901234561234567890123456'; // 必须是固定的32位(只支持数字、英文)
	$encrypt = "es2aF7DWr169X4fvMnlKNg=="; // 待解密的内容
	// 解密
	$decrypt = openssl_decrypt(base64_decode($encrypt), 'aes-256-ecb', substr($key, 0, 32), OPENSSL_RAW_DATA);
	echo $decrypt;
?>
# Run start
Run your project, experience and test payment.
# uni-pay component introduction
# Component properties
| property name | description | type | default value | optional values |
|---|---|---|---|---|
| adpid | uni-ad's ad slot ID, if filled in, the ad will be displayed on the successful payment result page (it can increase the developer's advertising revenue) | string | - | - |
| returnUrl | After the payment is successful, the user clicks the [View Order] button to jump to the page address. If this attribute is not filled, there will be no [View Order] button | string | - | - |
| mainColor | The main color of the payment result page, the default Alipay MiniApp is #108ee9, and all other ends are #01be6e | string | #01be6e | See below |
| mode | cash register mode, the plug-in will automatically identify, or manually pass parameters, mobile phone mode pc computer mode | string | automatic identification | mobile, pc |
| logo | When the mode is PC, the displayed logo | string | /static/logo.png | - |
| height | cash register height | string | 70vh | - |
mainColor value reference:
- Green line #01be6e
- Blue line #108ee9
- Brown #816a4e
- pink #fe4070
- orange #ffac0c
- Orange #ff7100
- Other customizable
# Component Events
| Event Name | Description | Parameters |
|---|---|---|
| success | Callback for successful payment | res |
| cancel | callback for payment cancellation | res |
| fail | Callback for payment failure | res |
| create | Callback when creating a payment order (the user has not paid yet) | res |
# Component Methods
通过 let res = await this.$refs.pay.xxx(); 方式调用,详情调用方式参考下方的【前端完整示例代码】
| method name | description |
|---|---|
| open | Initiate payment - Open the pop-up window of the payment cashier View details |
| createOrder | Initiate payment directly (no cashier) View Details |
| getOrder | Query Order View Details |
| refund | Initiate a refund (this interface requires permission to access) View Details |
| getRefund | Query Refund View Details |
| closeOrder | Close Order View Details |
| getPayProviderFromCloud | Get supported payment providers View Details |
| getProviderAppId | Get the appid in the payment configuration (mainly used to get the appid of the WeChat official account to get the code) View Details |
| getOpenid | Get openid according to the code (mainly used for WeChat official account code exchange for openid) View details |
Complete front-end sample code
<template>
	<view class="app">
		<view>
			<view class="label">支付单号:</view>
			<view><input v-model="out_trade_no" /></view>
		</view>
		<view>
			<view class="label">支付金额(单位分,100=1元):</view>
			<view><input v-model.number="total_fee" /></view>
		</view>
		<button @click="open">唤起收银台支付</button>
		<view class="tips">支付前,让用户自己选择微信还是支付宝</view>
		<!-- #ifdef MP-WEIXIN || H5 || APP -->
		<button @click="createOrder('wxpay')">直接发起微信支付</button>
		<!-- #endif -->
		<!-- #ifdef MP-ALIPAY || H5 || APP -->
		<button @click="createOrder('alipay')">直接发起支付宝支付</button>
		<!-- #endif -->

		<button @click="createQRcode('wxpay')">生成独立支付二维码</button>
		<view class="tips">用于把生成的二维码放到自己写的页面中(组件不会弹窗,请从日志中查看二维码base64值)</view>

		<button @click="getOrder">查询支付状态</button>
		<!--
		<button @click="refund">发起退款</button>
		<view class="tips">发起退款需要admin权限,本示例未对接登录功能</view>
		<button @click="getRefund">查询退款状态</button>
		<button @click="closeOrder">关闭订单</button>
		-->
		<!-- #ifdef H5 -->
		<button v-if="h5Env === 'h5-weixin'" @click="getWeiXinJsCode('snsapi_base')">公众号获取openid示例</button>
		<!-- #endif -->
		<!-- 统一支付组件,注意:vue3下ref不可以等于组件名,因此这里ref="pay" 而不能是 ref="uniPay" -->
		<uni-pay ref="pay" :adpid="adpid" return-url="/pages/order-detail/order-detail" logo="/static/logo.png" @success="onSuccess" @create="onCreate"></uni-pay>
	</view>
</template>

<script>
	export default {
		data() {
			return {
				total_fee: 1, // 支付金额,单位分 100 = 1元
				order_no: "", // 业务系统订单号(即你自己业务系统的订单表的订单号)
				out_trade_no: "", // 插件支付单号
				description: "测试订单", // 支付描述
				type: "test", // 支付回调类型 如 recharge 代表余额充值 goods 代表商品订单(可自定义,任意英文单词都可以,只要你在 uni-pay-co/notify/目录下创建对应的 xxx.js文件进行编写对应的回调逻辑即可)
				//qr_code: true, // Whether to force the use of scan code payment
				openid:"", // 微信公众号需要
				custom:{
					a: "a",
					b: 1
				},
				adpid: "1000000001", // uni-ad的广告位id
			}
		},
		onLoad(options={}) {
			if (options.code && options.state) {
				// Get the openid of the WeChat official account
				setTimeout(() => {
					this.getOpenid({
						provider: "wxpay",
						code: options.code
					});
				}, 300);
			}
		},
		methods: {
			/**
			 * 发起支付(唤起收银台,如果只有一种支付方式,则收银台不会弹出来,会直接使用此支付方式)
			 * 在调用此api前,你应该先创建自己的业务系统订单,并获得订单号 order_no,把order_no当参数传给此api,而示例中为了简化跟支付插件无关的代码,这里直接已时间戳生成了order_no
			 */
			open() {
				this.order_no = `test`+Date.now();
				this.out_trade_no = `${this.order_no}-1`;
				// 打开支付收银台
				this.$refs.pay.open({
					total_fee: this.total_fee, // 支付金额,单位分 100 = 1元
					order_no: this.order_no, // 业务系统订单号(即你自己业务系统的订单表的订单号)
					out_trade_no: this.out_trade_no, // 插件支付单号
					description: this.description, // 支付描述
					type: this.type, // 支付回调类型
					qr_code: this.qr_code, // 是否强制使用扫码支付
					openid: this.openid, // 微信公众号需要
					custom: this.custom, // 自定义数据
				});
			},
			/**
			 * 发起支付(不唤起收银台,手动指定支付方式)
			 * 在调用此api前,你应该先创建自己的业务系统订单,并获得订单号 order_no,把order_no当参数传给此api,而示例中为了简化跟支付插件无关的代码,这里直接已时间戳生成了order_no
			 */
			createOrder(provider){
				this.order_no = `test`+Date.now();
				this.out_trade_no = `${this.order_no}-1`;
				// 发起支付
				this.$refs.pay.createOrder({
					provider: provider, // 支付供应商
					total_fee: this.total_fee, // 支付金额,单位分 100 = 1元
					order_no: this.order_no, // 业务系统订单号(即你自己业务系统的订单表的订单号)
					out_trade_no: this.out_trade_no, // 插件支付单号
					description: this.description, // 支付描述
					type: this.type, // 支付回调类型
					qr_code: this.qr_code, // 是否强制使用扫码支付
					openid: this.openid, // 微信公众号需要
					custom: this.custom, // 自定义数据
				});
			},
			/**
			 * 生成支付独立二维码(只返回支付二维码)
			 * 在调用此api前,你应该先创建自己的业务系统订单,并获得订单号 order_no,把order_no当参数传给此api,而示例中为了简化跟支付插件无关的代码,这里直接已时间戳生成了order_no
			 */
			createQRcode(provider){
				this.order_no = `test`+Date.now();
				this.out_trade_no = `${this.order_no}-1`;
				// 发起支付
				this.$refs.pay.createOrder({
					provider: provider, // 支付供应商
					total_fee: this.total_fee, // 支付金额,单位分 100 = 1元
					order_no: this.order_no, // 业务系统订单号(即你自己业务系统的订单表的订单号)
					out_trade_no: this.out_trade_no, // 插件支付单号
					description: this.description, // 支付描述
					type: this.type, // 支付回调类型
					qr_code: true, // 是否强制使用扫码支付
					cancel_popup: true, // 配合qr_code:true使用,是否只生成支付二维码,没有二维码弹窗
					openid: this.openid, // 微信公众号需要
					custom: this.custom, // 自定义数据
				});
			},
			// query payment status
			async getOrder() {
				let res = await this.$refs.pay.getOrder({
					out_trade_no: this.out_trade_no, // 插件支付单号
					await_notify: true
				});
				if (res) {
					let obj = {
						"-1": "已关闭",
						"1": "已支付",
						"0": "未支付",
						"2": "已部分退款",
						"3": "已全额退款"
					};
					uni.showToast({
						title: obj[res.status] || res.errMsg,
						icon: "none"
					});
				}
			},
			// initiate a refund
			async refund() {
				let res = await this.$refs.pay.refund({
					out_trade_no: this.out_trade_no, // 插件支付单号
				});
				if (res) {
					uni.showToast({
						title: res.errMsg,
						icon: "none"
					});
				}
			},
			// Query refund status
			async getRefund() {
				let res = await this.$refs.pay.getRefund({
					out_trade_no: this.out_trade_no, // 插件支付单号
				});
				if (res) {
					uni.showModal({
						content: res.errMsg,
						showCancel: false
					});
				}
			},
			// close the order
			async closeOrder() {
				let res = await this.$refs.pay.closeOrder({
					out_trade_no: this.out_trade_no, // 插件支付单号
				});
				if (res) {
					uni.showModal({
						content: res.errMsg,
						showCancel: false
					});
				}
			},
			// Get official account code
			async getWeiXinJsCode(scope="snsapi_base") {
				let res = await this.$refs.pay.getProviderAppId({
					provider: "wxpay",
					provider_pay_type: "jsapi"
				});
				if (res.appid) {
					let appid = res.appid;
					let redirect_uri = window.location.href.split("?")[0];
					let url = `https://open.weixin.qq.com/connect/oauth2/authorize?appid=${appid}&redirect_uri=${redirect_uri}&response_type=code&scope=${scope}&state=STATE#wechat_redirect`;
					window.location.href = url;
				}

			},
			// Get the official account openid
			async getOpenid(data) {
				let res = await this.$refs.pay.getOpenid(data);
				if (res) {
					this.openid = res.openid;
					uni.showToast({
						title: "已获取到openid,可以开始支付",
						icon: "none"
					});
				}
			},
			// Listen to the event - the payment order is successfully created (the user has not paid at this time)
			onCreate(res){
				console.log('create: ', res);
				// If you just want to generate a payment QR code and do not need the pop-up window that comes with the component, you can get the payment QR code here qr_code_image
			},
			// listen event - payment successful
			onSuccess(res){
				console.log('success: ', res);
				if (res.user_order_success) {
					// On behalf of the user has paid, and the callback written by you is successful and executed correctly

				} else {
					// Represents that the user has paid, but the callback you wrote yourself executed successfully (usually because of a problem with your callback code)

				}
			}
		},
		computed: {
			h5Env(){
				// #ifdef H5
				let ua = window.navigator.userAgent.toLowerCase();
				if (ua.match(/MicroMessenger/i) == 'micromessenger' && (ua.match(/miniprogram/i) == 'miniprogram')) {
					// WeChat MiniApp
					return "mp-weixin";
				}
				if (ua.match(/MicroMessenger/i) == 'micromessenger') {
					// WeChat public account
					return "h5-weixin";
				}
				if (ua.match(/alipay/i) == 'alipay' && ua.match(/miniprogram/i) == 'miniprogram') {
					return "mp-alipay";
				}
				if (ua.match(/alipay/i) == 'alipay') {
					return "h5-alipay";
				}
				// external H5
				return "h5";
				// #endif
			}
		},
	}
</script>

<style lang="scss" scoped>
	.app{
		padding: 30rpx;
	}
	input {
		border: 1px solid #f3f3f3;
		padding: 10rpx;
	}

	button {
		margin-top: 20rpx;
	}

	.label{
		margin: 10rpx 0;
	}

	.tips{
		margin-top: 20rpx;
		font-size: 24rpx;
		color: #565656;
	}

</style>
# Cloud object (uni-pay-co) introduction
# Catalog structure
├─common                  公用逻辑
├─config                  配置
│  └─permission.js             调用接口所需的权限配置
├─dao                     数据库相关API
├─lang                    国际化目录
├─lib                     基础功能,不建议修改此目录下文件
│  ├─alipay.js                支付宝平台相关API
│  ├─common.js                一些通用API
│  ├─qrcode.js                云端生成二维码的插件(来自于npm i qrcode的压缩版)
│  └─wxpay.js                 微信支付平台相关API
├─middleware              中间件
├─notify                  异步通知逻辑(你自己的异步通知逻辑写在这里)
└─service                 分模块存放的云对象方法的服务实现
# Public response parameters
uni-pay-co All api return values meet the uniCloud response body specification
return value example
{
	errCode: 0, // 错误码,详见错误码列表
	errMsg: '', // 错误信息,uni-pay-co会自动根据客户端语言对错误信息进行国际化
	// ...the rest of the parameters
}
# API list
The method of uni-pay front-end component and uni-pay-co cloud object is the same. Usually, the front end can directly call the method in the uni-pay component (the component will automatically call the API in the cloud object, no need to manually call the API in the cloud object)
The following is an introduction to these APIs.
| API | Description |
|---|---|
| uniPayCo.createOrder | Create Payment View Details |
| uniPayCo.getOrder | Query Order View Details |
| uniPayCo.refund | Initiate a refund (this interface requires permission to access) View Details |
| uniPayCo.getRefund | Query Refund View Details |
| uniPayCo.closeOrder | Close Order View Details |
| uniPayCo.getPayProviderFromCloud | Get supported payment providers View Details |
| uniPayCo.getProviderAppId | Get the appid in the payment configuration (mainly used to get the appid of the WeChat official account to get the code) View Details |
| uniPayCo.getOpenid | Obtain openid according to code (mainly used for WeChat official account code exchange for openid) View details |
# Create payment
Payment component method form (cash register pop-up window mode) (recommended)
The parameters of open and createOrder are the same, the only difference is that open will open the cashier, while createOrder does not have a cashier, and directly calls the payment.
open If there is only one payment method, for example, in the WeChat MiniApp, only WeChat payment can be used, the cash register will not pop up, but the payment will be called directly.
this.$refs.pay.open({
	total_fee: 1, // 支付金额,单位分 100 = 1元
	type: "recharge", // 支付回调类型
	order_no: "20221027011000101001010", // 业务系统订单号
	out_trade_no: "2022102701100010100101001", // 插件支付单号
	description: "uniCloud个人版包月套餐", // 支付描述
});
Skip directly to the cashier page mode (recommended)
The difference from the pop-up mode is: the jump page mode is to jump directly to the cashier page through uni.navigateTo, while the pop-up mode is to pop up the cashier on the original page.
let options = {
	total_fee: 1, // 支付金额,单位分 100 = 1元
	type: "recharge", // 支付回调类型
	order_no: "20221027011000101001010", // 业务系统订单号
	out_trade_no: "2022102701100010100101001", // 插件支付单号
	description: "uniCloud个人版包月套餐", // 支付描述
};
let optionsStr = encodeURI(JSON.stringify(options));
uni.navigateTo({
	url:`/uni_modules/uni-pay/pages/pay-desk/pay-desk?options=${optionsStr}`
});
The cash register page source code is in /uni_modules/uni-pay/pages/pay-desk/pay-desk
If you want to customize the cashier style, it is recommended to copy this page to your project pages directory, such as /pages/pay-desk/pay-desk, then modify the style on the copied page, and jump to the self The code to define the cash register is as follows:
let options = {
	total_fee: 1, // 支付金额,单位分 100 = 1元
	type: "recharge", // 支付回调类型
	order_no: "20221027011000101001010", // 业务系统订单号
	out_trade_no: "2022102701100010100101001", // 插件支付单号
	description: "uniCloud个人版包月套餐", // 支付描述
};
let optionsStr = encodeURI(JSON.stringify(options));
uni.navigateTo({
	url:`/pages/pay-desk/pay-desk?options=${optionsStr}`
});
Payment Component Method Form (Without Cashier)
When there is no cash register, the provider parameter is a mandatory item, representing the payment provider
this.$refs.pay.createOrder({
	provider: "wxpay", // 支付供应商
	total_fee: 1, // 支付金额,单位分 100 = 1元
	type: "recharge", // 支付回调类型
	order_no: "20221027011000101001010", // 业务系统订单号
	out_trade_no: "2022102701100010100101001", // 插件支付单号
	description: "uniCloud个人版包月套餐", // 支付描述
});
Cloud Object Interface Form
await uniPayCo.createOrder({
  provider: "wxpay", // 支付供应商
  total_fee: 1, // 支付金额,单位分 100 = 1元
	type: "recharge", // 支付回调类型
  order_no: "20221027011000101001010", // 业务系统订单号
  out_trade_no: "2022102701100010100101001", // 插件支付单号
  description: "uniCloud个人版包月套餐", // 支付描述
});
Parameter Description
| parameter name | type | required | description |
|---|---|---|---|
| provider | string | yes | payment provider such as wxpay alipay |
| total_fee | int | Yes | The total amount of the order, in cents, 100 is equal to 1 yuan |
| type | string | Yes | Order type goods: order payment recharge: balance recharge payment vip: vip recharge payment, etc., can be customized, mainly used to determine which callback logic to use (such as the callback logic of product payment and balance recharge must be different) |
| order_no | string | Yes | The order number of the business system is recommended to be controlled within 20-28 digits (not 24 digits, 24 digits may cause problems in Alibaba Cloud space) (repeatable, representing multiple payments for one business order situation) |
| out_trade_no | string | No | Payment plug-in order number (need to be unique, otherwise it will be automatically generated by the plug-in) |
| description | string | No | Payment description, such as: uniCloud Personal Edition monthly package |
| qr_code | boolean | No | If set to true, the QR code payment mode will be forced to open |
| openid | string | No | The openid of the user who initiated the payment (WeChat official account payment is required, and plug-ins such as MiniApp payment will automatically obtain it, no need to fill in |
| custom | object | No | Custom parameters (will not be sent to the third-party payment server) |
| other | object | No | Other request parameters (will be sent to the third-party payment server) |
return value
| parameter name | type | description |
|---|---|---|
| order | object | order information for initiating payment |
| order_no | string | The order number of this transaction is equal to the value of order_no you passed at the beginning |
| out_trade_no | string | payment plugin order number for this transaction |
| provider | string | payment provider for this transaction |
| provider_pay_type | string | The payment type of the payment provider for this transaction |
| qr_code | boolean | Whether this transaction is a scan code payment mode |
| qr_code_image | string | If it is a scan code payment, this field will be returned, representing the base64 value of the QR code |
Special attention (must see)
Before calling this api, you should first create your own business system order and get the order number order_no, and then pass order_no as a parameter to this api.
The whole logic is like this:
Taking the example of user payment for purchasing goods
- Front-end user login (not a function of this plugin)
- The front-end user purchases and places an order, and the cloud generates your own business system product order information, and returns the order number
order_noto the front-end (not a function of this plug-in)
- The front-end user purchases and places an order, and the cloud generates your own business system product order information, and returns the order number
- Use the
order_noreturned by the cloud in the previous step to call the plug-in create payment API (writegoodsfor the value of the type parameter) to initiate the real payment function (this plug-in function)
- Use the
- After the user's payment is successful, the cloud receives the asynchronous callback request sent by the third-party payment. After the cloud verifies the legitimacy of the request, it executes the asynchronous callback logic of the product payment success (i.e. executes the
goodscallback), and marks the order as paid (This plug-in function)
- After the user's payment is successful, the cloud receives the asynchronous callback request sent by the third-party payment. After the cloud verifies the legitimacy of the request, it executes the asynchronous callback logic of the product payment success (i.e. executes the
- The front end listens to the payment success event, jumps to the payment success page, and displays the advertisement (this plug-in function)
- The user clicks to view the order and jumps to the product order details page of the business system written by yourself (this plug-in function)
- Finished
Taking the user's recharge balance as an example
- Front-end user login (not a function of this plugin)
- The front-end user submits the amount of the recharge balance, and the cloud generates the recharge order information of the business system written by yourself, and returns the order number
order_noto the front-end (not the function of this plug-in)
- The front-end user submits the amount of the recharge balance, and the cloud generates the recharge order information of the business system written by yourself, and returns the order number
- Use the
order_noreturned by the cloud in the previous step to call the plug-in create payment API (writerechargefor the value of the type parameter) to initiate the real payment function (this plug-in function)
- Use the
- After the user's payment is successful, the cloud receives the asynchronous callback request sent by the third-party payment. After the cloud verifies the legitimacy of the request, it executes the asynchronous callback logic of balance recharge payment success (i.e. executes
rechargecallback), and marks the order as completed Payment (this plugin function)
- After the user's payment is successful, the cloud receives the asynchronous callback request sent by the third-party payment. After the cloud verifies the legitimacy of the request, it executes the asynchronous callback logic of balance recharge payment success (i.e. executes
- The front end listens to the payment success event, jumps to the payment success page, and displays the advertisement (this plug-in function)
- The user clicks to view the order, and jumps to the recharge order details page of the business system written by yourself (this plug-in function)
- Finished
# Query order
Payment Component Method Form (recommended)
await this.$refs.pay.getOrder({
	out_trade_no: "2022102701100010100101001", // 插件支付单号
	await_notify: true, // 是否需要等待异步通知执行完成,若为了响应速度,可以设置为false,若需要等待异步回调执行完成,则设置为true
});
Cloud Object Interface Form
await uniPayCo.getOrder({
  out_trade_no: "2022102701100010100101001", // 插件支付单号
  await_notify: true, // 是否需要等待异步通知执行完成,若为了响应速度,可以设置为false,若需要等待异步回调执行完成,则设置为true
});
Parameter Description
| parameter name | type | required | description |
|---|---|---|---|
| out_trade_no | string | choose one of out_trade_no and transaction_id | plug-in order number |
| transaction_id | string | choose one of out_trade_no and transaction_id | third-party payment transaction number |
| await_notify | boolean | No | The default is false, whether to wait for the completion of the asynchronous notification, if it is for the response speed, it can be set to false, if it is necessary to wait for the completion of the asynchronous callback, set it to true |
What scenario is **await_notify = true suitable for? **
When the data displayed on your next page needs to be displayed after the logic execution in the payment asynchronous callback is completed, it needs to be set to true.
What scenario is **await_notify = false suitable for? **
When the data displayed on your next page does not need to be displayed after the logic execution in the payment asynchronous callback is completed, you can set it to false. Setting it to false can speed up the response.
return value
| parameter name | type | description |
|---|---|---|
| has_paid | boolean | Marks whether the user has paid successfully (this parameter can only indicate that the user has indeed paid, but the asynchronous callback logic of the system may not be executed yet) |
| user_order_success | boolean | Whether the user asynchronous notification logic has been executed completely without exception (it is recommended that the front end judge whether the payment is successful or not by whether this parameter is true) |
| out_trade_no | string | payment plugin order number |
| transaction_id | string | Third-party payment transaction number (returned only if the payment is successful) |
| status | int | current payment order status -1: closed 0: not paid 1: paid 2: partially refunded 3: fully refunded |
| pay_order | object | Complete information of the payment order |
# Initiate a refund
Notice
发起退款默认需要admin权限(基于uni-id用户体系登录),否则会报权限不足或缺少token。查看uni-id介绍
Of course, you can also modify the permission rules in the uni-pay-co/config/permission.js file.
Payment Component Method Form (recommended)
await this.$refs.pay.refund({
	out_trade_no: "2022102701100010100101001", // 插件支付单号
});
Cloud Object Interface Form
await uniPayCo.refund({
  out_trade_no: "2022102701100010100101001", // 插件支付单号
});
Parameter Description
| parameter name | type | required | description |
|---|---|---|---|
| out_trade_no | string | choose one of out_trade_no and out_refund_no | plugin order number |
| out_refund_no | string | out_trade_no, out_refund_no choose one | plug-in refund order number |
| refund_desc | string | no | refund description |
| refund_fee | int | No | refund fee, unit points 100 = 1 yuan |
return value
| parameter name | type | description |
|---|---|---|
| result | object | the result returned by the third-party provider |
# Query Refund
Payment Component Method Form (recommended)
await this.$refs.pay.getRefund({
	out_trade_no: "2022102701100010100101001", // 插件支付单号
});
Cloud Object Interface Form
await uniPayCo.getRefund({
  out_trade_no: "2022102701100010100101001", // 插件支付单号
});
Parameter Description
| parameter name | type | required | description |
|---|---|---|---|
| out_trade_no | string | yes | plugin order number |
Parameter Description
| parameter name | type | required | description |
|---|---|---|---|
| out_trade_no | string | choose one of out_trade_no and out_refund_no | plugin order number |
| out_refund_no | string | out_trade_no, out_refund_no choose one | plug-in refund order number |
| refund_desc | string | no | refund description |
| refund_fee | int | No | refund fee, unit points 100 = 1 yuan |
return value
| parameter name | type | description |
|---|---|---|
| result | object | the result returned by the third-party provider |
| pay_order | object | payment order information |
# Close order
Under normal circumstances, there is no need to call this method to actively close the order (if the order is not paid, it will be automatically closed after a period of time), but when you need to actively close the order, you can use this API to actively close the order. (Only unpaid orders can be actively closed)
注意:
- 微信支付订单生成后不能马上调用关单接口,最短调用时间间隔为5分钟
- 支付宝订单生成后需用户进入过输入密码的页面,才能调用关单接口(无需间隔5分钟)
Payment Component Method Form (recommended)
await this.$refs.pay.closeOrder({
	out_trade_no: "2022102701100010100101001", // 插件支付单号
});
Cloud Object Interface Form
await uniPayCo.closeOrder({
  out_trade_no: "2022102701100010100101001", // 插件支付单号
});
Parameter Description
| parameter name | type | required | description |
|---|---|---|---|
| out_trade_no | string | yes | plugin order number |
return value
| parameter name | type | description |
|---|---|---|
| result | object | the result returned by the third-party provider |
# Get supported payment providers
Under normal circumstances, there is no need to call this api, the uni-pay component has automatically called this api.
Payment Component Method Form (recommended)
await this.$refs.pay.getPayProviderFromCloud();
Cloud Object Interface Form
await uniPayCo.getPayProviderFromCloud();
Parameter Description
The API has no parameters
return value
| parameter name | type | description |
|---|---|---|
| wxpay | boolean | Whether to support WeChat payment |
| alipay | boolean | Whether to support Alipay payment |
| provider | array<string> | Which payment providers are supported, such as ["wxpay","alipay"] |
# Get the appid in the payment configuration
await this.$refs.pay.getProviderAppId({
	provider: "wxpay",
	provider_pay_type: "jsapi",
});
Cloud Object Interface Form
await uniPayCo.getProviderAppId({
  provider: "wxpay",
  provider_pay_type: "jsapi",
});
Parameter Description
| parameter name | type | required | description |
|---|---|---|---|
| provider | string | yes | payment provider such as wxpay alipay |
| provider_pay_type | string | yes | payment provider such as jsapi |
return value
| parameter name | type | description |
|---|---|---|
| appid | string | appid |
# Obtain openid
Generally used for WeChat official account to obtain user openid according to the code returned by the webpage authorization callback
Notice
The MiniApp does not need to call this method, the openid has been automatically and silently obtained inside the component
await this.$refs.pay.getOpenid({
	provider: "wxpay",
	code: options.code
});
Cloud Object Interface Form
await uniPayCo.getOpenid({
  provider: "wxpay",
  code: options.code
});
Parameter Description
| parameter name | type | required | description |
|---|---|---|---|
| provider | string | yes | payment provider such as wxpay alipay |
| code | string | yes | the code returned by the WeChat official account web page authorization callback |
return value
| parameter name | type | description |
|---|---|---|
| openid | string | openid |
# ios in-app purchase payment
Overview
The full name of IAP: In-App Purchase, refers to the in-app purchase of the Apple App Store, which is a set of transaction system provided by Apple for in-app purchase of virtual goods or services.
Scope of application: Product functions or virtual goods/services that require payment in the app, such as game props, e-books, music, videos, subscription members, advanced functions of the app, etc. need to use IAP, while purchasing physical goods in the app (such as Taobao to buy mobile phones) or virtual goods (such as recharge) or services that are not used in the App (such as Didi hailing a car) are not applicable to IAP.
In short, Apple stipulates that for virtual goods or services within the scope of application, IAP must be used for purchase and payment. Alipay, WeChat payment and other third-party payment methods (including Apple Pay) are not allowed, nor are any methods ( Including jumping out of the app, prompt copy, etc.) to guide users to purchase through external channels of the app.
Example Code
Note: Only use the uni-pay payment component to initiate
// 发起ios内购支付
this.$refs.pay.createOrder({
	provider: "appleiap", // 支付供应商(这里固定未appleiap,代表ios内购支付)
	order_no: "20221027011000101001010", // 业务系统订单号
	out_trade_no: "2022102701100010100101001", // 插件支付单号
	type: "appleiap", // 支付回调类型(可自定义,建议填写appleiap)
	productid: "io_dcloud_hellouniapp_pay_like6", // ios内购产品id(仅ios内购生效)
	// custom data
	custom: {}
});
Click to view ios in-app purchase notes
Complete ios in-app purchase payment sample code
<template>
	<view class="content">
		<view class="uni-list">
			<radio-group @change="applePriceChange">
				<label class="uni-list-cell" v-for="(item, index) in productList" :key="index">
					<radio :value="item.productid" :checked="item.checked" />
					<view class="price">{{item.title}} {{item.price}}元</view>
				</label>
			</radio-group>
		</view>
		<view class="uni-padding-wrap">
			<button class="btn-pay" @click="createOrder" :loading="loading" :disabled="disabled">立即支付</button>
		</view>

		<!-- 统一支付组件,注意:vue3下ref不可以等于组件名,因此这里ref="pay" 而不能是 ref="uniPay" -->
		<uni-pay ref="pay" :debug="true" :adpid="adpid" return-url="/pages/order-detail/order-detail" @mounted="onMounted" @success="onSuccess"></uni-pay>
	</view>
</template>

<script>
	export default {
		data() {
			return {
				order_no: "", // 业务系统订单号(即你自己业务系统的订单表的订单号)
				out_trade_no: "", // 插件支付单号
				adpid: "1000000001", // uni-ad的广告位id

				loading: false, // 支付按钮是否在loading中
				disabled: true, // 支付按钮是否禁用
				productid: "", // 用户选择的商品id
				// List of ios in-app purchase items for sale
				productList: [
					{
						"description": "为DCloud提供的免费软件进行赞助",
						"price": 1,
						"productid": "io_dcloud_hellouniapp_pay_like1",
						"title": "赞赏"
					},
					{
						"description": "为DCloud提供的免费软件进行赞助",
						"price": 6,
						"productid": "io_dcloud_hellouniapp_pay_like6",
						"title": "赞赏"
					}
				],
			}
		},
		onLoad: function() {

		},
		onShow() {
			if (this.$refs.pay && this.$refs.pay.appleiapRestore) {
				// ios内购支付漏单重试
				this.$refs.pay.appleiapRestore();
			}
		},
		onUnload() {},
		methods: {
			// Execute after the payment component is loaded
			onMounted(insideData){
				this.init();
			},
			// initialization
			async init() {
				this.productList[0].checked = true;
				this.productid = this.productList[0].productid;
				this.disabled = false;
				if (this.$refs.pay && this.$refs.pay.appleiapRestore) {
					// ios内购支付漏单重试
					this.$refs.pay.appleiapRestore();
				}
			},
			/**
			 * 发起支付
			 * 在调用此api前,你应该先创建自己的业务系统订单,并获得订单号 order_no,把order_no当参数传给此api,而示例中为了简化跟支付插件无关的代码,这里直接已时间戳生成了order_no
			 */
			createOrder(){
				this.order_no = `test`+Date.now();
				this.out_trade_no = this.order_no;
				// 发起支付
				this.$refs.pay.createOrder({
					provider: "appleiap", // 支付供应商(这里固定未appleiap,代表ios内购支付)
					order_no: this.order_no, // 业务系统订单号(即你自己业务系统的订单表的订单号)
					out_trade_no: this.out_trade_no, // 插件支付单号
					type: "appleiap", // 支付回调类型(可自定义,建议填写appleiap)
					productid: this.productid, // ios内购产品id(仅ios内购生效)
					// custom data
					custom: {}
				});
			},
			// listen event - payment successful
			onSuccess(res){
				console.log('success: ', res);
				if (res.user_order_success) {
					// On behalf of the user has paid, and the callback written by you is successful and executed correctly

				} else {
					// Represents that the user has paid, but the callback you wrote yourself failed to execute (usually because of a problem with your callback code)

				}
			},

			// Listen - the selected value of the multi-select box changes
			applePriceChange(e) {
				this.productid = e.detail.value;
			},
		}
	}
</script>

<style>
	.content {
		padding: 15px;
	}

	button {
		background-color: #007aff;
		color: #ffffff;
	}

	.uni-list-cell {
		display: flex;
		flex-direction: row;
		align-items: center;
		padding: 10px;
		border-bottom: 1px solid #eee;
	}

	.price {
		margin-left: 10px;
	}

	.btn-pay {
		margin-top: 30px;
	}
</style>
# Payment Statistics
uni-pay adds payment statistics based on uni-statistics 2.0. Empowering digital operations for you.
# Access payment statistics
uni-admin 2.2.0 and above versions have built-in payment statistics, and the menu location is uni statistics / payment statistics
If you are currently using the old version of uni-admin, you need to update to the new version of uni-admin first (right-click `package. Contrasted with direct merging which overwrites your previously written code)
At the same time, create an empty json file, copy the following content into the newly created json file, and finally go to the opendb-admin-menus table of uniCloud console to manually import the json file
{"menu_id": "uni-stat-pay","name": "支付统计","icon": "uni-icons-circle","url": "","sort": 2122,"parent_id": "uni-stat","permission": [],"enable": true,"create_date": 1667386977981}
{"menu_id": "uni-stat-pay-overview","name": "概况","icon": "","url": "/pages/uni-stat/pay-order/overview/overview","sort": 21221,"parent_id": "uni-stat-pay","permission": [],"enable": true,"create_date": 1667387038602}
{"menu_id": "uni-stat-pay-funnel","name": "漏斗分析","icon": "","url": "/pages/uni-stat/pay-order/funnel/funnel","sort": 21222,"parent_id": "uni-stat-pay","permission": [],"enable": true,"create_date": 1668430092890}
{"menu_id": "uni-stat-pay-ranking","name": "价值用户排行","icon": "","url": "/pages/uni-stat/pay-order/ranking/ranking","sort": 21223,"parent_id": "uni-stat-pay","permission": [],"enable": true,"create_date": 1668430256302}
# Payment trend
Overview
In the Overview column, you can intuitively see the data of today, yesterday, the day before yesterday, this week, this month, this quarter, this year, and the cumulative data.

Glossary:
- Order Amount (GMV): The order amount (including unpaid orders and refunded orders) within the statistics period.
- Payment Amount (GPV): The amount of orders successfully paid (including refunded orders) within the statistics period.
- Refund Amount: The amount of refunds that occurred within the statistics period.
- Actual received amount: actual received amount = received amount - refund amount
Today's data
You can see more today's statistics in the Statistics of the day column.

Glossary:
- order amount:
- Order: Today's order amount (including unpaid orders and refunded orders).
- Collection: The amount of orders successfully paid today (including refunded orders).
- Refunds: The amount of refunds that occurred today.
- quantity of order:
- Orders: The number of orders successfully placed today (including unpaid orders and refunded orders).
- Receipts: The number of orders successfully paid today (including refunded orders).
- Refunds: The number of orders refunded today.
- amount of users:
- Orders: The number of customers who successfully placed orders today (including unpaid orders and refunded orders).
- Receipts: The number of users who have successfully paid today (including refund orders).
- Refunds: The number of users who received refunds today.
- Equipment Quantity:
- Orders: The number of devices successfully placed today (including unpaid orders and refunded orders).
- Receipts: The number of devices successfully paid for today (including refunded orders).
- Refunds: The number of devices for which refunds occurred today.
Trend
In the column of Trend Chart, carry out trend statistics by Day Dimension, Month Dimension, Quarter Dimension, Year Dimension. You can intuitively see the growth trend of income.
# Conversion Funnel Analysis
It can analyze the payment conversion rate of the specified time period for you, and display the payment conversion rate trend graph at the same time.
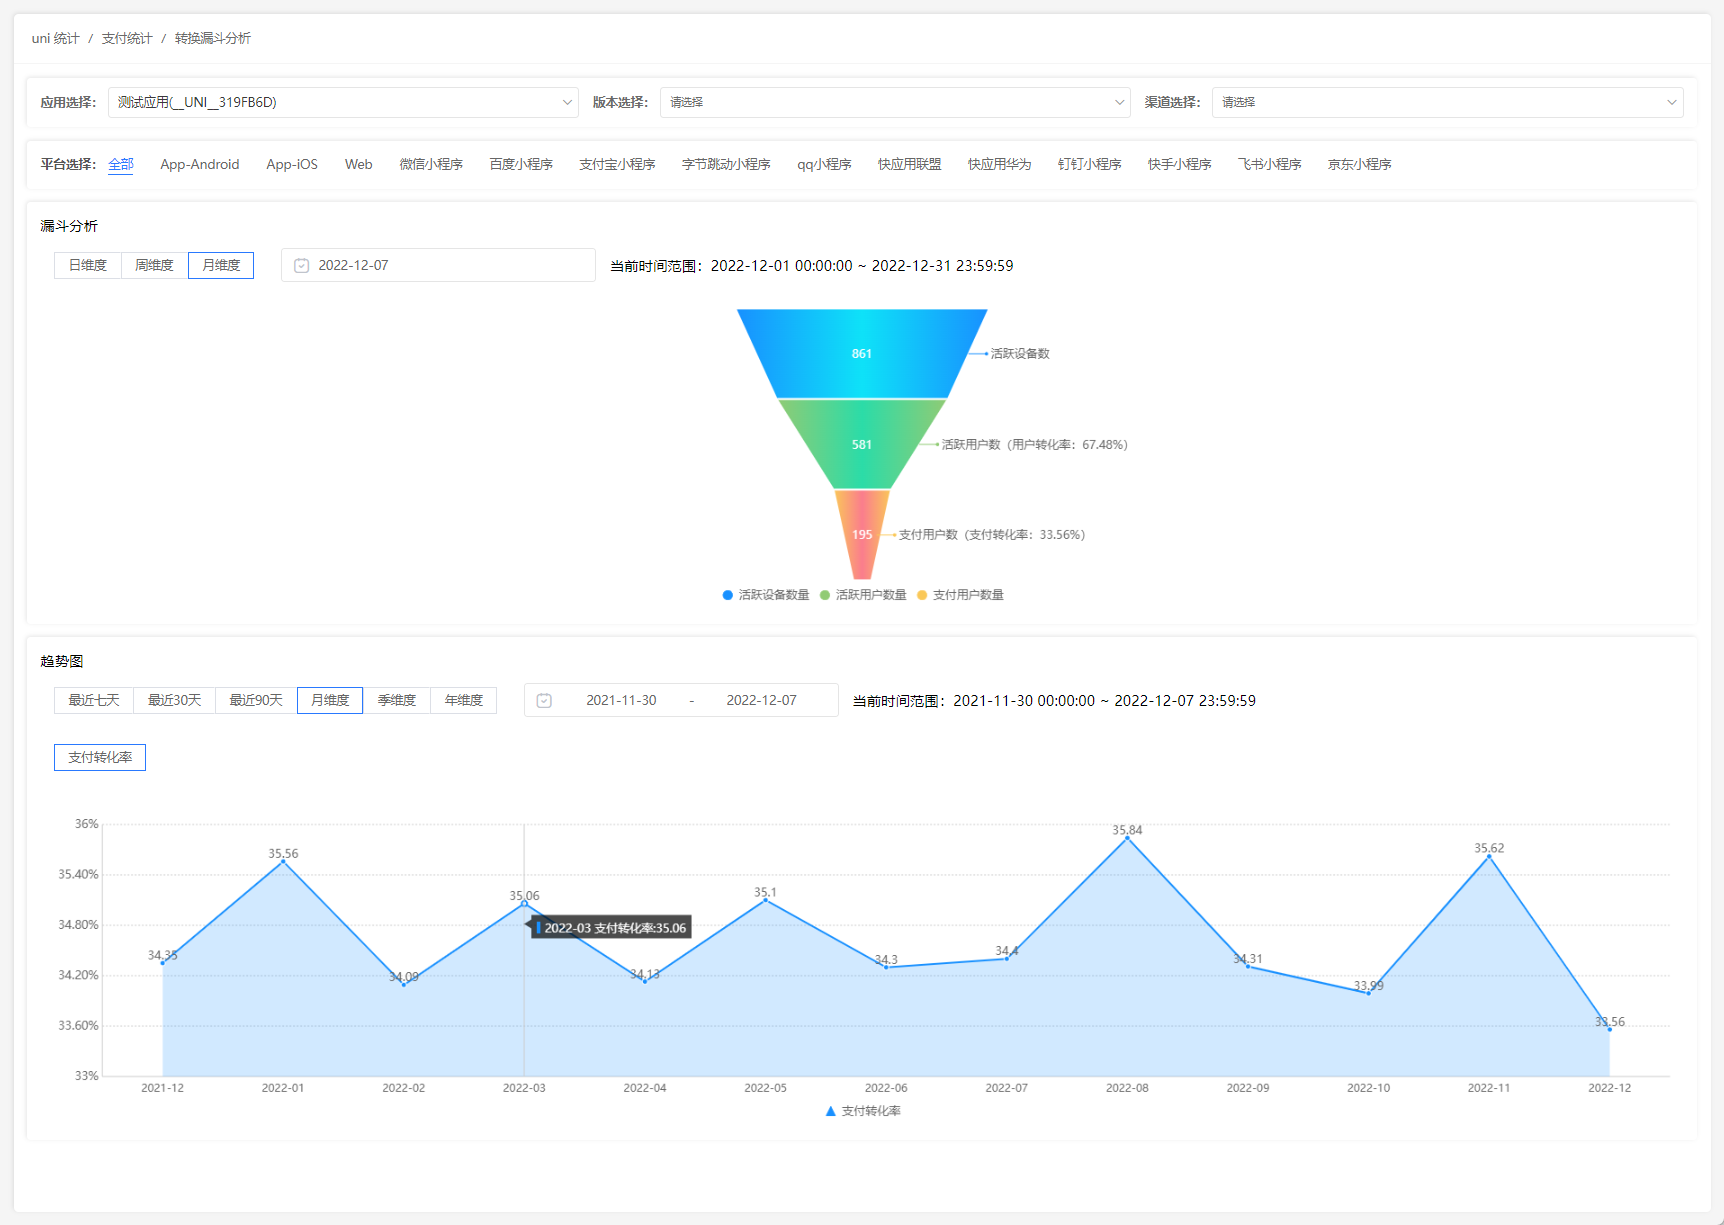
Glossary:
- Number of active devices: including the number of users who are not logged in and logged in
- Number of active users: the number of logged-in users
- Number of payment users: users who have at least one successful payment order
- User conversion rate: User conversion rate = number of active users/number of active devices
- Payment conversion rate: payment conversion rate = number of paying users/number of active users
# Value User Ranking
It can quickly screen high-value users and users with high repurchase rate for you.
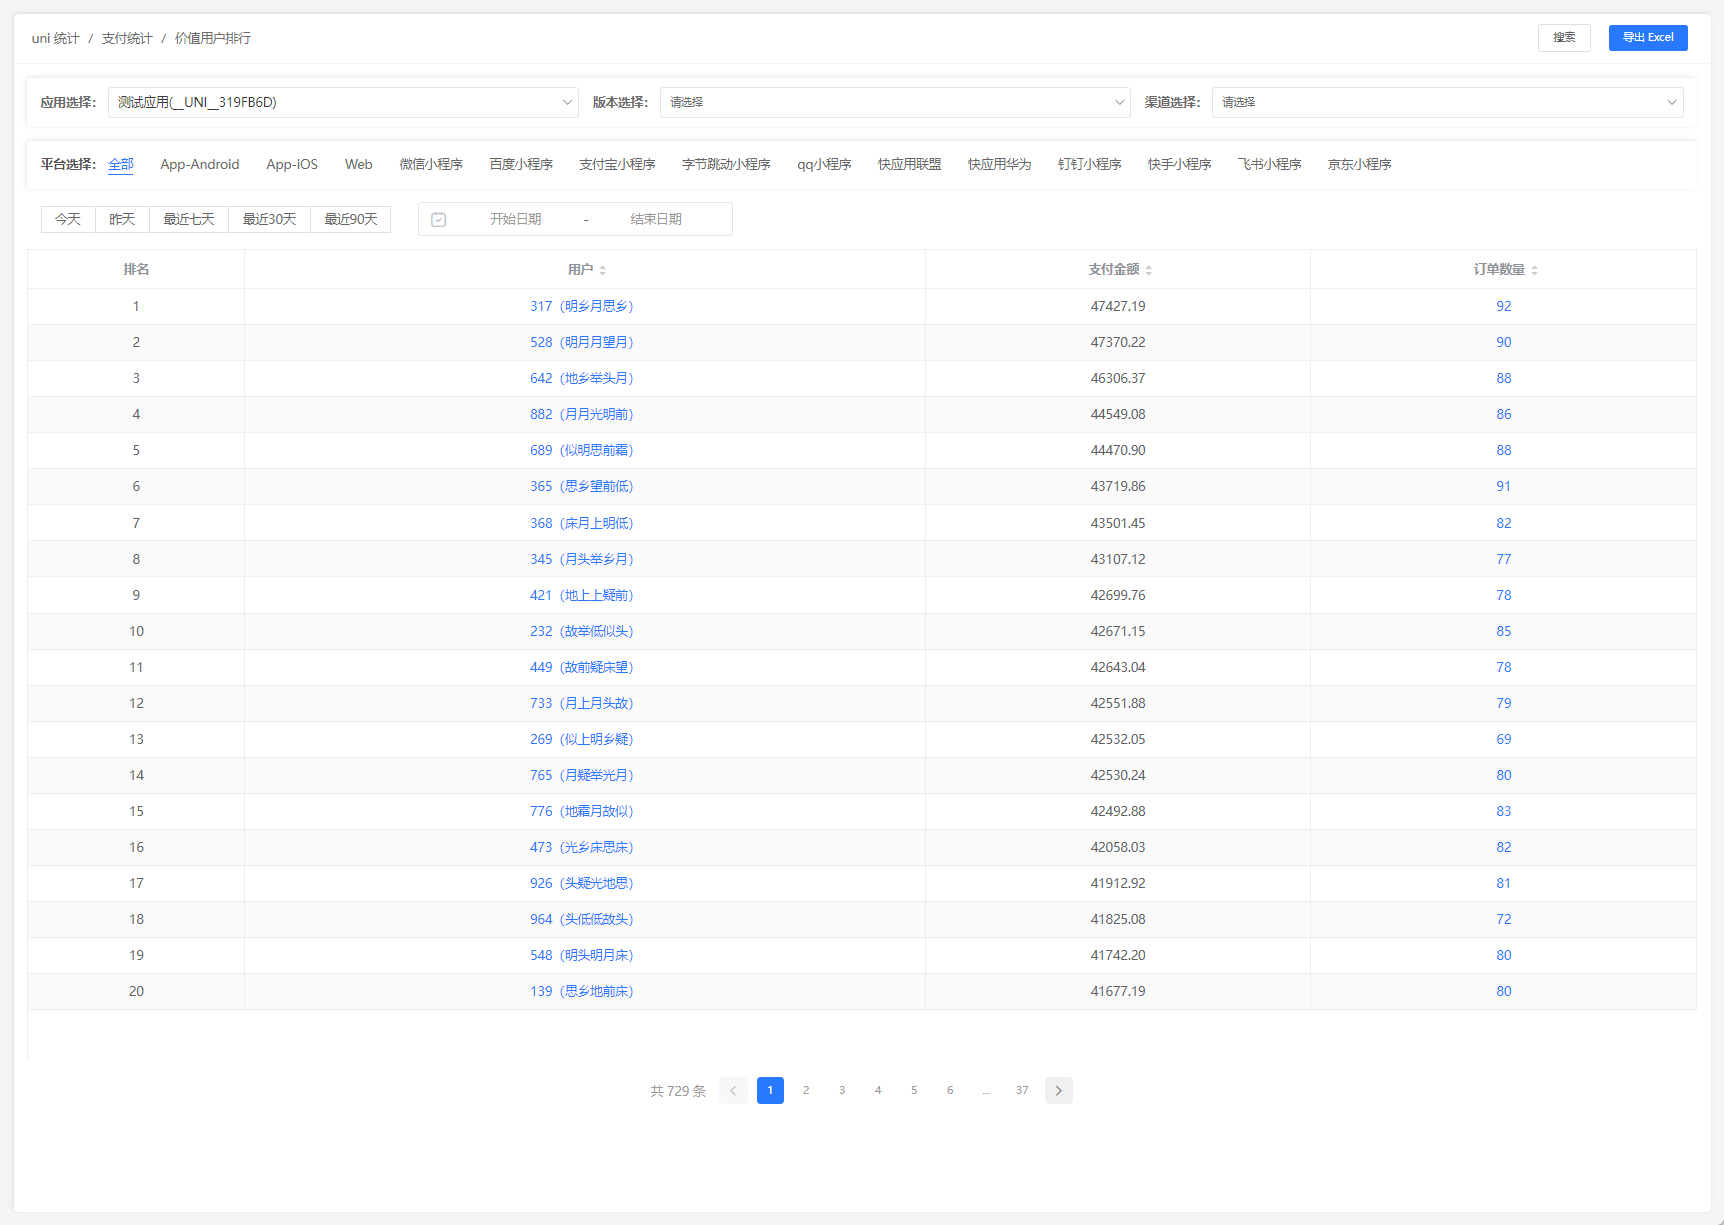
# Order Details
Can search and view order details
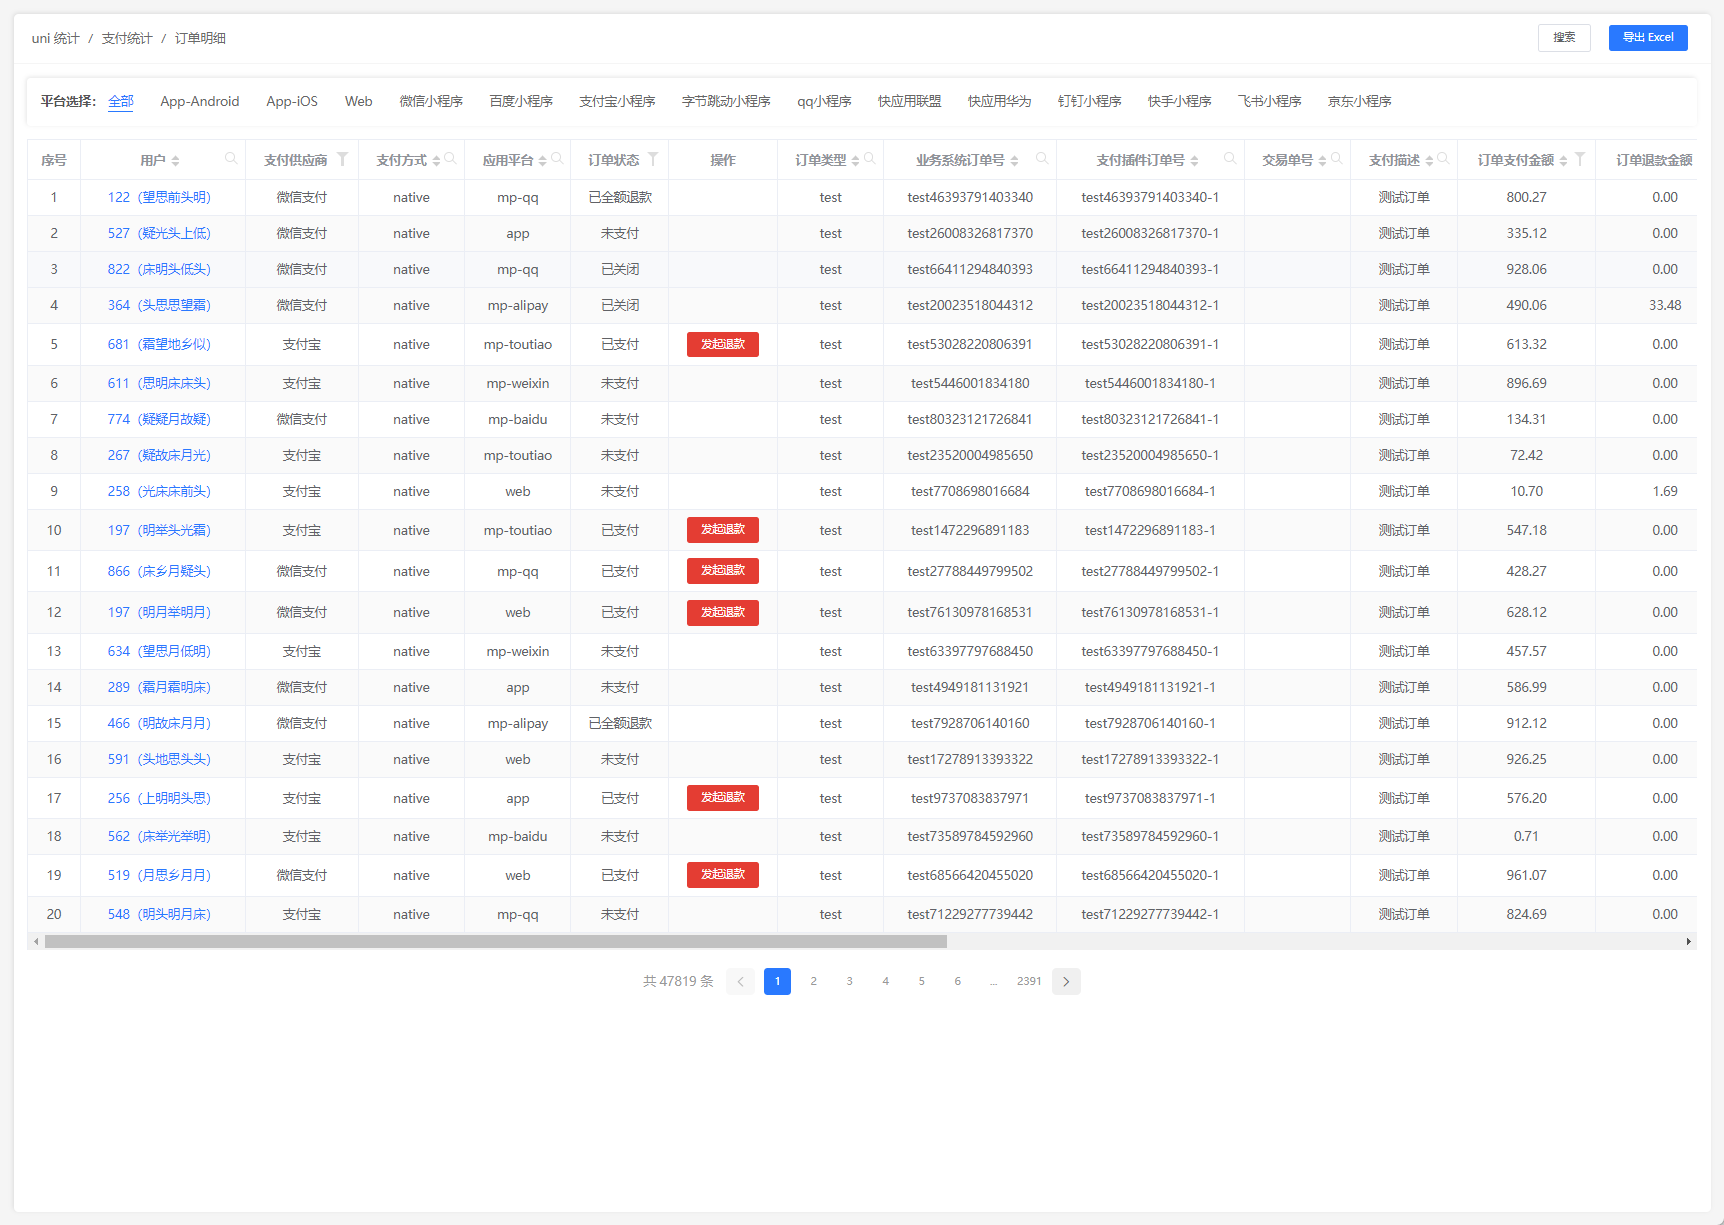
# Precautions
# WeChat public account
The routing mode of h5 must be configured as history, because the callback address of WeChat official account login does not support hash mode.
At the same time, the development and debugging of the WeChat official account is more troublesome. The trouble is that the domain name whitelist needs to be added for web page authorization. If you use localhost or ip to access the local area, you cannot obtain the WeChat code, so you cannot obtain the openid, resulting in payment failure.
Steps
- The mobile phone and the computer are connected to the same LAN (under the router WiFi)
- Check the LAN ip address of your computer, such as 192.168.1.8
- Assuming that your online domain name is (you must have your own domain name) www.abc.com, then set test.abc.com to resolve to your front-end hosting domain name first (in order to allow WeChat to verify the domain name, because the verification domain name , you need to upload the files specified by WeChat to your front-end hosting).
- Enter the background of the official account, set and develop -> official account settings -> set the authorized domain name of the webpage, add test.abc.com
- After successful addition, reset test.abc.com to resolve to your computer's LAN ip, such as 192.168.1.8
- After a period of time (about 20 minutes later, it will take time to change the domain name resolution to take effect, so please do not visit http://test.abc.com again within 20 minutes)
- After 20 minutes, visiting http://test.abc.com is equivalent to visiting http://192.168.1.8, so your mobile phone will use http://test.abc.com to visit your project
- Once the openid can be obtained normally, the payment test of the local WeChat official account can be performed normally (otherwise, it needs to be uploaded to the server for testing every time).
When using a custom domain name, you also need to add a vue.config.js file in the project root directory, the content is as follows:
module.exports = {
	devServer: {
		disableHostCheck: true, // 忽略域名检查
		port: 80, // 设置80端口为项目启动端口
	}
}
# WeChat MiniApp
In addition to configuring the payment configuration of uni-pay for WeChat MiniApp payment, you also need to configure the WeChat MiniApp appid in manifest.json, as shown in the figure below.
If the following error is reported, please click here
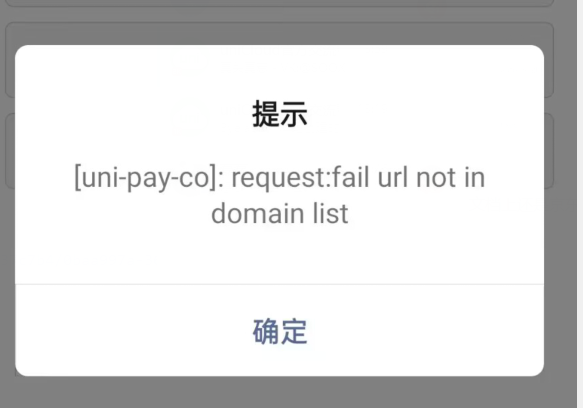
# APP payment
In addition to configuring the payment configuration of uni-pay for APP payment, it is also necessary to add a payment module when packaging, as shown in the figure below.
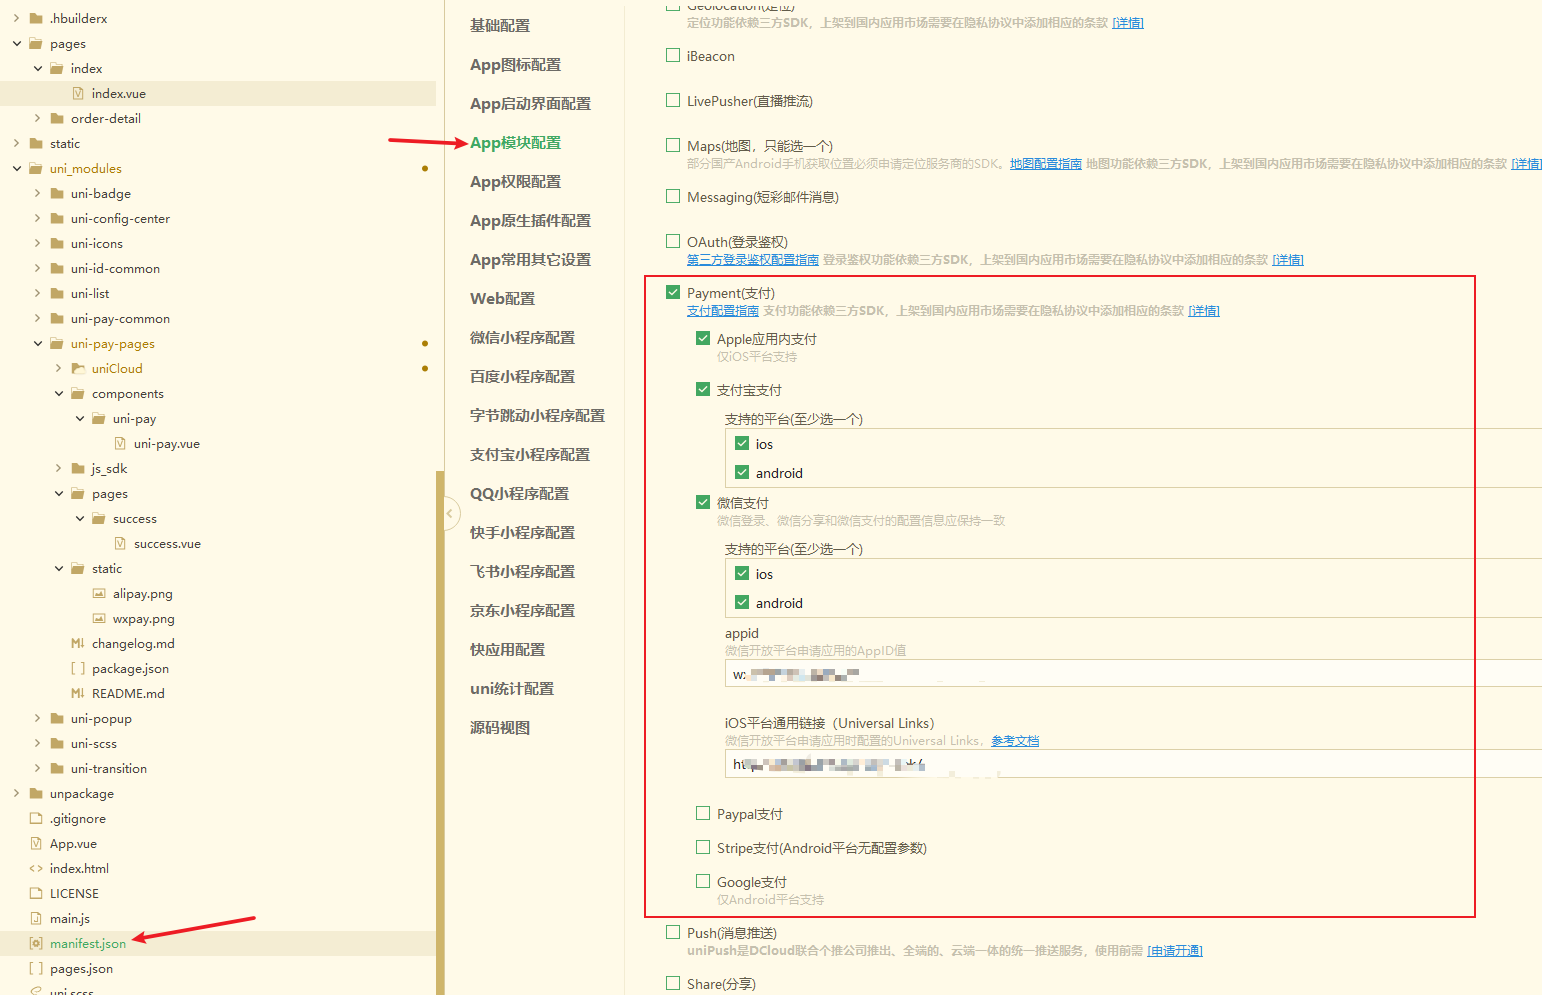
At the same time, you also need to create a custom base (the package name needs to be the same as that filled in under the open platform), and your application under the open platform must pass the review. (For example, the APP application under the WeChat open platform only shows that it has passed the review)
# ios in-app purchase payment
- For ios in-app purchase payment, you need to check the Apple in-app payment in the App module configuration
- Need to play ios custom dock
- You need to register an ios developer account and pay an annual fee (688 yuan/year)
- It is necessary to add in-app purchase products on the ios developer platform and obtain the product id
- When testing in the ios sandbox, you need to add a sandbox test account on the ios developer platform first, and you need to log in to the ios sandbox account on your test phone
- At present, the hot refresh of the hbx version will cause the ios payment to fail to be called normally. Therefore, after saving the code every time, you need to close the mobile app first, then restart the project in hbx, and then open the mobile app. (HBX will fix this problem later)
# Global error code
| Error Module | Error Code | Description |
|---|---|---|
| uni-pay | 50403 | The current login user has insufficient role permissions |
| uni-pay | 51001 | Payment order number (out_trade_no) cannot be empty |
| uni-pay | 51002 | code cannot be empty |
| uni-pay | 51003 | The order number (order_no) cannot be empty |
| uni-pay | 51004 | The callback type (type) cannot be empty, such as setting goods to represent a commodity order |
| uni-pay | 51005 | The payment amount (total_fee) must be a positive integer (integer > 0) (Note: 100=1 yuan) |
| uni-pay | 51006 | Payment description (description) cannot be empty |
| uni-pay | 51007 | payment provider (provider) cannot be empty |
| uni-pay | 51008 | ClientInfo not obtained |
| uni-pay | 51009 | cloudInfo not obtained |
| uni-pay | 52001 | The queried payment order does not exist |
| uni-pay | 52002 | The correct asynchronous callback URL is not configured |
| uni-pay | 53001 | Failed to obtain payment information (for specific information, refer to the log printed on the console) |
| uni-pay | 53002 | Refund failed (for specific information, please refer to the log printed on the console) |
| uni-pay | 53003 | Failed to query refund information (for specific information, please refer to the log printed on the console) |
| uni-pay | 53004 | Failed to close the order (for details, please refer to the log printed on the console) |
| uni-pay | 53005 | Certificate error, please check the payment certificate |
return value example
{
	"errMsg": "支付单号(out_trade_no)不能为空",
	"errCode": 51001,
	"errSubject": "uni-pay"
}
# FAQ
# How to upgrade old projects to uni-pay 2
uni-pay 2 still has a built-in uni-pay public module, which is backward compatible with uni-pay 1.x, that is, one-click upgrade from uni-pay 1.x to uni-pay 2.x , and will not affect your old projects.
# When the payment is initiated, the database table does not exist
The payment plugin needs to create payment-related tables before it can work properly. View related database tables
# How to apply for a payment account
The payment channel connected to this plug-in is the official channel of WeChat and Alipay
WeChat payment
Application address https://pay.weixin.qq.com/index.php/apply/applyment_home/guide_normal
Application Guide https://pay.weixin.qq.com/static/applyment_guide/applyment_index.shtml
Alipay
Application address https://open.alipay.com
Application Guidelines https://opendocs.alipay.com/common/02asmu
Notice
The application for a payment account requires enterprise qualifications (individual industrial and commercial households are also allowed, but personal qualifications are not allowed, business licenses and bank corporate accounts are required).
# How to get the key parameters required by the plugin
WeChat payment
WeChat payment parameters and certificate generation tutorial
- pfx: The certificate needed for WeChat payment v2 is a file with the suffix
.p12, if your.p12file is notapiclient_cert.p12, then rename it toapiclient_cert.p12, And copy it touni-config-center/uni-pay/wxpay/directory - appCertPath: The certificate needed for WeChat payment v3 is a file named
apiclient_cert.pem, copy it to theuni-config-center/uni-pay/wxpay/directory - appPrivateKeyPath: The certificate needed for WeChat Pay v3 is a file named
apiclient_key.pem, copy it to theuni-config-center/uni-pay/wxpay/directory
Alipay
Alipay Payment Certificate Generation Tutorial
- privateKey: Alipay merchant private key
- appCertPath: Alipay merchant public key path, which is a file with the suffix
appCertPublicKey.crt, copy it to theuni-config-center/uni-pay/alipay/directory - alipayPublicCertPath: Alipay merchant public key path, which is a file with the suffix
alipayCertPublicKey_RSA2.crt, copy it to theuni-config-center/uni-pay/alipay/directory - alipayRootCertPath: Alipay root certificate path, which is a file with the suffix
alipayRootCert.crt, copy it to theuni-config-center/uni-pay/alipay/directory
# Wechat MiniApp real machine reports fail url not in domain list error
This is because the domain name developed by the cloud has not been added to the domain name whitelist of the WeChat MiniApp. You need to go to the background of the WeChat MiniApp and add the following domain names to the domain name whitelist of the WeChat MiniApp.
https://api.next.bspapp.com;https://api.bspapp.com;https://tcb-api.tencentcloudapi.com;
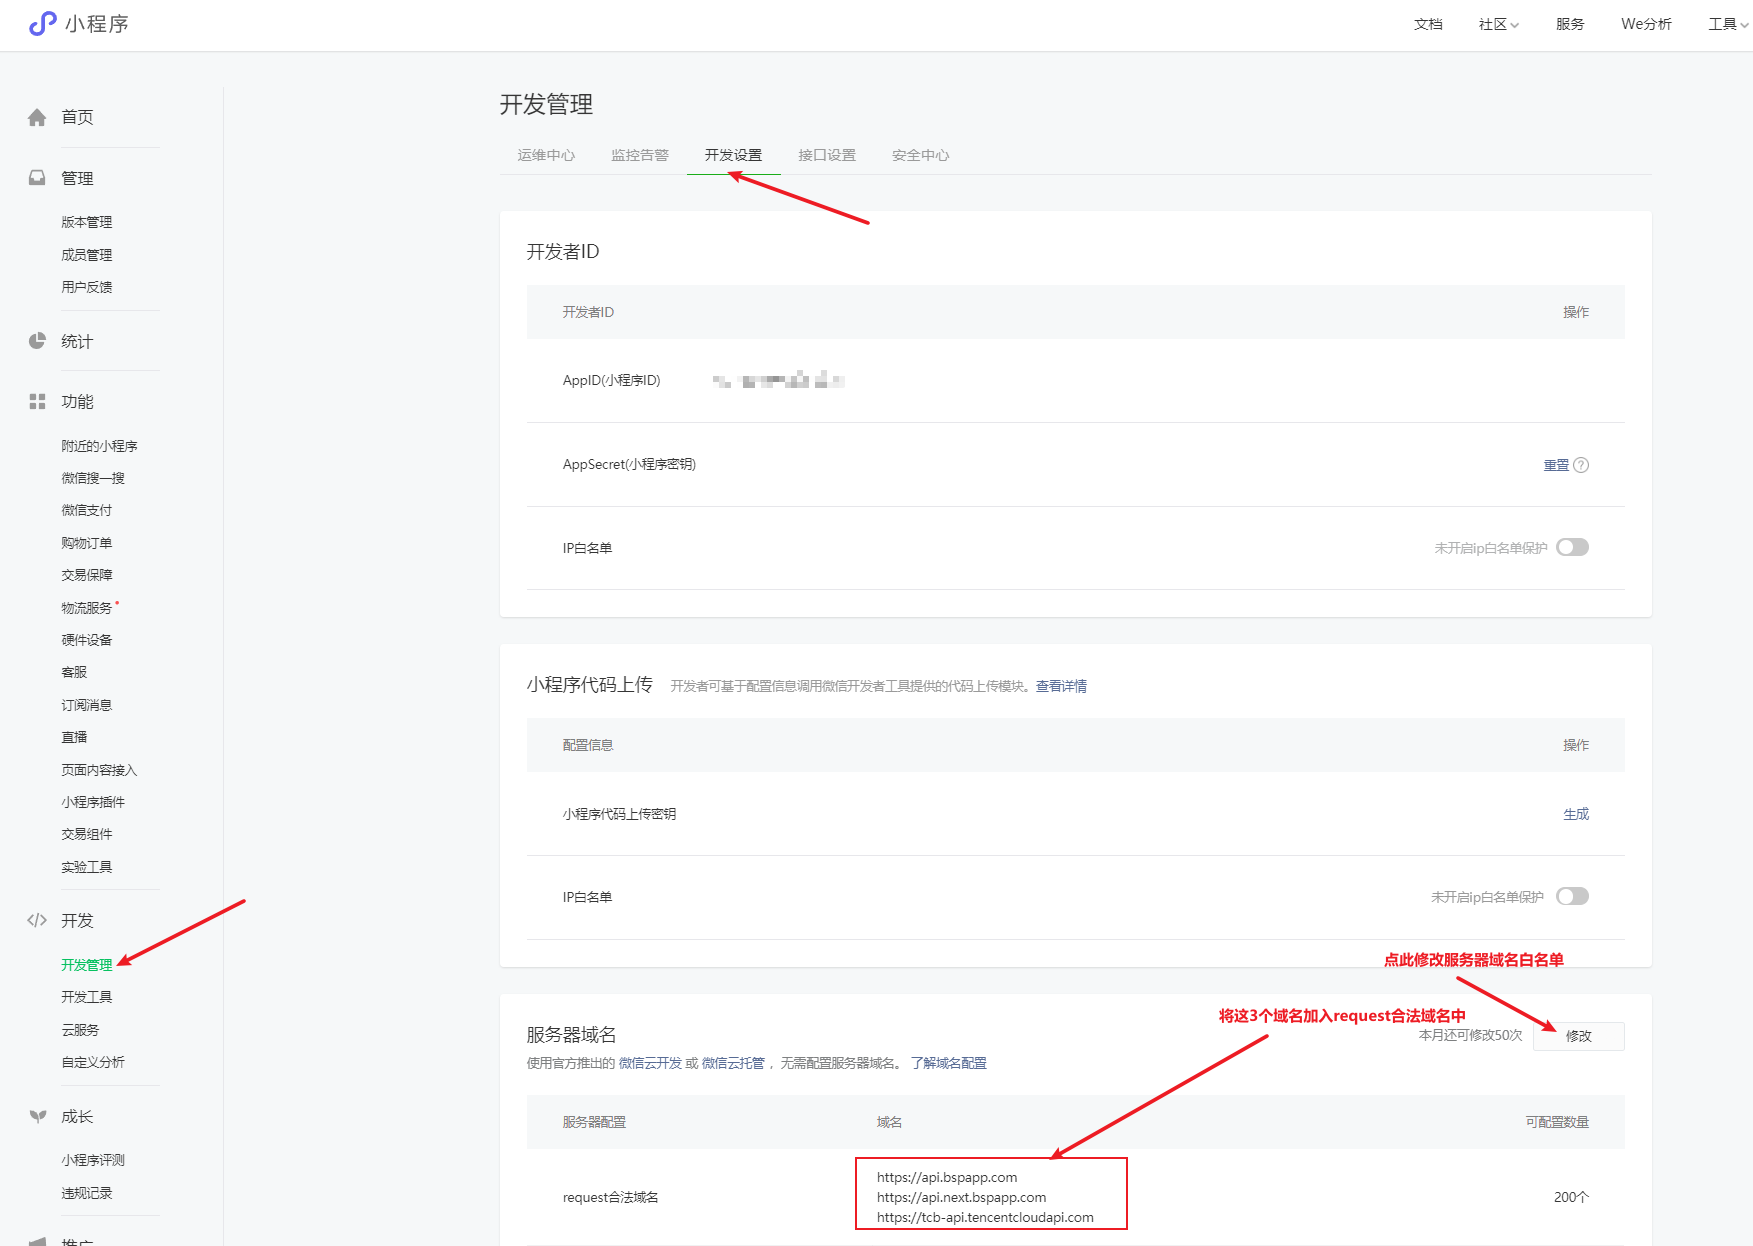
**After adding the domain name, be sure to restart the WeChat developer tools, then delete the recently used MiniApp in the mobile phone WeChat (this step is critical), and finally scan the QR code to enter the MiniApp. **