English
English
**The main function of this function is to delete the files stored in the cloud at the front end, and this usage is not recommended. **
This function is only supported by Tencent Cloud
Tencent Cloud provides a set of its own user permissions. This system is different from uni-id, does not support programming, and cannot be used for real accounts in business systems. Front-end management for cloud storage only.
In the Tencent Cloud concept, all users access cloud storage through anonymous login by default, and custom login provides the ability to distinguish user identities in the cloud. After enabling Tencent Cloud custom login, each user will have an identity tag in the background of Tencent Cloud. When uploading files from the front end to cloud storage, Tencent Cloud will automatically add this tag to the file. If only the creator is writable in the cloud storage permission configuration, the front-end can delete the cloud storage directly. When deleting, Tencent Cloud will automatically verify that the userId of the file uploader is the same as the current user's userId.
In the development of WeChat applet cloud, custom login can also be used for front-end operation database.
但因为腾讯云提供的这套方案不够灵活和完善,uniCloud单独做了uni-id用于完善的账户体系,单独做了clientDB,用于完善快捷的前端操作数据库。
Therefore, the value of Tencent Cloud's custom login function in uniCloud is only left to delete cloud storage at the front end. DCloud does not recommend developers to use it this way. Front-end direct cloud storage does not require Tencent Cloud custom login, and deletion of cloud storage should still be done in the cloud.
# Glossary
- Ticket: The ticket returned by the cloud function call
auth.createTicket, which is used by the client to log in with the ticket - Anonymous login: the state where the user has not logged in
- Short-term access token: User identity credentials (access token), which are automatically stored after calling
signInWithTicketorlinkAndRetrieveDataWithTicket
# Cloud function interface
# uniCloud.customAuth
Important: Since HBuilderX 2.9.12, this interface has been adjusted from uniCloud.auth to uniCloud.customAuth, and will still be compatible with uniCloud.auth in a short time
Get the login object
Sample code
const auth = uniCloud.customAuth()
# auth.createTicket
The cloud creates a ticket based on the user id for the client to log in to the corresponding cloud vendor
Interface form
auth.createTicket(String uid, Object options)
Parameter Description
| Field | Type | Required | Description |
|---|---|---|---|
| uid | string | yes | User unique id within the app |
| options.refresh | number | No | Refresh time of access_token, default one hour |
| options.expire | number | no | expire time of access_token |
Sample code
let uid = '123456';

const ticket = uniCloud.customAuth().createTicket(uid, {
  refresh: 10 * 60 * 1000 // 每十分钟刷新一次登录态, 默认为一小时
});
# auth.getUserInfo
After successful login in any way, you can call getUserInfo to get the user's identity information.
Response parameters
| Field | Type | Required | Description |
|---|---|---|---|
| uid | string | Yes | User's unique ID in the cloud vendor |
| customUserId | string | No | UserId passed in by user using custom login |
Sample code
const {
	uid,
	customUserId
} = await auth.getUserInfo()
# client interface
# uniCloud.customAuth
Important: Since HBuilderX 2.9.12, this interface has been adjusted from uniCloud.auth to uniCloud.customAuth, and will still be compatible with uniCloud.auth in a short time
Get the login object
Sample code
const auth = uniCloud.customAuth()
# auth.signInWithTicket
Use the ticket returned by the cloud function interface createTicket to log in. For a detailed description, refer to login process
Example Code
auth.signInWithTicket('YourTicket').then(() => {
    // get user information
    return auth.getUserInfo()
  })
  .then(userInfo => {
    //...
  })
# auth.getLoginState
Developers can get the current login status through getLoginState(). After calling getLoginState(), the SDK will identify whether there is a login status locally. If so, it will try to refresh the login status. If the login status is refreshed successfully, then Will return the new login status, otherwise return undefined.
Example Code
auth.getLoginState().then(loginState => {
  if (loginState) {
    // login status is valid
  } else {
    // There is no login status, or the login status has expired
  }
})
# auth.getUserInfo
After successful login in any way, you can call getUserInfo to get the user's identity information.
Response parameters
| Field | Type | Required | Description |
|---|---|---|---|
| uid | string | Yes | the unique ID of the user in the cloud provider |
| customUserId | string | No | The user uses a custom login to pass in the user Id |
Example Code
auth.signInWithTicket('YourTicket').then(() => {
    // get user information
    return auth.getUserInfo()
  })
  .then(userInfo => {
    //...
  })
# Login process
uniCloud allows developers to authenticate users with specific login credentials Ticket. Developers can use the server SDK to create a Ticket, and pass the Ticket into the application, and then call signInWithTicket() to obtain the login status.
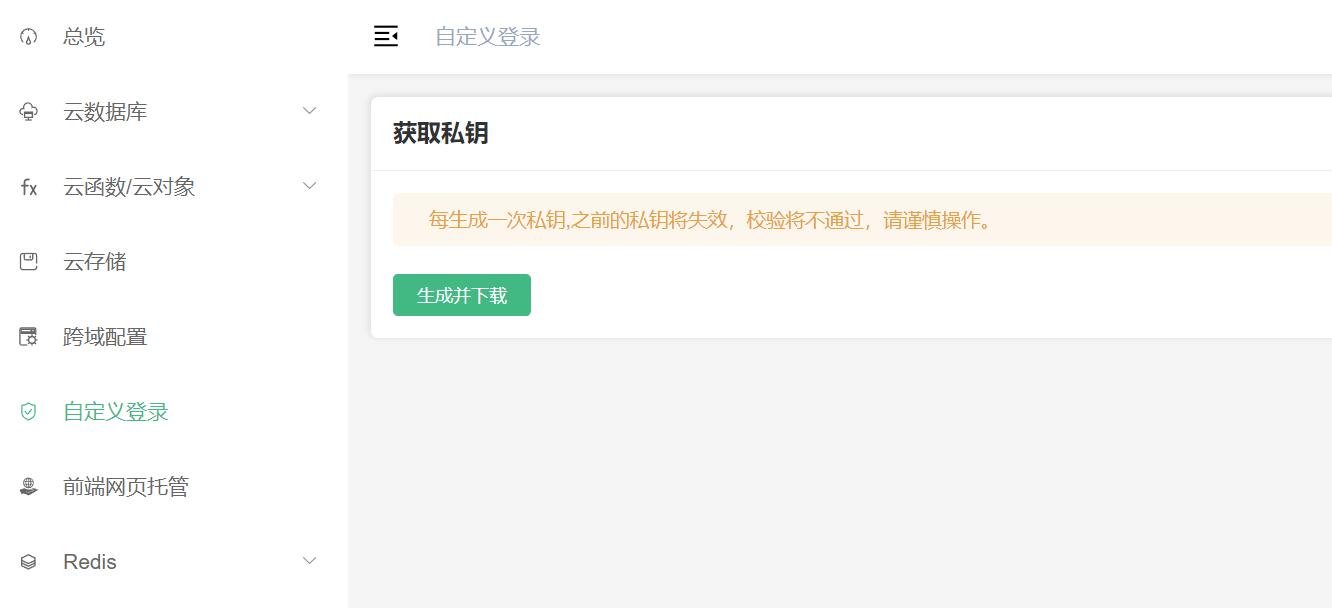
# Step 1: Obtain the private key file
Log in to the uniCloud console uniCloud console, in custom login, click "generate and download"
Note: Repeatedly generating a private key will invalidate the previously generated private key and cause the user's login status to become invalid
# Step 2: Use cloud functions to create login credentials
After obtaining the private key file (credentials.json), put it at the same level as index.js in the cloud function that needs to generate Ticket
Server-side SDK has a built-in interface for generating Ticket, and the developer needs to provide a custom customUserId as the unique identity of the user. Ticket is valid for 5 minutes, and it will be invalid when it expires.
The customUserId of each user cannot be the same, and each time the user logs in again, the original login status will become invalid.
Ticket is generally issued after the username and password are successfully verified
let customUserId = '123456';

const ticket = uniCloud.customAuth().createTicket(customUserId, {
  refresh: 10 * 60 * 1000 // 每十分钟刷新一次登录态, 默认为一小时
  refresh: 10 * 60 * 1000 // Refresh the login status every ten minutes, the default is one hour
});
// then send the ticket to the client
# Step 3: Use Ticket to log in on the client
After creating a Ticket, the developer should send the Ticket to the client, and then use the signInWithTicket() provided by the Client SDK to log in to uniCloud:
auth.signInWithTicket(ticket).then(() => {
  // login successful
})
# Anonymous login
uniCloud allows developers to use anonymous login to perform silent authorization, which can avoid forced login. In the anonymous state, uniCloud resources can be called normally, and developers can also cooperate with security rules to formulate corresponding access restrictions for anonymous users.
# Anonymous user re-login
If anonymous users want to log in again using the identity provided by the developer, they can call auth.signInWithTicket to do so. REFERENCE
# Convert anonymous users to official users
Currently uniCloud supports the conversion of anonymous users into official users. This regular user will inherit the resources created by anonymous users in the cloud. The process is as follows:
- First, you need to build a service to obtain a custom login credential
ticketaccording to login process; - The client requests the interface to obtain a custom login credential
ticket. Please note, thisticketmust not have been registered with uniCloud, in other words, anonymous users can only be converted into new uniCloud users; - The client calls
auth.linkAndRetrieveDataWithTicketAPI, as follows:
// Before calling this API, you need to request the interface to get the ticket
auth.linkAndRetrieveDataWithTicket(ticket).then(res => {
  // transfer successfully
}).catch(err => {
  // If the forwarding fails, an error will be thrown
});
# Login authorization related events and hook functions
# Event: 'loginStateExpire'
When the login status fails, this event will be triggered, and the developer can try to log in to uniCloud again in the callback of this event.
auth.onLoginStateExpire(() => {
  // try to log in again
});
# Event: 'refreshAccessToken'
JS SDK will automatically refresh and maintain the short-term access token (access token) while the login status is in effect, and this event will be triggered every time it is successfully refreshed.
For applications where two login states coexist (uniCloud, self-service login state), this event can be used to synchronize the state between login states.
auth.onAccessTokenRefreshed(() => {
  // At this time, the uniCloud short-term access token has been refreshed, and you can try to refresh the login status of your own business
})
# Auth.shouldRefreshAccessToken(callback)
shouldRefreshAccessToken receives a callback function, and will call this callback function before refreshing the short-term access token, and decide whether to refresh the short-term access token according to the return value.
For applications where two login states coexist (uniCloud, self-service login state), you can judge whether the self-service login state is invalid in callback, so as to decide whether to renew the short-term access token of uniCloud.
auth.shouldRefreshAccessToken(() => {
  if (/* 自身业务登录态还有效 */) {
  if (/* own business login status is still valid */) {
    return true;
  } else {
    return false;
  }
});