English
English
# Automated test plugin
# plugin description
本插件,用于在HBuilderX内运行uni-app自动化测试,支持H5、微信小程序、Android、iOS、Harmony自动化测试。
The main functions are:
- Initialize the test environment (create a test configuration file, and install the environment required for testing)
- Run tests (run all test cases under the project, run a test case)
- New test case (uni-app pages page, right-click menu [New test case])
- View historical test reports (HBuilderX top run menu)
# Test Notes
- This plugin supports
uni-app common projectanduniapp-cli project. For the uniapp-cli project, to run automated tests, you need to install automated test dependencies under the current project. - Windows computers do not support running tests to
ios phone. - MacOSX电脑,仅支持运行测试到
iOS模拟器,不支持ios真机,测试iOS模拟器,需要电脑装安装XCode。 - 运行测试到H5,仅支持
chrome浏览器,不支持其它浏览器。 - Run the test to the Android phone, if HBuilderX detects only one android device,
directlyrun the test to the currently connected device. When you havemultipledevices, a pop-up window will ask you to select a phone. - node: When node is not installed on the machine, the test will be run using HBuilderX
built-in node. On the contrary, if the node is installed on the machine, the node of the machine is used. - To run the test to the WeChat applet, you must configure the WeChat applet appid in manifest.json. If the WeChat Developer Tools cannot open the project successfully, please open it manually for the first time.
# Plugin installation
As shown in the figure below, in the plug-in market, enter the [plug-in details page] (https://ext.dcloud.net.cn/plugin?id=5708), click [Import Plug-in], and the locally installed HBuilderX will be automatically launched.
Special Note: Plug-in installation depends on HBuilderX terminal plug-in.
# Test environment install
插件依赖:
- H5, WeChat, ios, android automated testing depends on
puppeteer,adbkit,node-simctl,jest,playwright. When running the plugin, if this dependency is not installed, a pop-up window will be installed automatically. Note: This plug-in version 0.0.3 and below, node: When node is not installed on this machine, the built-in node of HBuilderX will be used to run the test. On the contrary, if the node is installed on the machine, the node of the machine is used.Note: This plugin version 0.0.4+, new configuration items support custom settings which node version to use for uni-app compilation
pay attention:
- For common uni-app projects, the test environment needs to be installed through the plug-in
hbuilderx-for-uniapp-test. - uniapp-cli project, just install the relevant test dependencies under the project. Details
# uni-app普通项目
For uni-app ordinary projects, when initializing the test environment or running the test, if the relevant dependencies are not installed, they will be installed automatically.
As shown in the figure below, the project manager, select the project, right-click menu [initialize the test environment]
注意:安装环境依赖时,如果检测到项目下不存在测试配置文件 env.js 和jest.config.js,则会自动创建测试配置文件。
# uniapp-cli项目
The uniapp-cli project, automated test running, will use the dependent library under the project.
Open the command line, enter the project directory, and enter the following command to install:
npm install --save cross-env puppeteer adbkit node-simctl jest playwright @playwright/test
# Create test case
uni-app project, pages page, right-click menu, create test cases
# Test run
After creating a test case, select the project, right-click the menu [Run uni-app automated test], and select the running platform to start running the test.
Note: If you want to run the specified test case, please select the use case to be run in the project manager, right-click menu [Run current test case]
# 测试平台说明
- Windows computers NOT SUPPORTED to run tests to
ios phone - MacOSX computer, only supports running tests to
ios simulator, does not support ios real machine. - Run the test to H5, only supports
chromebrowser, does not support other browsers. - Run the test to an Android phone, if HBuilderX only detects one android device, run the test directly to the currently connected device. When there are multiple devices, a pop-up window will ask to select a mobile phone.
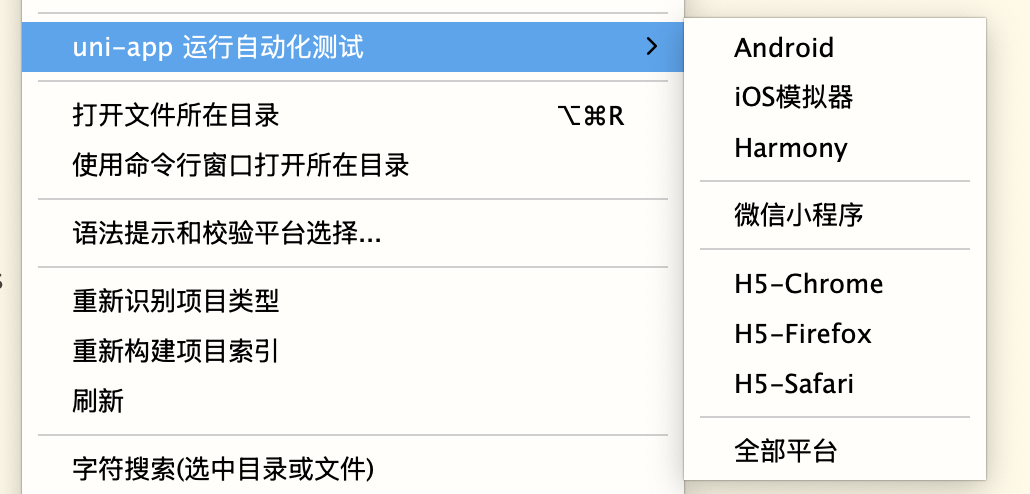
# 选择测试平台
As shown in the figure below, when running the test, you can select the corresponding platform.
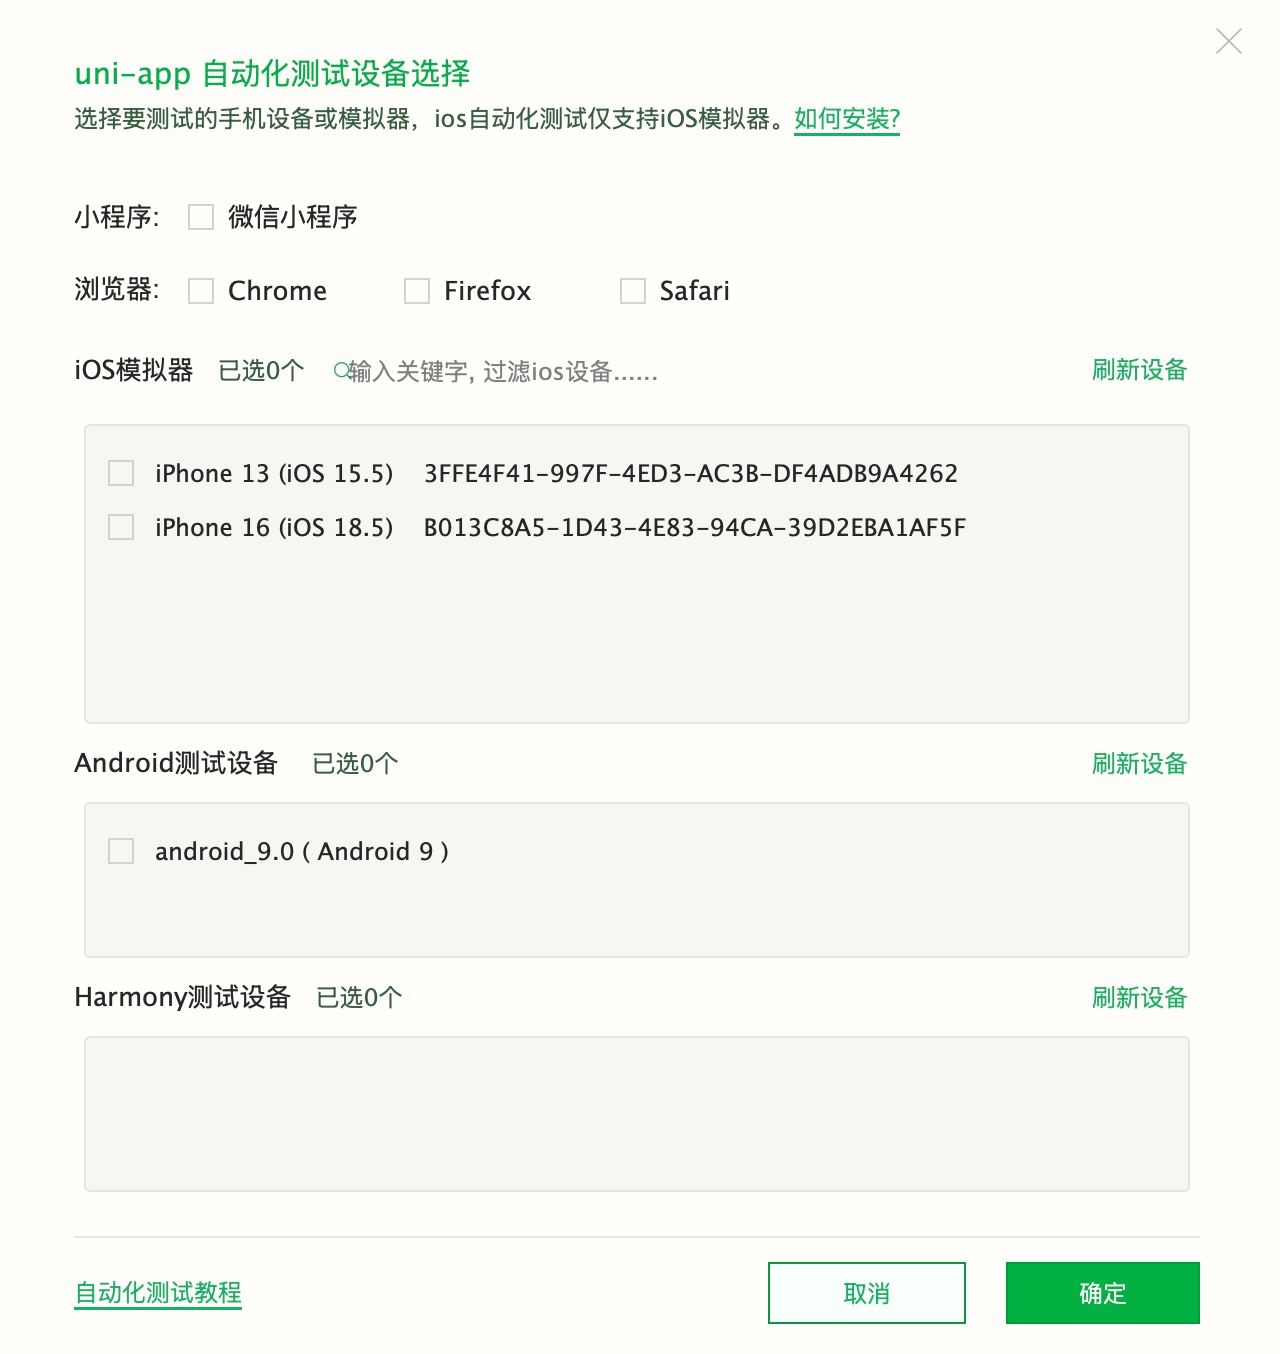
# 选择设备
如果无法获取到设备信息,请参考
# Plugin configuration
Click the menu [Settings] [Plugin Configuration], find the hbuilderx-for-uniapp-test item, and you can see the setting items.

As pictured above
- Support custom Test Report path.
- Automatically modify testMatch in jest.config.js file, default is
true. After removing the check, testMatch will no longer be automatically modified. - Plugin version 0.0.4+, new configuration items support custom setting which node version to use for uni-app compilation. That is, you can choose to use HBuilderX
built-in Node, or useoperating systeminstalled Node for uni-app compilation.
# How to write test cases
uni-app automated testing, using the common jest testing library in the industry.
- In the uni-app project, under the pages directory, right-click the menu [Create Test Case], and select a template.
- Test case file name, must be xxx.test.js
- When writing test cases, please follow the jest specification.
# jest用例解析
The following will use a simplest example to explain the composition of test cases.
- describe represents a set of use cases, describe will form a scope
- it test function
- test test function, similar to it
- expect matcher. Using documentation
# 求和测试
function sum(a, b) {
    return a + b;
};

describe("sum test", () => {
    it('adds 1 + 2 to equal 3', () => {
        expect(sum(1, 2)).toBe(3);
    });
    test('adds 1 + 1 to equal 3', () => {
        expect(sum(1, 1)).toBe(3);
    });
})
# uni-app页面用例示例
Take the uni-app [default template] index page as an example.
Write a test case that checks the index.vue page, if the title is Hello
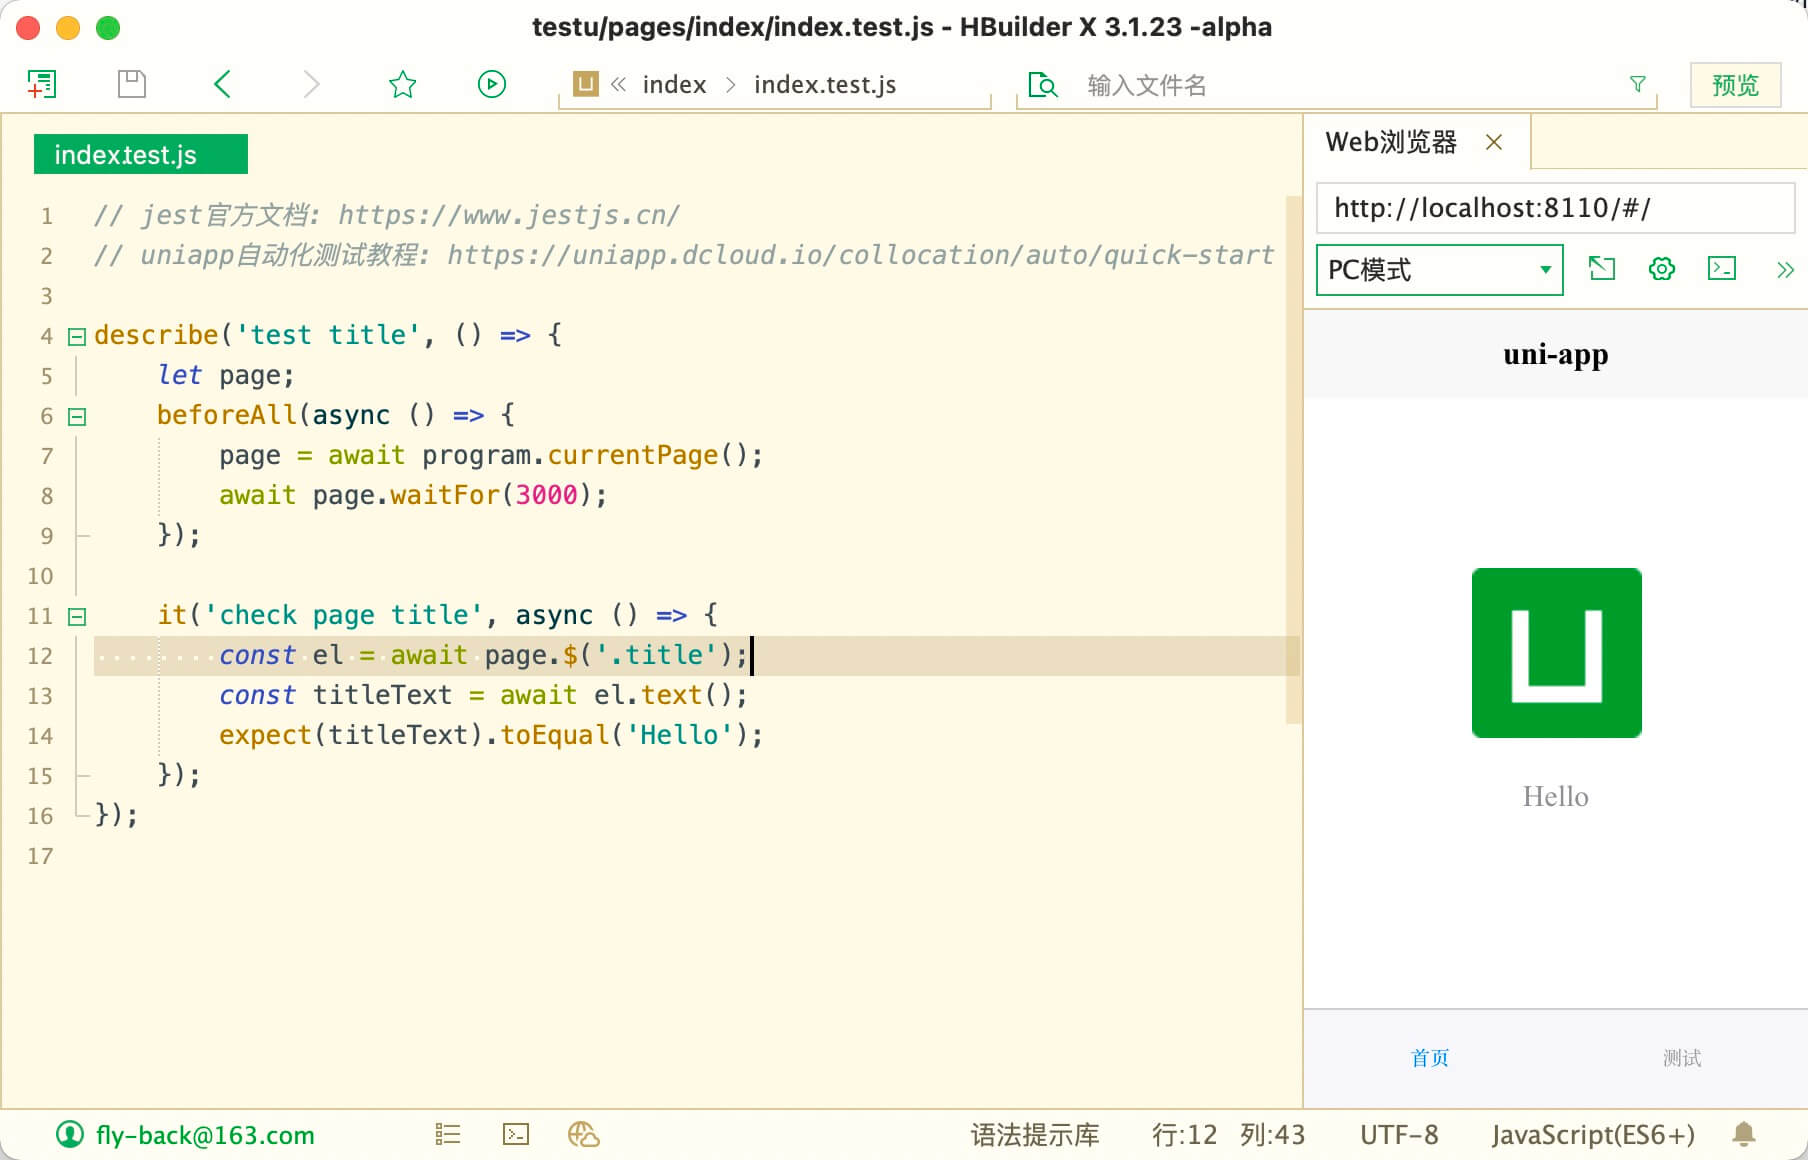
describe('test title', () => {
    let page;
    beforeAll(async () => {
        page = await program.currentPage();
        await page.waitFor(3000);
    });

    it('check page title', async () => {
        const el = await page.$('.title');
        const titleText = await el.text();
        expect(titleText).toEqual('Hello');
    });
});
扩展:如上测试代码中,使用了beforeAll函数,它用于在所有测试之前执行。了解jest更多钩子函数
# Setup and Teardown
Often when writing tests, you need to do some setup work before the test runs, and some finishing work after the test runs. You can use Jest's hook function to solve this problem.
4 hook functions in jest
- beforeAll: execute before all tests
- afterAll: After all tests are executed
- beforeEach: executed before each test instance
- afterEach: executed after each test instance completes
Documentation extension: jest setup-teardown
# 钩子函数的执行顺序
Using the following code, let's see the function execution order
describe('test Run Sequence', () => {
    beforeAll(() => {
        console.log('1 - beforeAll');
    });
    afterAll(() => {
        console.log('1 - afterAll');
    });
    beforeEach(() => {
        console.log('1 - beforeEach');
    });
    afterEach(() => {
        console.log('1 - afterEach');
    });
    test('test', () => {
        console.log('1 - test')
    });
});
operation result
  test Run Sequence
    ✓ test (4 ms)

  console.log
    1 - beforeAll

  console.log
    1 - beforeEach

  console.log
    1 - test

  console.log
    1 - afterEach

  console.log
    1 - afterAll

Test Suites: 1 passed, 1 total
Tests:       1 passed, 1 total
Snapshots:   0 total
Time:        0.454 s
# Built-in Jest code blocks
In order to write test cases more quickly, this plugin has built-in jest part of the code block
| prefix | code block |
|---|---|
| describe | describe('', () => {}); |
| test | test('', () => {}); |
| ta | test('', async () => {await}); |
| beforeAll | beforeAll(() => {}); |
| afterEach | afterEach(() => {}); |
| afterAll | afterAll(() => {}); |
| beforeAll | beforeAll(() => {}); |
# env.js
提醒:下面关于env.js的介绍,大部分情况下,自动化测试插件会自动修改,无需您手动调整。如果不确定,请勿修改。
通常,测试项目下有个测试配置文件env.js,内容如下:
module.exports = {
	// is-custom-runtime = true,修改env.js时,将不会使用标准基座路径,替代env.js中已配置的android、ios基座路径。
    "is-custom-runtime": false,
    "UNI_TEST_CUSTOM_ENV": {
		// 自动化测试插件 1.9.0版本新增`UNI_TEST_CUSTOM_ENV`
		"xx": "xx"
    },
    "compile": true,
    "h5": {
        // 此处省略........
    },
    "mp-weixin": {
		// 此处省略........
    },
    "app-plus": {
        // 此处省略........
    }
}
# env.js UNI_TEST_CUSTOM_ENV
提示:大部分场景下,您不会用到UNI_TEST_CUSTOM_ENV。修改请慎重。
下面将对UNI_TEST_CUSTOM_ENV做介绍。
自动化测试插件 1.9.0版本新增UNI_TEST_CUSTOM_ENV, 用于读取自定义环境变量,并传递给uniapp自动化测试框架命令行。后期会随时扩充新的key。
{
	"UNI_TEST_CUSTOM_ENV": {
		// APPID 用于测试自定义基座
		"UNI_TEST_BASE_APPID": "__UNI__xxxxxxxx",
		// 基座包名 用于测试自定义基座
		"UNI_TEST_BASE_PACKAGE_NAME": "io.xxx.xxx"
	}
}
# 多个HBuilderX时,如何共用一个测试依赖?
场景:电脑上安装了HBuilderX 正式版、Dev、Alpha版本,每个程序plugins目录都重新安装一遍测试依赖?答案:不需要。
解决方案:
- 进入HBuilderX安装目录,将plugins目录下的hbuilderx-for-uniapp-test-lib目录,拷贝到电脑其它目录。
- 拷贝后,在命令行进入
上面的拷贝目录下,执行npm install - 打开HBuilderX菜单【设置】【源码视图】,增加配置项:
{
}