English
English
# State Management Vuex
# Introduction
# What is Vuex?
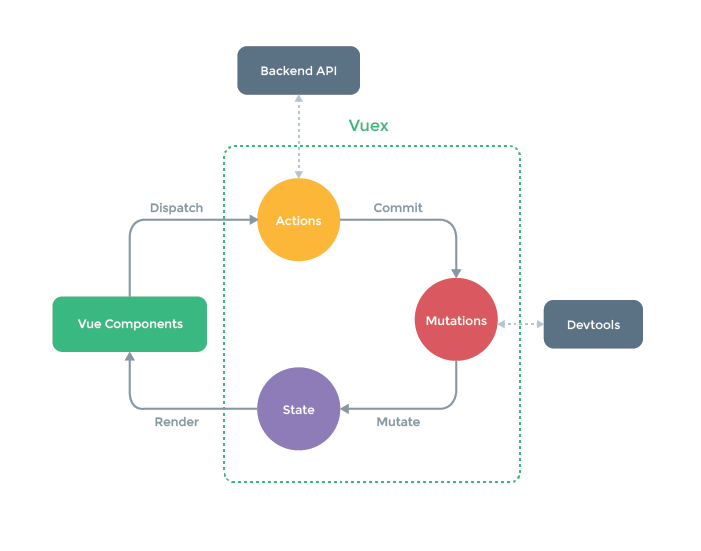
Vuex is a state management pattern + library for Vue.js applications. It serves as a centralized store for all the components in an application, with rules ensuring that the state can only be mutated in a predictable fashion.
uni-app has built-in Vuex.
# What is a "State Management Pattern"?
Let's start with a simple Vue counter app:
<!-- view -->
<template>
	<view>
		{{count}}
	</view>
</template>
<script>
	export default {
		// state
		data() {
			return {
				count: 0
			}
		},
		// actions
		methods: {
			increment() {
				this.count++
			}
		}
	}
</script>
It is a self-contained app with the following parts:
- The state, the source of truth that drives our app;
- The view, a declarative mapping of the state;
- The actions, the possible ways the state could change in reaction to user inputs from the view.
This is a simple representation of the concept of "one-way data flow":

However, the simplicity quickly breaks down when we have multiple components that share a common state:
- Multiple views may depend on the same piece of state.
- Actions from different views may need to mutate the same piece of state.
So why don't we extract the shared state out of the components, and manage it in a global singleton? With this, our component tree becomes a big "view", and any component can access the state or trigger actions, no matter where they are in the tree!This is the emergence of vuex.
By defining and separating the concepts involved in state management and enforcing rules that maintain independence between views and states, we give our code more structure and maintainability.This is the basic idea behind vuex.
Vuex is a library implementation tailored specifically for Vue.js to take advantage of its granular reactivity system for efficient updates.
If you want to learn Vuex in an interactive way you can check out this Vuex course on Scrimba (opens new window), which gives you a mix of screencast and code playground that you can pause and play around with anytime.
# Advantages and usage scenarios
- Vuex's state storage is responsive, tracking every state change. Once it changes, all related components will automatically update the corresponding data.
- Sharing data solves the problem of message transmission among non-parent-child components (storing data in state).
- Unified state management reduces the number of requests. In some scenarios, data can be obtained directly from the state in the memory.
# Differences between Vuex and global variable
| vuex | Global variable |
|---|---|
| The variables in the store can not be changed directly. The data should be modified by a unified method | Can be modified at will |
| Each component can be referenced by its own vuex variable name without being affected | Global variables may operate naming pollution |
| Solve the problem of communication among multiple components | Cross-page data sharing |
| Suitable for medium or large projects with multiple modules and complex business relationships | Suitable for demo or small projects |
# When is vuex needed?
- When a component needs to dispatch events multiple times. For example, the addition and subtraction of the number of shopping carts.
- Sharing data across components or across pages. For example, order status updates.
- Data that needs to be persistent. For example, the user's information after logging in.
- When you need to develop medium or large applications suitable for data interaction among complex multi-module and multi-page, and are considering how to better manage the state outside the component.
# Project structure
Rules to follow when using Vuex:
The state of the application level should be centralized into a single
storeobject.Submitting
mutationis the only way to change the status, and this process is synchronous.Asynchronous logic should be encapsulated into
actioninside.
As long as the above rules are followed, you can freely organize the code at will. If your store file is too large, just split action, mutation and getter into separate files.
For large-scale applications, we would like to split the Vuex related code into modules. The following is an example of the project structure:
├── pages
├── static
└── store
    ├── index.js          # 我们组装模块并导出 store 的地方
    ├── actions.js        # 根级别的 action
    ├── mutations.js      # 根级别的 mutation
    └── modules           # 模块文件夹
        ├── cart.js       # 购物车模块
        └── products.js   # 产品模块
├── App.vue
├── main.js
├── manifest.json
├── pages.json
└── uni.scss
# Core Concepts
At the center of every Vuex application is the store. A "store" is basically a container that holds your application state.
State management has five cores:state、getter、mutation、action、module。
# State
A single state tree, which defines the default initial value of the application state, from which the data required by page display is read.
- Vuex uses a single state tree - that is, this single object contains all your application level state and serves as the "single source of truth." This also means usually you will have only one store for each application.
- A single state tree makes it straightforward to locate a specific piece of state, and allows us to easily take snapshots of the current app state for debugging purposes.
- You cannot directly mutate the store's state. The only way to change a store's state is by explicitly committing mutations.
Using store state in a component simply involves returning the state within a computed property, because the store state is reactive.
// Counter
const Counter = {
	computed: {
		count () {
			return store.state.count
		}
	}
}
Whenever store.state.count changes, it will cause the computed property to re-evaluate, and trigger associated DOM updates.
However, this pattern causes the component to rely on the global store singleton. When using a module system, it requires importing the store in every component that uses store state, and also requires mocking when testing the component.
Vuex provides a mechanism to "inject" the store into all child components from the root component with the store option (enabled by Vue.use(Vuex)):
- In the root directory of the
uni-appproject, create a newstoredirectory, and create a newindex.jsfile in this directory. The configuration in theindex.jsfile is as follows:
// Page path: store/index.js
import Vue from 'vue'
import Vuex from 'vuex'

Vue.use(Vuex);//vue的插件机制

//Vuex.Store constructor option
const store = new Vuex.Store({
		"username":"foo",
		"age":18
	}
})
export default store
- Import the file in
main.js.
// Page path: main.js
import Vue from 'vue'
import App from './App'
import store from './store'

Vue.prototype.$store = store

//Provide the store object to the "store" option, which can inject an instance of the store into all sub-components.
const app = new Vue({
	store,
	...App
})
app.$mount()
Get state
- Access through attributes requires the injection of
storeat the root node.
<!-- Page path: pages/index/index.vue -->
<template>
	<view>
		<text>用户名:{{username}}</text>
	</view>
</template>
<script>
	export default {
		data() {
			return {}
		},
		computed: {
			username() {
				return store.state.username
			}
		}
	}
</script>
- Used in the component, access to the data in
statethroughthis.$store.
<!-- Page path: pages/index/index.vue -->
<template>
	<view>
		<text>用户名:{{username}}</text>
	</view>
</template>
<script>
	export default {
		data() {
			return {}
		},
		computed: {
			username() {
				return this.$store.state.username
			}
		}
	}
</script>
# mapState
- Obtained by the
mapStateauxiliary function.
When a component needs to make use of multiple store state properties or getters, declaring all these computed properties can get repetitive and verbose. To deal with this we can make use of the mapState helper which generates computed getter functions for us, saving us some keystrokes:
<!-- Page path: pages/index/index.vue -->
<template>
	<view>
		<view>用户名:{{username}}</view>
		<view>年龄:{{age}}</view>
	</view>
</template>
<script>
	export default {
		data() {
			return {}
		},
		computed: mapState({
		    // state
		    username: state => state.username,
			age: state => state.age,
		})
	}
</script>
- We can also pass a string array to mapState when the name of a mapped computed property is the same as a state sub tree name.
<!-- Page path: pages/index/index.vue -->
<template>
	<view>
		<view>用户名:{{username}}</view>
		<view>年龄:{{age}}</view>
	</view>
</template>
<script>
	export default {
		data() {
			return {}
		},
		computed: mapState([
			'age',
		])
	}
</script>
- to access local state with
this, a normal function must be used
<!-- Page path: pages/index/index.vue -->
<template>
	<view>
		<view>用户名:{{username}}</view>
		<view>年龄:{{age}}</view>
	</view>
</template>
<script>
	export default {
		data() {
			return {
				firstName:"Li"
			}
		},
		computed: {
			...mapState({
				username: function (state) {
				    return this.firstName + ' ' +  state.username
				},
				age: state => state.age,
			})
		},
	}
</script>
- Object Spread Operator
Note that mapState returns an object. How do we use it in combination with other local computed properties? Normally, we'd have to use a utility to merge multiple objects into one so that we can pass the final object to computed. However with the Object Spread Operator (opens new window), we can greatly simplify the syntax:
<!-- Page path: pages/index/index.vue -->
<template>
	<view>
		<view>用户名:{{username}}</view>
		<view>年龄:{{age}}</view>
	</view>
</template>
<script>
	export default {
		data() {
			return {}
		},
		computed: {
			// mix this into the outer object with the object spread operator
			...mapState({
				username: state => state.username,
				age: state => state.age,
			})
		},
	}
</script>
# Getter
It can be considered as the calculated attribute of store, and the processing of state is derived data.
- Like computed properties, a getter's result is cached based on its dependencies, and will only re-evaluate when some of its dependencies have changed.
- The
getterfunction can be shared among multiple components, which can also improve the running efficiency.
Under the uni-app project root directory, and the store directory index.js file:
// Page path: store/index.js
import Vue from 'vue'
import Vuex from 'vuex'

Vue.use(Vuex);

const store = new Vuex.Store({
	state: {
		todos: [{
				id: 1,
				done: true
			},
			{
				id: 2,
				done: false
			}
		]
	},
	getters: {
		doneTodos: state => {
			return state.todos.filter(todo => todo.done)
		}
	}
})

export default store
Register getter on store, and the getter method accepts the following parameters:
- state, is the local state of the module if defined in the module
- getters, equivalent to store.getters
// Page path: store/index.js
import Vue from 'vue'
import Vuex from 'vuex'

Vue.use(Vuex);

const store = new Vuex.Store({
	state: {
		todos: [{
				id: 1,
				done: true
			},
			{
				id: 2,
				done: false
			}
		]
	},
	getters: {
		doneTodos: state => {
			return state.todos.filter(todo => todo.done)
		},
		doneTodosCount: (state, getters) => {
			//state: can access data
			//getters: access other functions, equivalent to store.getters
			return getters.doneTodos.length
		},
		getTodoById: (state) => (id) => {
			return state.todos.find(todo => todo.id === id)
		}
	}
})

export default store
Get getters
- Property-Style Access,The getters will be exposed on the
store.gettersobject, and you access values as properties:
<!-- Page path: pages/index/index.vue -->
<template>
	<view>
		<view v-for="(item,index) in todos">
			<view>{{item.id}}</view>
			<view>{{item.text}}</view>
			<view>{{item.done}}</view>
		</view>
	</view>
</template>
<script>
	export default {
		computed: {
			todos() {
				return store.getters.doneTodos
			}
		}
	}
</script>
Note that getters accessed as properties are cached as part of Vue's reactivity system.
- Access via
this.$store.
<!-- Page path: pages/index/index.vue -->
<template>
	<view>
		<view v-for="(item,index) in todos">
			<view>{{item.id}}</view>
			<view>{{item.text}}</view>
			<view>{{item.done}}</view>
		</view>
	</view>
</template>
<script>
	export default {
		computed: {
			todos() {
				return this.$store.getters.doneTodos
			}
		}
	}
</script>
- Method-Style Access
You can also pass arguments to getters by returning a function. This is particularly useful when you want to query an array in the store:
Note that getters accessed via methods will run each time you call them, and the result is not cached.
<!-- Page path: pages/index/index.vue -->
<template>
	<view>
		<view v-for="(item,index) in todos">
			<view>{{item}}</view>
		</view>
	</view>
</template>
<script>
	export default {
		computed: {
			todos() {
				return this.$store.getters.getTodoById(2)
			}
		}
	}
</script>
# mapGetters
- Access via the
mapGettershelper function.
The mapGetters helper simply maps store getters to local computed properties:
<!-- Page path: pages/index/index.vue -->
<template>
	<view>
		<view>{{doneTodosCount}}</view>
	</view>
</template>
<script>
	export default {
		computed: {
			// mix the getters into computed with object spread operator
			...mapGetters([
				'doneTodos',
				'doneTodosCount',
				// ...
			])
		}
	}
</script>
If you want to map a getter to a different name, use an object:
<!-- Page path: pages/index/index.vue -->
<template>
	<view>
		<view>{{doneCount}}</view>
	</view>
</template>
<script>
	export default {
		computed: {
			...mapGetters({
			  // this.$store.getters.doneTodosCount -> this.doneCount
			  doneCount: 'doneTodosCount'
			})
		}
	}
</script>
# Mutation
The only way to actually change state in a Vuex store is by committing a mutation.
In popular understanding, mutations contains a collection of methods for changing data, and all methods for processing data logic are placed in mutations to separate data from views.
Vuex mutations are very similar to events: each mutation has a string type and a handler. The handler function is where we perform actual state modifications, and it will receive the state as the first argument:
// Page path: store/index.js
import Vue from 'vue'
import Vuex from 'vuex'

Vue.use(Vuex);

const store = new Vuex.Store({
	state: {
		count: 1
	},
	mutations: {
		add(state) {
			// mutate state
			state.count += 2
		}
	}
})
export default store
You cannot directly call a mutation handler. Think of it more like event registration: "When a mutation with type increment is triggered, call this handler." To invoke a mutation handler, you need to call store.commit with its type:
Notice: store.commit Call mutation(store needs to be injected into the root node).
<!-- Page path: pages/index/index.vue -->
<template>
	<view>
		<view>数量:{{count}}</view>
		<button @click="addCount">增加</button>
	</view>
</template>
<script>
import store from '@/store/index.js'
export default {
	computed: {
		count() {
			return this.$store.state.count
		}
	},
	methods: {
		addCount() {
			store.commit('add')
		}
	}
}
</script>
Incoming parameters
You can pass an additional argument to store.commit, which is called the payload for the mutation:
Take the example of the accumulator to realize the parameter passing of the mutation function to dynamically define the amount of accumulation.
- You can pass a parameter in
mutationpassing parameters (payload).
// Page path: store/index.js
import Vue from 'vue'
import Vuex from 'vuex'

Vue.use(Vuex);

const store = new Vuex.Store({
	state: {
		count: 1
	},
	mutations: {
		add(state, n) {
			state.count += n
		}
	}
})
export default store
<!-- Page path: pages/index/index.vue -->
<template>
	<view>
		<view>数量:{{count }}</view>
		<button @click="addCount">增加</button>
	</view>
</template>
<script>
	import store from '@/store/index.js'
	export default {
		computed: {
			count() {
				return this.$store.state.count
			}
		},
		methods: {
			addCount() {
			}
		}
	}
</script>
- You can also pass an object in
mutationpassing parameters (payload). Modify the accumulator example above:
// Page path: store/index.js
import Vue from 'vue'
import Vuex from 'vuex'

Vue.use(Vuex);

const store = new Vuex.Store({
	state: {
		count: 1
	},
	mutations: {
		add(state, payload) {
			state.count += payload.amount
		}
	}
})
export default store
<!-- Page path: pages/index/index.vue -->
<template>
	<view>
		<view>数量:{{count }}</view>
		<button @click="addCount">增加</button>
	</view>
</template>
<script>
	import store from '@/store/index.js'
	export default {
		computed: {
			count() {
				return this.$store.state.count
			}
		},
		methods: {
				store.commit('add', { amount: 10 })
			}
		}
	}
</script>
Submission method
- Object-Style Commit
An alternative way to commit a mutation is by directly using an object that has a type property:
<!-- Page path: pages/index/index.vue -->
<template>
	<view>
		<view>数量:{{count }}</view>
		<button @click="addCount">增加</button>
	</view>
</template>
<script>
	import store from '@/store/index.js'
	export default {
		computed: {
			count() {
				return this.$store.state.count
			}
		},
		methods: {
				store.commit({
					type: 'add',
					amount: 6
				})
			}
		}
	}
</script>
When using object-style commit, the entire object will be passed as the payload to mutation handlers, so the handler remains the same:
	mutations: {
		add(state, payload) {
			state.count += payload.amount
		}
	}
# mapMutations
- Submit via the
mapMutationshelper function.
Submit the method to create a component mutation.
Use the mapMutations auxiliary function to map the methods in the component to the store.commit call (you need to inject store at the root node).
<!-- Page path: pages/index/index.vue -->
<template>
	<view>
		<view>数量:{{count}}</view>
		<button @click="add">增加</button>
	</view>
</template>
<script>
	export default {
		computed: {
			count() {
				return this.$store.state.count
			}
		},
		methods: {
		}
	}
</script>
// Page path: store/index.js
import Vue from 'vue'
import Vuex from 'vuex'

Vue.use(Vuex);

const store = new Vuex.Store({
	state: {
		count: 1
	},
	mutations: {
		add(state) {
			// mutate state
			state.count += 2
		}
	}
})
export default store
Mutations Follow Vue's Reactivity Rules
Since a Vuex store's state is made reactive by Vue, when we mutate the state, Vue components observing the state will update automatically. This also means Vuex mutations are subject to the same reactivity caveats when working with plain Vue:
Prefer initializing your store's initial state with all desired fields upfront.
When adding new properties to an Object, you should either:
Use Vue.set(obj, 'newProp', 123), or
Replace that Object with a fresh one. For example, using the object spread syntax (opens new window)we can write it like this:
state.obj = { ...state.obj, newProp: 123 }
Mutations Must Be Synchronous
One important rule to remember is that mutation handler functions must be synchronous.
We want to change the state data by submitting mutation because we want to track the state changes more clearly. If it is asynchronous like this:
	mutations: {
		someMutation (state) {
			api.callAsyncMethod(() => {
				state.count++
			})
		}
	}
We have no idea about when the state will change, so we can't track it. This is contrary to the original intention of mutation, so it is mandatory that it must be a synchronous function.
# Action
Actions are similar to mutations, the differences being that:
- Instead of mutating the state, actions commit mutations.
- Actions can contain arbitrary asynchronous operations.
Let's register a simple action:
// Page path: store/index.js
import Vue from 'vue'
import Vuex from 'vuex'

Vue.use(Vuex);

const store = new Vuex.Store({
	state: {
		count: 1
	},
	mutations:{
		add(state) {
			// mutate state
			state.count += 2
		}
	},
	actions:{
		addCountAction (context) {
		    context.commit('add')
		}
	}
})
export default store
Action handlers receive a context object which exposes the same set of methods/properties on the store instance, so you can call context.commit to commit a mutation, or access the state and getters via context.state and context.getters.
In practice, we often use ES2015 argument destructuring (opens new window)to simplify the code a bit (especially when we need to call commit multiple times):
	actions: {
		//argument destructuring
		addCountAction ({commit}) {
		    commit('add')
		}
	}
Dispatching Actions
- Actions are triggered with the store.dispatch method:
<!-- Page path: pages/index/index.vue -->
<template>
	<view>
		<view>数量:{{count}}</view>
		<button @click="add">增加</button>
	</view>
</template>
<script>
	import store from '@/store/index.js';
	export default {
		computed: {
			count() {
				return this.$store.state.count
			}
		},
		methods: {
			add () {
				store.dispatch('addCountAction')
			}
		}
	}
</script>
- Actions support dispatch with a payload:
// Page path: store/index.js
import Vue from 'vue'
import Vuex from 'vuex'

Vue.use(Vuex);

const store = new Vuex.Store({
	state: {
		count: 1
	},
	mutations:{
		add(state, payload) {
			state.count += payload.amount
		}
	},
	actions:{
		addCountAction (context , payload) {
		    context.commit('add',payload)
		}
	}
})
export default store
<!-- Page path: pages/index/index.vue -->
<template>
	<view>
		<view>数量:{{count }}</view>
		<button @click="add">增加</button>
	</view>
</template>
<script>
	import store from '@/store/index.js';
	export default {
		computed: {
			count() {
				return this.$store.state.count
			}
		},
		methods: {
			add () {
				//dispatch with a payload
				store.dispatch('addCountAction', {amount: 10})
			}
		}
	}
</script>
- Actions support dispatch with an object:
	methods: {
		add () {
			// dispatch with an object
			store.dispatch({
				type: 'addCountAction',
				amount: 5
			})
		}
	}
action can perform arbitrary synchronous and asynchronous operations.
We can perform asynchronous operations inside an action:
// Page path: store/index.js
import Vue from 'vue'
import Vuex from 'vuex'

Vue.use(Vuex);

const store = new Vuex.Store({
	state: {
		count: 1
	},
	mutations:{
		add(state) {
			// mutate state
			state.count += 2
		}
	},
	actions:{
		addCountAction (context) {
			//When performing accumulation, it takes two seconds to execute
		    setTimeout(function () {
				context.commit('add')
		    }, 2000)
		}
	}
})
export default store
A more practical example of real-world actions would be an action to checkout a shopping cart, which involves calling an async API and committing multiple mutations:
	actions: {
		checkout ({ commit, state }, products) {
			// save the items currently in the cart
			const savedCartItems = [...state.cart.added]
			// send out checkout request, and optimistically clear the cart
			commit(types.CHECKOUT_REQUEST)
			// the shop API accepts a success callback and a failure callback
			shop.buyProducts(
				products,
				// handle success
				() => commit(types.CHECKOUT_SUCCESS),
				// handle failure
				() => commit(types.CHECKOUT_FAILURE, savedCartItems)
			)
		}
	}
Note we are performing a flow of asynchronous operations, and recording the side effects (state mutations) of the action by committing them.
# mapActions
- Distributed through the
mapActionshelper function.
Dispatching Actions in Components
- You can dispatch actions in components with this.$store.dispatch('xxx')
- or use the mapActions helper which maps component methods to store.dispatch calls (requires root store injection)
<!-- Page path: pages/index/index.vue -->
<template>
	<view>
		<view>数量:{{count }}</view>
		<button @click="addCountAction">增加</button>
	</view>
</template>
<script>
	import { mapActions } from 'vuex'
	export default {
		computed: {
			count() {
				return this.$store.state.count
			}
		},
		methods: {
			...mapActions([
			    'addCountAction',
				// this.$store.dispatch('addCountAction') -> this.addCountAction()
			])
		}
	}
</script>
mapActionsalso supports passing in parameters (payload):
	methods: {
		...mapActions([
		    'addCountAction'
			//`this.$store.dispatch('addCountAction', amount)`
		]),
	}
mapActionsalso supports passing an object:
	methods: {
		...mapActions({
			addCount: 'addCountAction',
			// this.$store.dispatch('addCountAction') -> this.addCount()
		})
	}
Composing Actions
Actions are often asynchronous, so how do we know when an action is done? And more importantly, how can we compose multiple actions together to handle more complex async flows?
The first thing to know is that store.dispatch can handle Promise returned by the triggered action handler and it also returns Promise:
	actions: {
		actionA ({ commit }) {
			return new Promise((resolve, reject) => {
				setTimeout(() => {
					commit('someMutation')
					resolve()
				}, 1000)
			})
		}
	}
Now you can do:
	store.dispatch('actionA').then(() => {
		// ...
	})
And also in another action:
	actions: {
		// ...
		actionB ({ dispatch, commit }) {
			return dispatch('actionA').then(() => {
				commit('someOtherMutation')
			})
		}
	}
Finally, if we make use of async / await (opens new window), we can compose our actions like this:
	// getData()/getOtherData() retrun Promise
	actions: {
		async actionA ({ commit }) {
			commit('gotData', await getData())
		},
		async actionB ({ dispatch, commit }) {
			commit('gotOtherData', await getOtherData())
		}
	}
It's possible for a
store.dispatchto trigger multiple action handlers in different modules. In such a case the returned value will be a Promise that resolves when all triggered handlers have been resolved.
# Module
Due to using a single state tree, all states of our application are contained inside one big object. However, as our application grows in scale, the store can get really bloated.
To help with that, Vuex allows us to divide our store into modules. Each module can contain its own state, mutations, actions, getters, and even nested modules - it's fractal all the way down:
- Create a
modulesfolder under thestorefolder, and create amoduleA.jsandmoduleB.jsfile below to store themodulesmodule ofvuex.
├── components             # 组件文件夹
    └── myButton
        └── myButton.vue   # myButton组件
├── pages
    └── index
	    └── index.vue      # index页面
├── static
├── store
    ├── index.js          # 我们组装模块并导出 store 的地方
    └── modules           # 模块文件夹
        ├── moduleA.js    # 模块moduleA
        └── moduleB.js    # 模块moduleB
├── App.vue
├── main.js
├── manifest.json
├── pages.json
└── uni.scss
- Introduce
storein themain.jsfile.
	// Page path: main.js
	import Vue from 'vue'
	import App from './App'
	import store from './store'

	Vue.prototype.$store = store

	//Provide the store object to the "store" option, which can inject an instance of the store into all sub-components.
	const app = new Vue({
		store,
		...App
	})
	app.$mount()
- In the project root directory, create a new
storefolder, and create a newindex.jsfile below as the module entry to import each sub-module.
	// Page path: store/index.js
	import Vue from 'vue'
	import Vuex from 'vuex'

	import moduleA from '@/store/modules/moduleA'
	import moduleB from '@/store/modules/moduleB'

	Vue.use(Vuex)
	export default new Vuex.Store({
		modules:{
			moduleA,moduleB
		}
	})
- Sub-module
moduleApage content.
// Submodule moduleA path: store/modules/moduleA.js
export default {
	state: {
	},
	getters: {

	},
	mutations: {

	},
	actions: {

	}
}
- Sub-module
moduleBpage content.
// Submodule moduleB path: store/modules/moduleB.js
export default {
	state: {
	},
	getters: {
			var date = new Date(state.timestamp);
			var year = date.getFullYear();
			var mon  = date.getMonth()+1;
			var day  = date.getDate();
			var hours = date.getHours();
			var minu = date.getMinutes();
			var sec = date.getSeconds();
			var trMon = mon<10 ? '0'+mon : mon
			var trDay = day<10 ? '0'+day : day
			return year+'-'+trMon+'-'+trDay+" "+hours+":"+minu+":"+sec;
		}
	},
	mutations: {
			state.timestamp = Date.now()
		}
	},
	actions: {

	}
}
- Reference the component myButton in the page, and read the initial data in
statethroughmapState.
<!-- Page path: pages/index/index.vue -->
<template>
	<view class="content">
		<view>{{text}}</view>
		<view>时间戳:{{timestamp}}</view>
		<view>当前时间:{{timeString}}</view>
		<myButton></myButton>
	</view>
</template>
<script>
	import {mapState,mapGetters} from 'vuex'
	export default {
		computed: {
			...mapState({
				text: state => state.moduleA.text,
				timestamp: state => state.moduleB.timestamp
			}),
			...mapGetters([
				'timeString'
			])
		}
	}
</script>
- In the component
myButton, refresh the current time through themutationsoperation.
<!-- Component path: components/myButton/myButton.vue -->
<template>
	<view>
		<button type="default" @click="updateTime">刷新当前时间</button>
	</view>
</template>
<script>
	import {mapMutations} from 'vuex'
	export default {
		data() {
			return {}
		},
		methods: {
			...mapMutations(['updateTime'])
		}
	}
</script>
vue is a one-way data flow, and the child component cannot directly modify the data of the parent component but is implemented through vuex state management: extract the shared state of the component and manage it in a global singleton pattern. In this mode, our component tree constitutes a giant "view", no matter where in the tree, any component can get the status or trigger the behavior!