English
English
# Overview
uni one-click login is a service launched by DCloud and a push company that integrates the gateway authentication capabilities of the three major operators.
Through the operator's underlying SDK, the App can directly obtain the mobile phone number without SMS verification code, which is the one-click login function provided by many mainstream apps.
uni one-click login is a next-generation login verification method that replaces SMS verification login, which can eliminate the pain points of long waiting time, cumbersome operation and easy leakage of the existing SMS verification mode.
- Supported version: HBuilderX 3.0+
- 支持项目类型:uni-app的App端,5+ App,Wap2App
- 支持系统平台: Android,iOS,HarmonyOS(4.61)
- Supported operators: China Mobile, China Unicom, China Telecom
HBuilderX3.1.6+ version authorization login interface supports full screen mode
调用uni.login时设置univerifyStyle中的fullScreen属性值为true即可:
HarmonyOS 不支持使用 uni.login 调用一键登录,请使用 univerifyManager
uni.login({
	provider: 'univerify',
	univerifyStyle: {
    fullScreen: true
  }
})
The full screen effect is as follows:
# Product advantages
- Good user experience
One-click login, no need to wait and copy SMS verification codes, can effectively reduce the user churn rate and improve the conversion rate of user registrations in app activations.
- Cheap
Use uni one-click login, each verification only takes 2 points! It is several times cheaper than the SMS verification code, and it is also cheaper than the one-click login provided by the three parties on the market.
- Safety
Adopt operator gateway authentication to avoid SMS hijacking and effectively improve security
- Good development experience
There is no need for native plug-ins or custom bases (the HBuilder standard base can run and debug directly), and it is simple and fast to go online.
# process
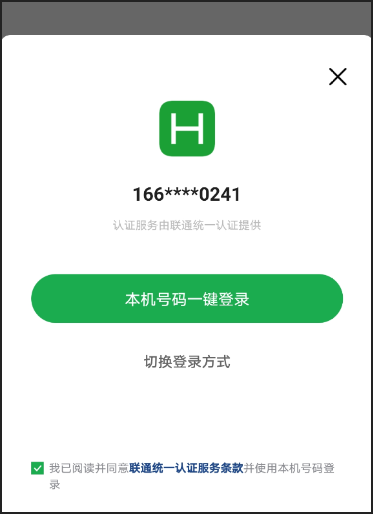
- The App interface pops up to request authorization, asking the user whether to agree to authorize the App to obtain the mobile phone number. This authorization request interface is popped up by the operator sdk and can be customized to a limited extent.
- After the user agrees to the authorization, the bottom layer of the SDK accesses the operator gateway for authentication, and obtains the current device
access_tokenand other information. - On the server side, use uniCloud to replace the
access_tokenand other information with the real mobile phone number of the current device. Then the server is directly stored in the warehouse to avoid the untrustworthy situation that the mobile phone number is passed to the front end.

precondition:
- The phone has a sim card installed
- Turn on the data flow of the mobile phone (It has nothing to do with wifi, it is not required to turn off the wifi, but the data flow cannot be disabled.)
- Activate uniCloud service (but do not require all backend code to use uniCloud)
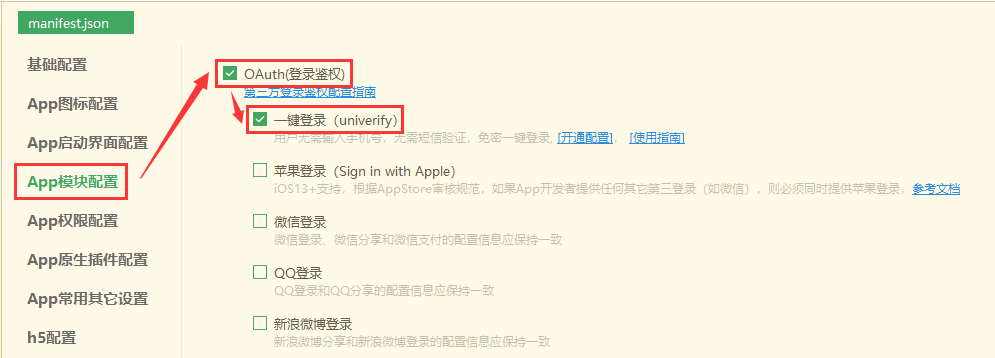
# open
# 开通uni一键登录服务
开发者需要登录uniCloud控制台,申请开通一键登录服务。
详细步骤参考:一键登录服务开通指南
注意
- 应用开通uni一键登录服务后,需要
等审核通过后才能正式使用。\ - 在审核期间可以使用
HBuilder标准基座真机运行调用一键登录功能,调用时会从你的账户中扣费;但审核期间不可以使用自定义基座调用一键登录功能,调用时会返回错误。鸿蒙不支持使用基座运行到手机调试,需要在申请开通一键登录服务后,在应用管理添加应用;将所添加应用的包名填写到manifest中,然后运行到手机上调试查看效果
# 开通uniCloud服务
一键登录在客户端获取 access_token 后,必须在 uniCloud 换取手机号码。
After getting the phone number in the cloud function of uniCloud, you can use it directly, or transfer it to a traditional server for processing, or you can use the cloud function url method Generate a common http interface for 5+ apps to use.
注意
虽然一键登录需要uniCloud,但并不要求开发者把所有的后台服务都迁移到uniCloud
服务器API详见:uniCloud云函数中使用一键登录
uniCloud产生的费用对于一键登陆可以忽略,详见
# development
This article mainly introduces the client calling method of uni-app. For 5+ App (Wap2App), please refer to: 5+ App One-Key Login User Guide
DCloud还提供了更易用的封装。在uni-id里已经预置了uni一键登录,并基于uni-id提供了云端一体应用快速开发基本项目模版,该项目模版内置了包括一键登录在内的各种常用登录示例,开发者可以拿去直接用
Next, continue to introduce the usage of the original API.
# client - get available service providers
One-click login is parallel to providers such as WeChat login and QQ login in uni.login.
The provider ID corresponding to one-click login is 'univerify'. When the provider list is obtained and found to contain 'univerify', it means that the current environment has packaged the one-click login SDK.
HarmonyOS 不支持,请使用 univerifyManager
uni.getProvider({
  service: 'oauth',
  success: function (res) {
    console.log(res.provider)// ['qq', 'univerify']
  }
});
# client-pre-login (optional)
The pre-login operation can determine whether the current device environment supports one-key login. If one-key login is supported, the one-key login option can be displayed at this time. At the same time, the pre-login will prepare the relevant environment, which significantly improves the speed of displaying the authorized login interface.
If the current device environment does not support one-click login, other login options should be displayed at this time.
If a valid SIM card is not inserted into the phone, or the cellular data network of the phone is turned off, the pre-login verification may fail.
HarmonyOS 不支持,请使用 univerifyManager
uni.preLogin(options)
uni.preLogin({
	provider: 'univerify',
	success(){  //预登录成功
		// Display one-click login options
	},
	fail(res){  // 预登录失败
		// Don't show the one-click login option (or grey it out)
    // Determine the cause of the failure according to the error message, and submit the error to the statistics server if necessary
		console.log(res.errCode)
		console.log(res.errMsg)
	}
})
# client - request login authorization
The user authorization interface pops up. Return the corresponding callback according to the user operation and authorization result, and get the access_token
HarmonyOS 不支持使用 uni.login 调用一键登录,请使用 univerifyManager
uni.login(options);
uni.login({
	provider: 'univerify',
	univerifyStyle: { // 自定义登录框样式
    //Refer to `univerifyStyle data structure`
  },
	success(res){ // 登录成功
	},
		console.log(res.errCode)
		console.log(res.errMsg)
	}
})
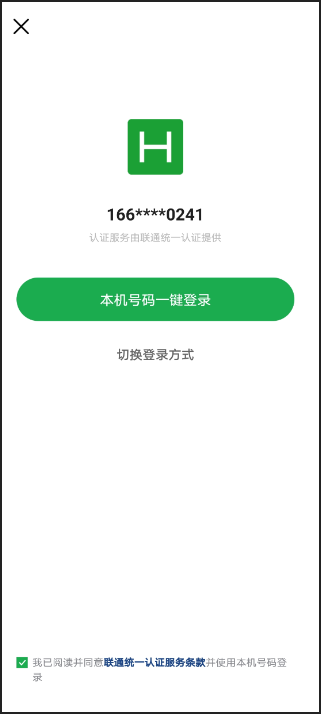
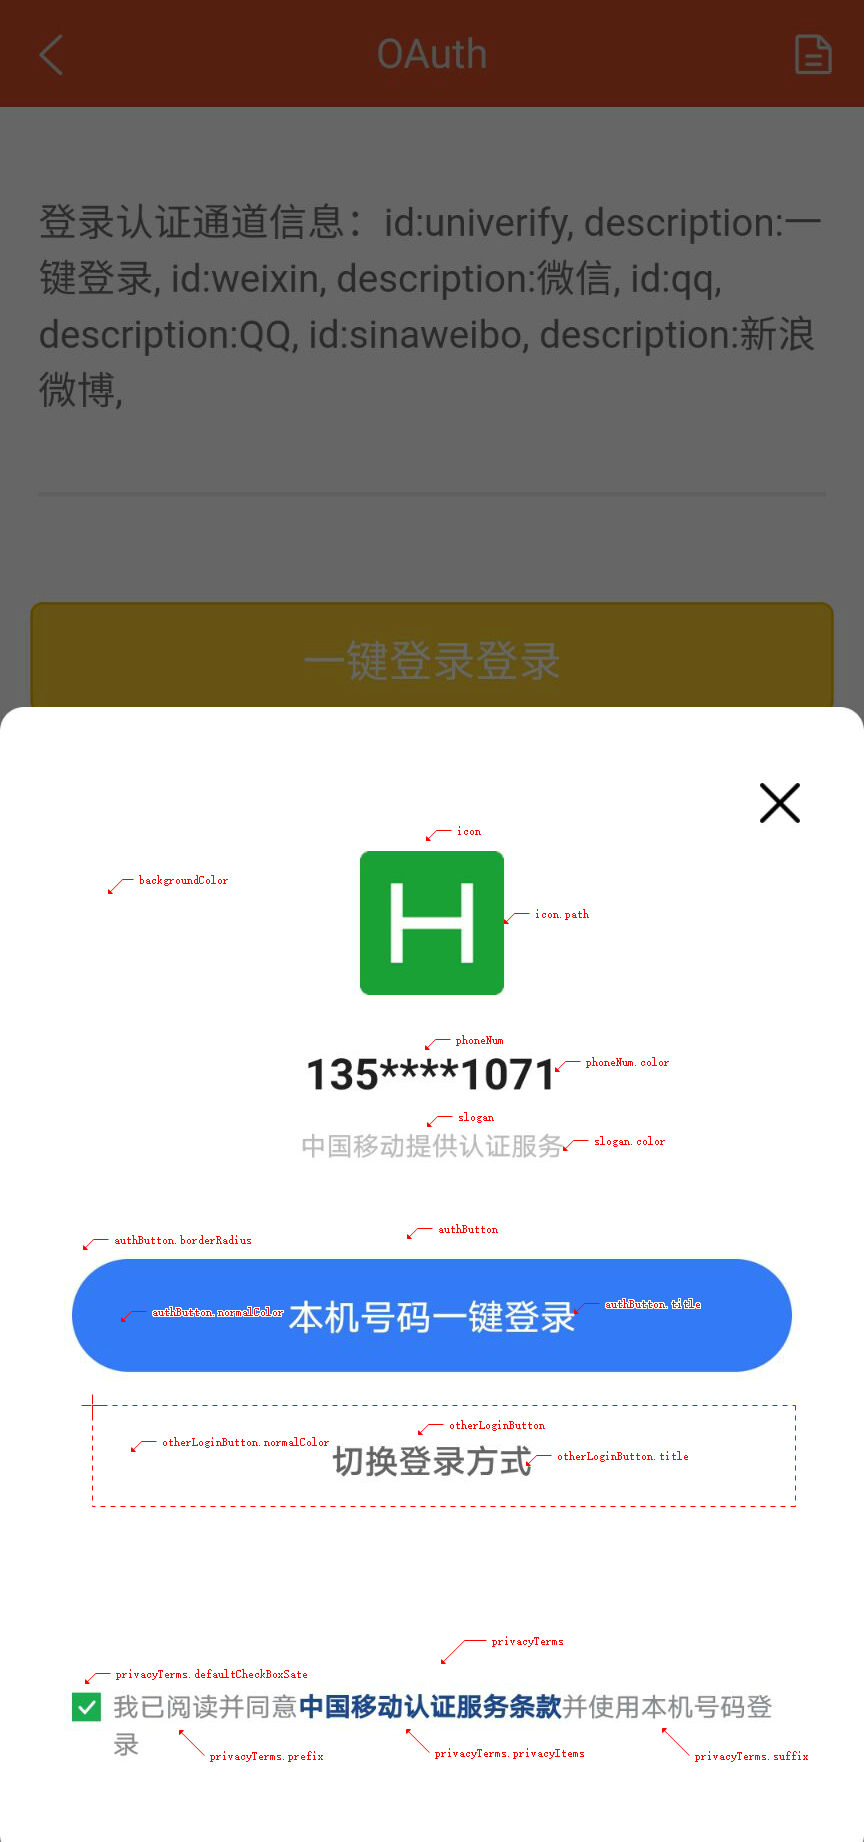
The authorization pop-up interface of uni one-click login is half-screen by default, and can also be configured to be full-screen. This interface is essentially popped up by the operator's sdk, which asks the mobile phone user whether to authorize their mobile phone number to be used by the app.
This authorization popup interface can be limitedly customized via the unverifyStyle setting.
unverifyStyle data structure:
HamronyOS仅支持fullScreen(是否全屏显示)、logoPath(自定义 logo 地址)、backgroundColor(背景颜色)、loginBtnText(登录按钮文本)
{
    "fullScreen": false, // 是否全屏显示,默认值: false
    "backgroundColor": "#ffffff",  // 授权页面背景颜色,默认值:#ffffff
    "icon": {
        "path": "static/xxx.png", // 自定义显示在授权框中的logo,仅支持本地图片 默认显示App logo
        "width":  "60px",  //图标宽度 默认值:60px
    },
    "closeIcon": {
        "path": "static/xxx.png", // 自定义显示在授权框中的logo,仅支持本地图片
        "width":  "60px",  //图标宽度 默认值:60px (HBuilderX 4.0+ 仅iOS支持)
    },
    "phoneNum": {
    },
    "slogan": {
    },
    "authButton": {
        "normalColor": "#3479f5", // 授权按钮正常状态背景颜色 默认值:#3479f5
        "highlightColor": "#2861c5",  // 授权按钮按下状态背景颜色 默认值:#2861c5(仅ios支持)
        "disabledColor": "#73aaf5",  // 授权按钮不可点击时背景颜色 默认值:#73aaf5(仅ios支持)
        "textColor": "#ffffff",  // 授权按钮文字颜色 默认值:#ffffff
        "title": "本机号码一键登录", // 授权按钮文案 默认值:“本机号码一键登录”
    },
    "otherLoginButton": {
        "visible": true, // 是否显示其他登录按钮,默认值:true
        "normalColor": "", // 其他登录按钮正常状态背景颜色 默认值:透明
        "highlightColor": "", // 其他登录按钮按下状态背景颜色 默认值:透明
        "textColor": "#656565", // 其他登录按钮文字颜色 默认值:#656565
        "title": "其他登录方式", // 其他登录方式按钮文字 默认值:“其他登录方式”
        "borderColor": "",  //边框颜色 默认值:透明(仅iOS支持)
    },
    "privacyTerms": {
        "defaultCheckBoxState":true, // 条款勾选框初始状态 默认值: true
        "isCenterHint":false, //未勾选服务条款时点击登录按钮的提示是否居中显示 默认值: false (3.7.13+ 版本支持)
        "uncheckedImage":"", // 可选 条款勾选框未选中状态图片(仅支持本地图片 建议尺寸 24x24px)(3.2.0+ 版本支持)
        "checkedImage":"", // 可选 条款勾选框选中状态图片(仅支持本地图片 建议尺寸24x24px)(3.2.0+ 版本支持)
        "checkBoxSize":12, // 可选 条款勾选框大小
        "textColor": "#BBBBBB", // 文字颜色 默认值:#BBBBBB
        "termsColor": "#5496E3", //  协议文字颜色 默认值: #5496E3
        "prefix": "我已阅读并同意", // 条款前的文案 默认值:“我已阅读并同意”
        "suffix": "并使用本机号码登录", // 条款后的文案 默认值:“并使用本机号码登录”
            {
                "url": "https://", // 点击跳转的协议详情页面
            }
        ]
    },
    "buttons": {  // 自定义页面下方按钮仅全屏模式生效(3.1.14+ 版本支持)
        "list": [
            {
                "provider": "apple",
            },
            {
                "provider": "weixin",
            }
        ]
    }
}
The interface indication diagram corresponding to the configuration of the unverifyStyle property
| Full screen effect | Non full screen effect |
|---|---|
 |  |
Return data example
{
	"errMsg": "login:ok",
	"authResult": {
		"openid": "208E2FBE6EF64DF3B2D377D886EF2A14124262bfd7ae16465ea0f0634554dcee7636",
		"access_token": "ZGI4NjkxZWE4YjAyNGUzMjhiMmZiNDcwODBjYjc5MDF8fDJ8djJ8Mg=="
	}
}
# The client closes the one-click login authorization interface
HarmonyOS 不支持,请使用 univerifyManager
After the request for login authentication is completed, the one-key login interface will not be closed regardless of success or failure. You need to actively call the closeAuthView method to close it.
The completion of the client login authentication only means that the access_token is obtained successfully. You need to submit this data to the server to obtain the mobile phone number. After completing the business service login logic, notify the client to close the login interface.
uni.closeAuthView()
# User clicks one-click login custom button
HarmonyOS 不支持
If the "fullScreen": "true" and buttons options are configured in univerifyStyle and the buttons array is not empty, custom buttons will be rendered in full screen.
When the user clicks the custom button, the fail callback of uni.login is triggered, and the returned data is as follows:
{
  "code": "30008",
  "errMsg": "用户点击了自定义按钮",
  "provider": "apple",
}
# Get whether the user has checked the checkbox (supported by HBuilderX 3.2.5+)
HarmonyOS 不支持,请使用 univerifyManager
uni.getCheckBoxState(options)
uni.getCheckBoxState({
	success(res){
		console.log(res.errMsg)
	},
	fail(res){
		console.log(res.errCode)
		console.log(res.errMsg)
	}
})
# univerifyManager
3.2.13+ version can use the global univerifyManager to use one-click login more efficiently
At this point, clicking the custom button will not trigger the
failcallback ofuni.login, nor will it automatically close the one-click login popup
const univerifyManager = uni.getUniverifyManager()

// pre-login
univerifyManager.preLogin()

// Call the one-click login popup
univerifyManager.login({
  univerifyStyle: {
    "fullScreen": true,
    "buttons": {
        "iconWidth": "45px",
        "list": [
            {
                "provider": "apple",
                "iconPath": "/static/apple.png"
            },
            {
                "provider": "weixin",
                "iconPath": "/static/wechat.png"
            }
        ]
    }
  },
  success (res) {
    console.log('login success', res)
  }
})

const callback = (res) => {
  // Get the check status of the one-click login popup protocol
  univerifyManager.getCheckBoxState({
    success(res) {
      console.log("getCheckBoxState res: ", res);
      if (res.state) {
        // Close the one-click login popup
        univerifyManager.close()
      }
    }
  })
}
// Subscribe to custom button click event
univerifyManager.onButtonsClick(callback)
// Unsubscribe from custom button click event
univerifyManager.offButtonsClick(callback)
# Change phone number with access_token
After the client obtains the access_token, it passes it to the uniCloud cloud function, and the cloud function obtains the real phone number through the uniCloud.getPhoneNumber method.
There are 3 ways to do this step:
- The uni-app project activates the uniCloud service, directly write
uniCloud.callFunctionin the front end, and pass theaccess_tokento the specified cloud function. - Submit
access_tokento the cloud function of uniCloud using a normal ajax request. This method can be used for uni-app, 5+App, and wap2app, but the cloud function on uniCloud needs to be URLized. - Submit the
access_tokento your traditional server using a normal ajax request, and then forward it to the uniCloud cloud function through your own traditional server. This method can be used for uni-app, 5+App, and wap2app, but the cloud function on uniCloud needs to be URLized.
Sample codes are provided below:
# The uni-app project uses uniCloud.callFunction to call cloud functions
If it is a uni-app project that has not been opened through uniCloud:
- First open the uniCloud service space, Reference
- Right-click on the project, create an uniCloud development environment, and then bind it to the service space created in the previous step
- Right-click on uniCloud/cloudfunctions/ to create a cloud function
- Copy the following code on the front end and the cloud respectively
- Right-click on the cloud function and upload to the service space
Client example:
// After getting access_token, call cloud function through callfunction
uniCloud.callFunction({
  data: {
    'access_token': 'xxx', // 客户端一键登录接口返回的access_token
  }
}).then(res => {
  // res.result = {
  //   code: '',
  //   message: ''
  // }
  // The login is successful, you can close the one-click login authorization interface
}).catch(err=>{
  // handle errors
})
Cloud function code example:
'use strict';
exports.main = async (event, context) => {
  // event contains the parameters submitted by the client
  const res = await uniCloud.getPhoneNumber({
  	provider: 'univerify',
  	access_token: event.access_token,
  	openid: event.openid
  })

  console.log(res); // res里包含手机号
  // Perform operations such as user information storage. Under normal circumstances, do not return the full mobile phone number to the front end
  // 如果数据库在uniCloud上,可以直接入库
  // 如果数据库不在uniCloud上,可以通过 uniCloud.httpclient API,将手机号通过http方式传递给其他服务器的接口,详见:https://doc.dcloud.net.cn/uniCloud/cf-functions?id=httpclient
  return {
    code: 0,
  }
}
For the complete source code of the project example, please refer to:
- uni-starter, a basic project template for rapid development of cloud-integrated applications: [https://ext.dcloud.net.cn/plugin?id=5057](https://ext.dcloud.net.cn/plugin?id =5057)
- hello uni-app, experience it directly after packaging: https://m3w.cn/uniapp; source code acquisition: create a new uni-app project in HBuilderX, select hello uni -app templates. The specific location of one-click login is in the API - login column.
Notice
- If the appid is re-acquired during development, the uni-app project needs to be recompiled
# The 5+ (wap2app) project exposes the normal http interface to the cloud function through URLization of the cloud function
5+ (wap2app) projects cannot use uniCloud.callFunction to request cloud functions.
The uniCloud cloud function provides the URLization solution, which can expose the cloud function to a common http interface. Setting method reference: https://uniapp.dcloud.io/uniCloud/http
At this time, the client code uses ordinary ajax writing.
Client code:
const xhr = new plus.net.XMLHttpRequest();
xhr.onload = function(e) {
  const {
    code,
    message
  } = JSON.parse(xhr.responseText)
}
xhr.setRequestHeader('Content-Type','application/json');
xhr.send(JSON.stringify({
  access_token: 'xxx', // 客户端一键登录接口返回的access_token
}));
Cloud function code:
// The following only shows the scenario where the client sends a request with a content-type of application/json using the post method
exports.main = async(event) => {
  let body = event.body
  if(event.isBase64Encoded) {
    body = Buffer.from(body,'base64')
  }
  const {
    access_token,
    openid
  } = JSON.parse(body)
  const res = await uniCloud.getPhoneNumber({
  	provider: 'univerify',
  	access_token: access_token,
  	openid: openid
  })
  console.log(res); // res里包含手机号
  // 如果数据库不在uniCloud上,可以通过 uniCloud.httpclient API,将手机号通过http方式传递给其他服务器的接口,详见:https://doc.dcloud.net.cn/uniCloud/cf-functions?id=httpclient

    code: 0,
  }
}
The uni-app project can also use ordinary uni.request to request the URLized http interface of the cloud function, and the example will not be repeated here.
# Connect uniCloud cloud functions through traditional servers
Developers can also pass information such as access_token to their traditional servers after the client obtains them. Then use your own traditional server to access the cloud function of uniCloud (the cloud function needs to be URLized).
The writing method is similar to the urlization method of the cloud function of the above 5+ projects, but the difference is that the cloud function needs to return the mobile phone number to its own server, so that data security needs to be ensured.
The following is a simple example to demonstrate how to use the signature to verify whether the request is legitimate
// Take nodejs as an example
const crypto = require('crypto')

const hmac = crypto.createHmac('sha256', secret);

// Generate signature by own server and send request in GET mode
const params = {
  openid: 'xxx'
}
// Concatenate the signature string after sorting alphabetically
const signStr = Object.keys(params).sort().map(key => {
  return `${key}=${params[key]}`
}).join('&')
hmac.update(signStr);
const sign = hmac.digest('hex')
// The final request is as follows, where https://xxxx/xxx is the URL of the cloud function
// https://xxxx/xxx?access_token=xxx&openid=xxx&sign=${sign} where ${sign} is the sign value obtained in the previous step
// The cloud function verifies the signature. In this example, accepting a GET request is used as an example to demonstrate
const crypto = require('crypto')
exports.main = async(event) => {

  const hmac = crypto.createHmac('sha256', secret);

  let params = event.queryStringParameters
  const sign = params.sign
  delete params.sign
  const signStr = Object.keys(params).sort().map(key => {
    return `${key}=${params[key]}`
  }).join('&')

  hmac.update(signStr);

  if(sign!==hmac.digest('hex')){
  }

  const {
    access_token,
    openid
  } = params
  const res = await uniCloud.getPhoneNumber({
  	provider: 'univerify',
  	access_token: access_token,
  	openid: openid
  })
  // Return the phone number to the server
  return res
}
# Return res data description
{
	"data": {
		"code": 0,
		"success": true,
		"phoneNumber": "166xxxx6666"
	},
	"statusCode": 200,
	"header": {
		"Content-Type": "application/json; charset=utf-8",
		"Connection": "keep-alive",
		"Content-Length": "53",
		"Date": "Fri, 06 Nov 2020 08:57:21 GMT",
		"X-CloudBase-Request-Id": "xxxxxxxxxxx",
		"ETag": "xxxxxx"
	},
	"errMsg": "request:ok"
}
# error code
| Error code | Error description | Solution |
|---|---|---|
| -7 | uniAppid is missing | check if configured/approved |
| 1000 | The current uniAppid has not yet opened one-key login | Check whether it is configured/passed audit |
| 1001 | The account information of the application owner is abnormal, please check whether the one-click login service of the account is normal | Check whether the one-click login service of the account is normal |
| 1002 | The account information of the application owner is abnormal, please check whether the account balance is sufficient | Check whether the account balance is sufficient |
| 4001 | The request parameter is abnormal | The verification is abnormal, contact the official staff |
| 4003 | 开发者账户appid 校验异常,联系官方人员 | 校验异常,联系官方人员 |
| 5000 | 取号失败,请检查SIM卡是否停机欠费;token是否过期 | 联系官方人员 |
| 20202 | Terminal does not enable SIM data | Guide users to manually turn on device data |
| 30001 | The current network environment is not suitable for this operation | None |
| 30002 | User clicked on another login method | None |
| 30003 | 用户关闭验证界面 | 无 |
| 30004 | 其他错误 | 参考30004章节自查或联系官方人员 |
| 30005 | Pre-login failed | There is no prerequisite for one-key login, the device does not support / data traffic is not enabled / other reasons |
| 30006 | One-click login failed | None |
| 30007 | Failed to obtain the verification token of the local number | The verification is abnormal, contact the official staff |
| 30008 | User clicked custom button | None |
| 40004 | The application does not exist | It is often used in custom docking scenarios, please ensure that the application has been reviewed and repackaged |
| 40047 | One-key login failed to get number | Check abnormal, contact official staff |
| 40053 | The mobile phone number verification failed | The verification is abnormal, contact the official staff |
| 40101 | Mobile-source IP authentication failed | Check whether the mobile phone card type is a normal carrier mobile phone card, and try again after turning off the airplane mode. |
| 40201 | Unicom-source IP authentication failed | Check whether the mobile phone card type is a normal carrier mobile phone card, and try again after turning off the airplane mode. |
| 40301 | Telecom - source IP authentication failed | Check whether the mobile phone card type is a normal carrier mobile phone card, and try again after turning off the airplane mode. |
# 30004错误码说明
- app-android平台,errMsg中包含-20102错误码:
- 确认开发者中心一键登录已添加应用并审核通过。
- 检查开通一键登录时使用的签名证书和云打包时使用的签名证书一致。
# Running the dock and packing
使用
uni一键登录,安卓平台不需要制作自定义基座,使用HBuilder标准真机运行基座即可,调用时会从你的账户中扣费。iOS平台使用标准基座必须要用io.dcloud.HBuilder这个bundleId重签,其他bundleId重签无法登录。Cloud packaging
Offline packaging
- Android platform: [One-click login Android offline package configuration](https://nativesupport.dcloud.net.cn/AppDocs/usemodule/androidModuleConfig/oauth?id=%e4%b8%80%e9%94%ae%e7 %99%bb%e5%bd%95)
- iOS平台:一键登录iOS离线打包配置
- HarmonyOS:无
# 常见问题
Pre-login validity period The pre-login is valid for 10 minutes. After 10 minutes, the pre-login is invalid. At this time, calling the login authorization login is equivalent to not calling the pre-login before. It takes about 1-2 seconds before the authorization interface pops up. Pre-login can only be used once. After calling login to pop up the authorization interface, if the user cancels the login authorization, the pre-login needs to be called again when using one-key login again.
Can dual SIM phones get two phone numbers at the same time It is not supported to obtain two mobile phone numbers at the same time. Dual SIM phones are authenticated with a SIM card with data traffic turned on.
Prompt "Non-Mobile Gateway IP Address" In most cases, it is because some specific devices do not support dual-card dual-standby network environment.
uniCloud费用贵不贵? uniCloud产生的费用对于一键登陆可以忽略,详见
Other questions about use 欢迎扫码加入 一键登录 微信交流群讨论: